Dear Pete Sir,
Thanks you very much for your guidance.
Rizwan Saeed
Dear Pete Sir,
Thanks you very much for your guidance.
Rizwan Saeed
Dear Pete Sir,
This link helped me a lot Thanks you again.
Rizwan Saeed
That’s an interesting use case. It’s doable for us.
I’ve been very busy, but here is the code to control the machine using the MAN/OFF/AUTO switch (V12 in code) in the Blynk app. If the switch is on AUTO, I set the variable appMode to a value of 2. I also declared virtual pin V13 to be responsible to turn off/on the machine from Automations. So if appMode is 2 and V13 is 1 then automations are considered.
BLYNK_WRITE(V12) {
  switch (param.asInt()) {
    case 0:
      Serial.println("Mode selection: MAN");
      appMode = 0;
      machineOn(); // Machine ON until the user switches it off manually
      break;
    case 1: {
      Serial.println("Mode selection: OFF");
      appMode = 1;
      machineShutdown(); // Machine OFF until the user switches it back on manually
      break;
    }
    case 2: {
      Serial.println("Mode selection: AUTO");
      appMode = 2;
      machineShutdown(); // Turn the machine off and wait for automations trigger
      break;
    }
  }
}

// Turn on machine by automations
BLYNK_WRITE(V13){
  if (appMode == 2 && param.asInt() == 1)
  {
    machineOnAuto(); // Machine ON routine when using timers
  }
  else if (appMode == 2 && param.asInt() == 0 )
  {
    machineShutdown(); // Turn the machine off when automations trigger for the end of cycle
  }
}
I still don’t really like this solution because if my device loses wifi connection and misses the Automations start trigger it can miss the whole cycle of working for several hours. Since there is no timer input widget I will create my own, combining some other widgets, and write some code on the Arduino MKR 1010 to handle all that using internal RTC and Blynk RTC clock API. Since timer input is a really common use case I don’t know why Blynk has removed it? Automations are cool but not really practical from a UX perspective since the user has to go out of the app tab and search for specific Automation in the Automations tab…
Yes ! Removal of Time input was a bad move. But upon request they have agreed to bring it back soon. It was removed as all the automation will be done one the app side n no coding required. And also there is offline automation coming shortly. And that would totally eliminate the use of time input, but unfortunately that feature is available for commercial customers n not makers. So they are bring the time input widget back. Till then we have to hold our seats tight.
BTW how are you reading the state of automation card (ON/OFF) from the app ? Is that possible ?
If not, then your man/auto/off will continue to work along with automation.
If you need to have offline automation then we will have to wait for time input. There is no way out at least in my books…
EDIT :

If you are a plus or pro user you can have menu or text input widgets to input time and run a rtc in your code to keep track of the time n trigger the devices accordingly.! This seems to work. LOTS OF CODING INVOLVED !!!
Yes, I’ve read that they are about to bring it back but you never know how long it will take since I believe the Blynk team is quite busy atm.
It’s not possible as far as I know. Right now, if I don’t want to use specific automation I toggle it off so it doesn’t trigger the V13 pin. I just know when the V13 is triggered…
If you are a plus or pro user you can have menu or text input widgets to input time and run a rtc in your code to keep track of the time n trigger the devices accordingly.! This seems to work. LOTS OF CODING INVOLVED !!!
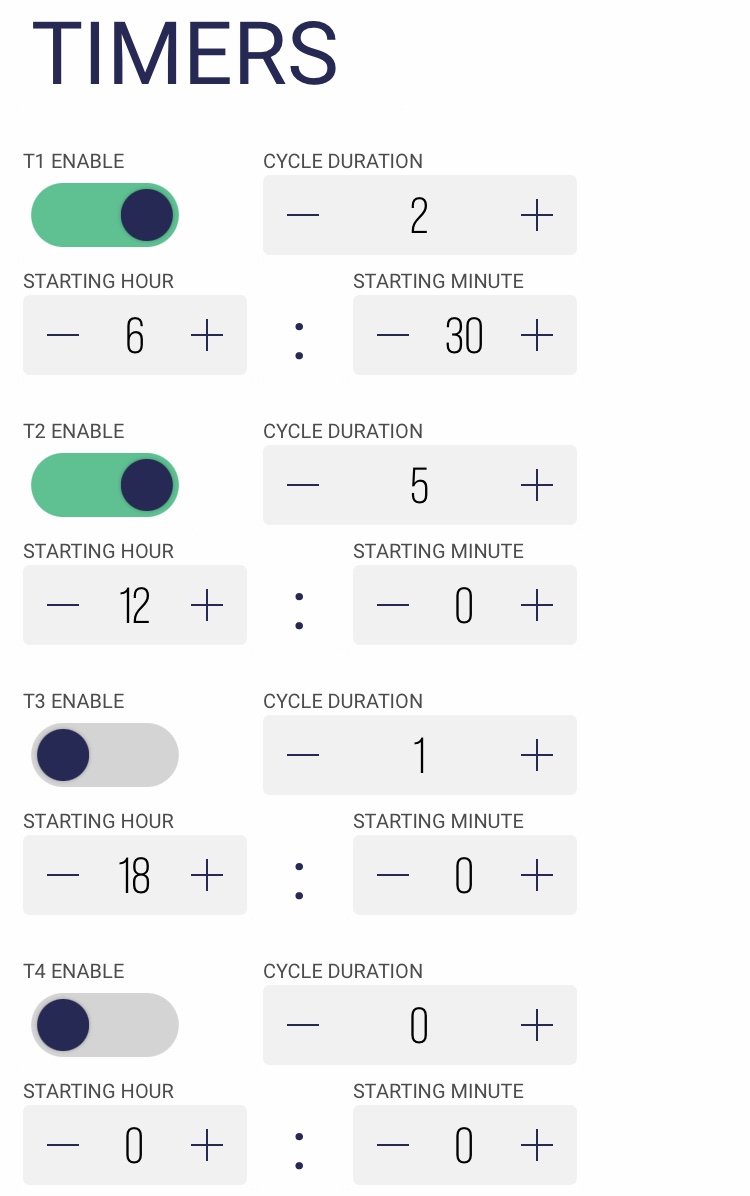
Yes I’m a plus subscriber and in the picture above I’ve created a demo using a value input widget (one for hours, minutes, and working cycle duration). I’ve also added the switch to enable/disable a certain timer. But yeah there will be a some (a lot of) coding involved…
I’m not quite sure that’s what Blynk has said!
Pete.

They said the request will be considered ! Am i wrong then ?
“The request will be considered” and “Yes, we’ll bring it back - soon” are two very different things in my book.
Pete.
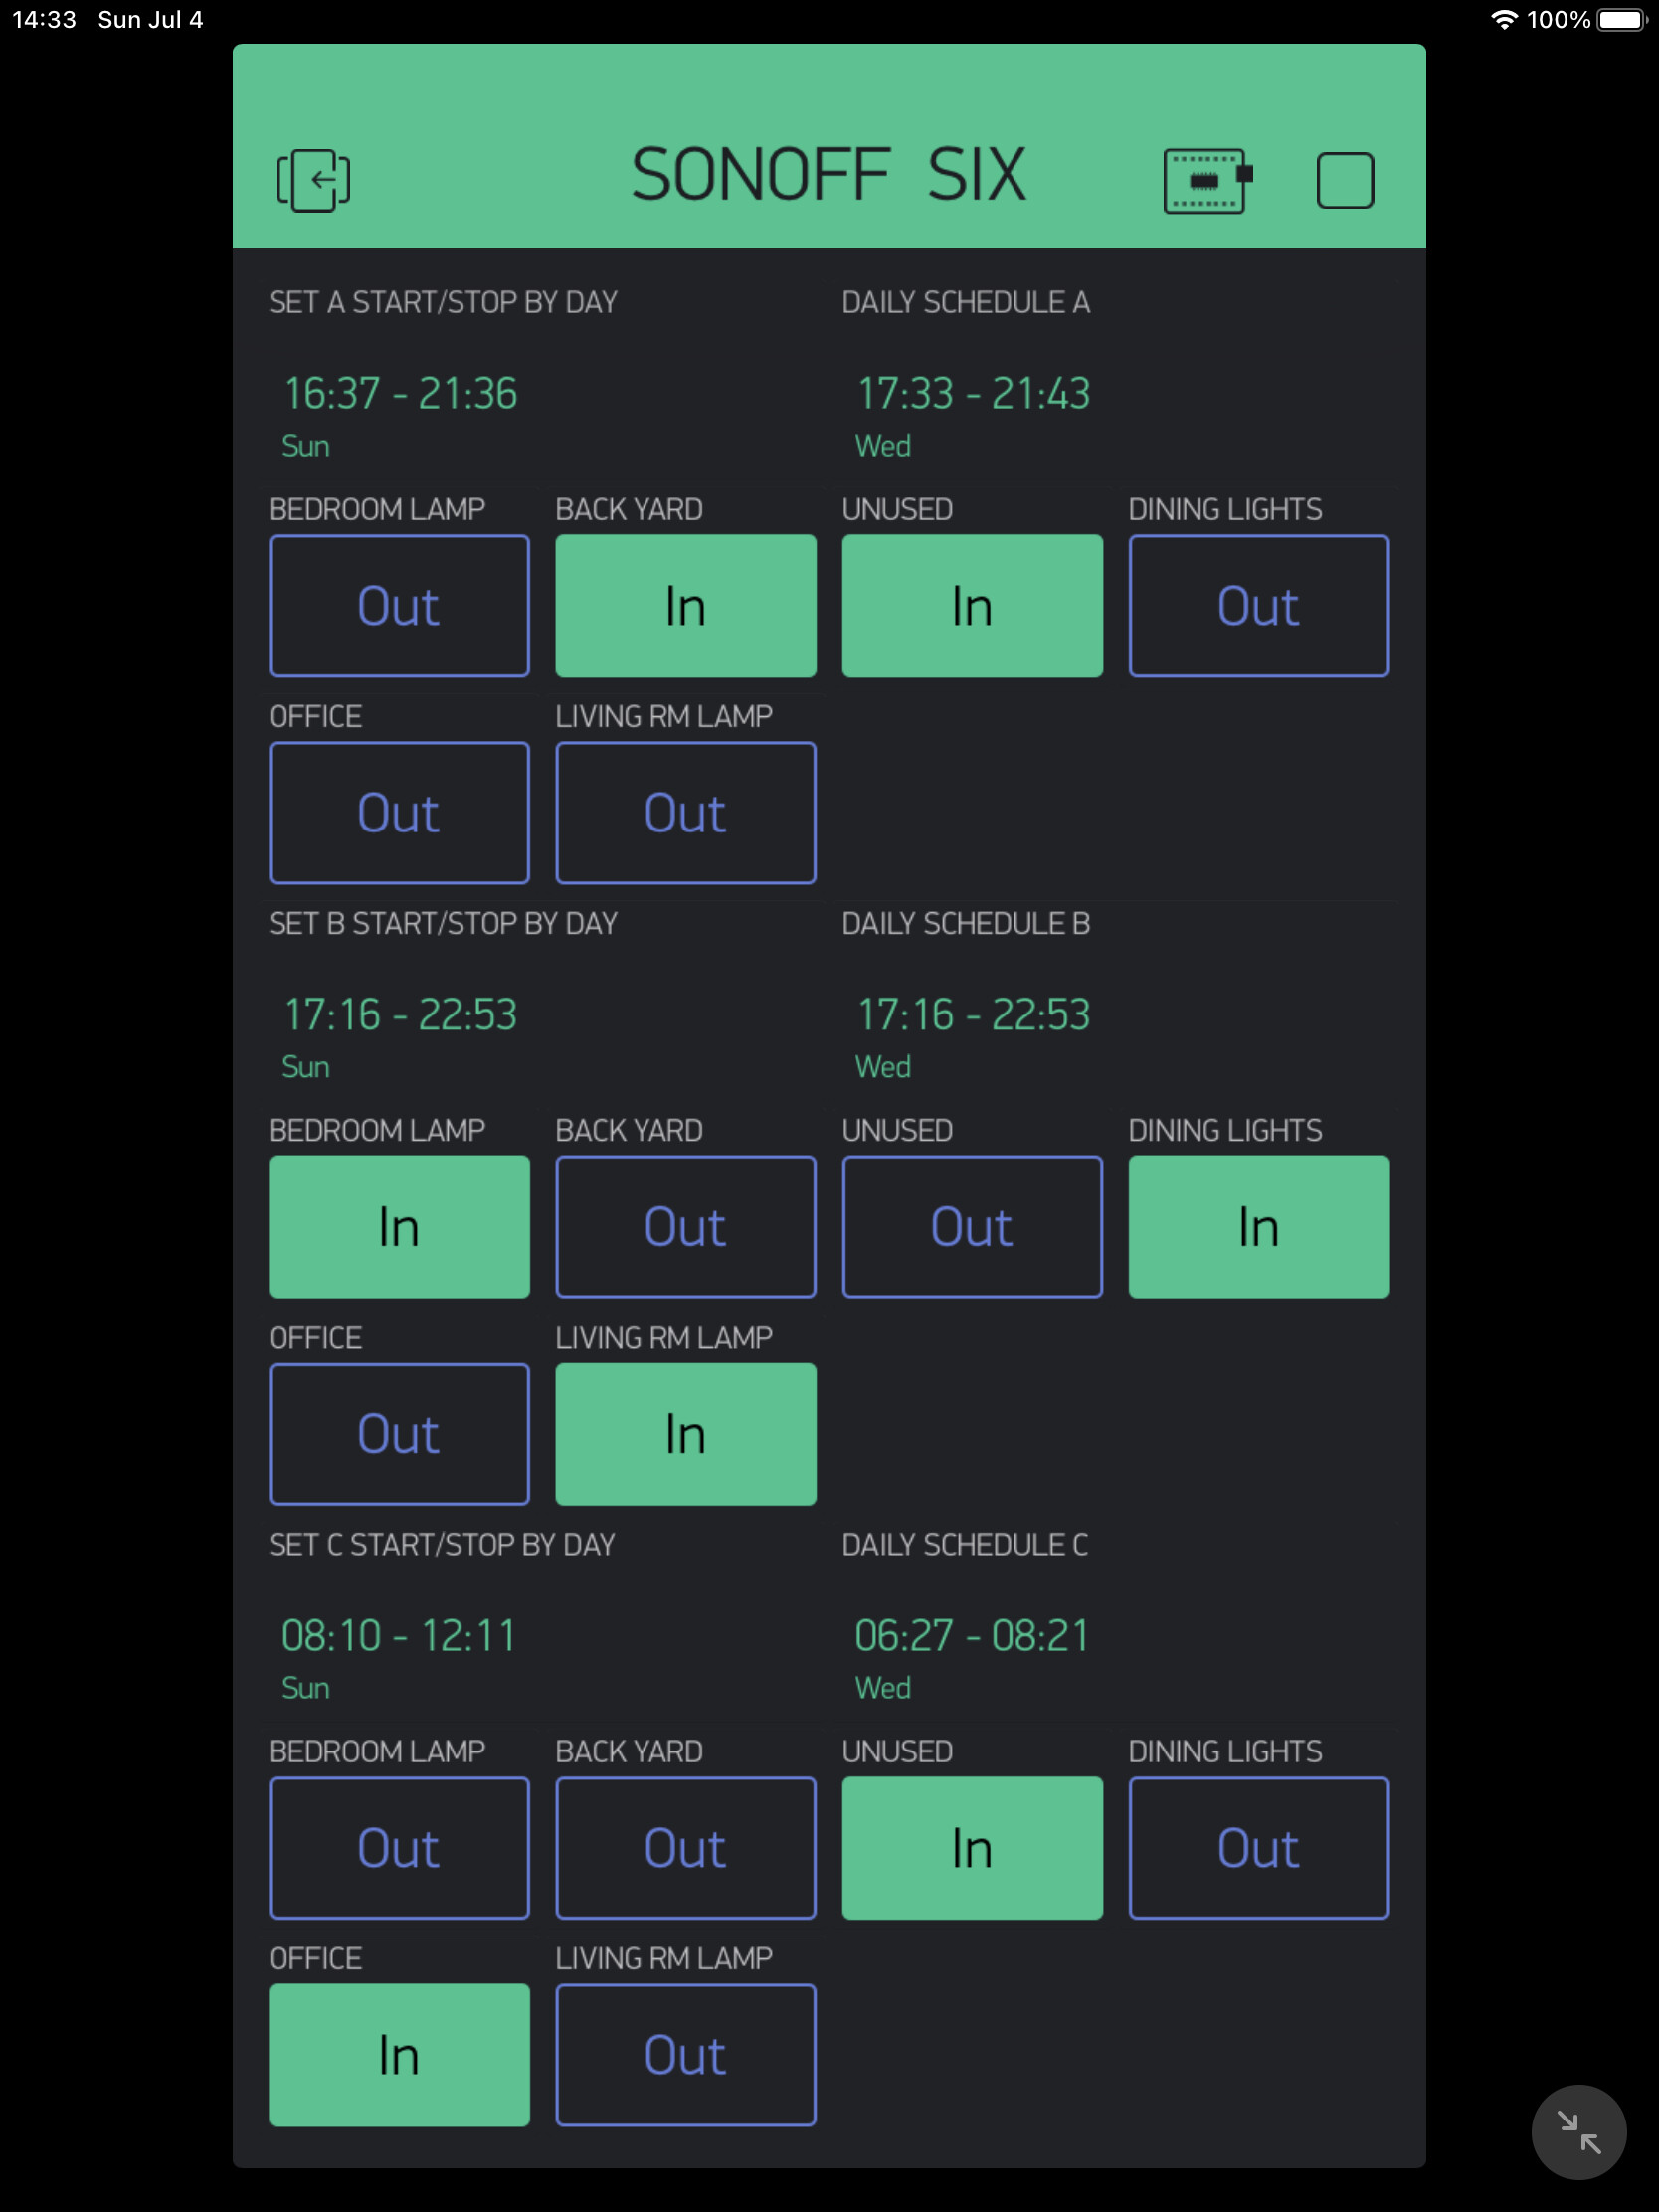
Thanks @Dmitriy for working this topic. I used the Time Input widget heavily in old Blynk for BOTH Input and Display of schedule times. (Using Android Time Input widget as Display doesn’t work. The iOS display capability works well. See iOS screenshot, below.)
I will be fine with your new implementation using automations, but I miss the easy UI for Start/Stop Times Input and Display in Blynk 2.0.
Use case: My app schedules six SONOFFs across three different schedules.
So, if and when Blynk re-implements such a Start/Stop Time Input (with both Input and Display capability) widget, here are my preferences.
Good luck. Please keep the flow coming.
Here’s my UI in Old Blynk. Six devices. Three different schedules. It’s been a great little app for me. Probably cannot port to Blynk 2.0 without a better Start/Stop Time Input widget.
I am not finding the thread where it was said. But it was on a positive note. I dont remember who said that too…. So i am having a positive vibe that they will bring it back.
Edit :
There is no Automation tab in my android app, I see only Devices and Notification tab.
I follow the instruction here and automation permission is allowed. Automations - Blynk Documentation
Show me the screenshots of the Advanced section of your datastream setup for those datastreams you intend to use with automations.
Pete.
Ok, after I expose datastream to Automation, it works. Thanks
My problem with automations is happening reverse condition.
For example, I have to set automations on to switch off relay switch which is already on.
I toggled override high/low OFF and ON button, toggle value 0 and 1, changing ON/OFF Lables in my andriod phone and blynk account. But it didn’t work. Pls teach me. How can I fix it? Thanks.
@thetnaing please post the sketch you are using.
Don’t forget to format the code correctly using triple backticks at the beginning and end.
Triple backticks look like this:
```
Copy and paste the triple backticks that I’ve provided above in necessary.
Pete.
#define BLYNK_TEMPLATE_ID "xxxxxxxxxxxxxxx"
#define BLYNK_DEVICE_NAME "xxxxxxxxxxxxxxx"
#define BLYNK_AUTH_TOKEN "xxxxxxxxxxxxxxx"

#define BLYNK_FIRMWARE_VERSION        "0.1.0"

#define BLYNK_PRINT Serial
//#define BLYNK_DEBUG

#define APP_DEBUG

// Uncomment your board, or configure a custom board in Settings.h
//#define USE_SPARKFUN_BLYNK_BOARD
#define USE_NODE_MCU_BOARD
//#define USE_WITTY_CLOUD_BOARD
//#define USE_WEMOS_D1_MINI

#include "BlynkEdgent.h"

int RelayPin1 = 5;   //D1
int RelayPin2 = 4;   //D2
int RelayPin3 = 14;  //D5
int RelayPin4 = 12;  //D6

BLYNK_WRITE(V0) { //Button Widget is writing to pin V0
  int pinValue = param.asInt();
  digitalWrite(RelayPin1, pinValue);
}

BLYNK_WRITE(V1) { //Button Widget is writing to pin V1
  int pinValue = param.asInt();
  digitalWrite(RelayPin2, pinValue);
}
BLYNK_WRITE(V2) { //Button Widget is writing to pin V2
  int pinValue = param.asInt();
  digitalWrite(RelayPin3, pinValue);
}
BLYNK_WRITE(V3) { //Button Widget is writing to pin V3
  int pinValue = param.asInt();
  digitalWrite(RelayPin4, pinValue);
}

void setup()
{
  Serial.begin(115200);
  pinMode(RelayPin1, OUTPUT);
  pinMode(RelayPin2, OUTPUT);
  pinMode(RelayPin3, OUTPUT);
  pinMode(RelayPin4, OUTPUT);

  //TURN OFF all Relays on Start
  digitalWrite(RelayPin1, LOW);
  digitalWrite(RelayPin2, LOW);
  digitalWrite(RelayPin3, LOW);
  digitalWrite(RelayPin4, LOW);

  delay(100);
  BlynkEdgent.begin();
}

void loop() {
  BlynkEdgent.run();
}
Changing this:
digitalWrite(RelayPin1, pinValue);
to this:
digitalWrite(RelayPin1, !pinValue);
will have the effect of writing the logical opposite of whatever value arrives on the virtual pin to the relay. That’s what the exclamation mark, which is the logical NOT operator, does.
also, you may need to change this to HIGH…
if your relays are active LOW rather than active HIGH.
Pete.
Wow!!! It works perfectly. You’re great. Thanks. 
I would also like to advocate for the timer input. I used it to set the time that a client can open doors. Each lock can be active at different times based on who is trying to use it. Not sure how I am going to implement this in the current system