I have uploaded the BlynkBlybk sketch:
/*******************************************************************
Blynk lets you create beautiful drag-and-drop visual interfaces
for your projects in 5 minutes. And it works with almost every
hardware out there.
Docs, Tutorials, everything: http://www.blynk.cc
Github: blynkkk (Blynk IoT platform) · GitHub
Blynk Community: http://community.blynk.cc
Follow Us: Blynk
http://twitter.com/blynk_app
Blynk library is licensed under MIT license
This example code is in public domain.
You’ll need, in general:
- Blynk App (download from AppStore or Google Play)
- Arduino UNO or similar microcontroller board
- Decide how to connect Arduino to the Internet (USB, Ethernet,
Wi-Fi, etc.). Bluetooth is on the way.
There is a bunch of great example sketches included to show you how to get
started. Think of them as LEGO bricks and combine them as you wish.
For example, take the Ethernet Shield sketch and combine it with the
Servo example, or choose a USB sketch and add a code from SendData
example.
Let’s turn ON your LED with Blynk!
In this example we’ll use Arduino UNO + Ethernet Shield
5 Steps guide:
(watch video tutorial here: )
- Connect LED to Pin 9
( http://arduino.cc/en/uploads/Tutorial/simplefade_bb.png )
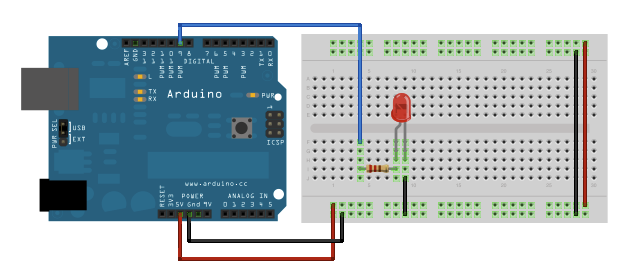
In the Blynk App:
2. Create New Project
3. Email yourself Auth Token. You can do it later at any time
4. Add a Button Widget. Select Pin D9 in Widget’s Settings
5. Press Play icon. Enjoy Blynking!
********************************************************************/
#define BLYNK_PRINT Serial // Enables Serial Monitor
#include <SPI.h>
#include <Ethernet.h>
#include <BlynkSimpleEthernet.h> // This part is for Ethernet stuff
char auth = “80df1d56e05c4d21b954ac95e0e88e97”; // Put your Auth Token here. (see Step 3 above)
void setup()
{
Serial.begin(9600); // See the connection status in Serial Monitor
Blynk.begin(auth); // Here your Arduino connects to the Blynk Cloud.
}
void loop()
{
Blynk.run(); // All the Blynk Magic happens here…
// You can inject your own code or combine it with other sketches.
// Check other examples on how to communicate with Blynk. Remember
// to avoid delay() function!
}
I have run the blynk-ser.bat as instructed in the comments. Com 3 9600 baud cloud.blynk.cc etcetera
I get nothing but this in the serial monitor:
[0] Blynk v0.2.2
[0] Getting IP…
And when I hit play in the blynk app, I get Arduino Uno is not in network.
Connected by USB to the laptop. laptop is connected by wifi to the internet.