Arduino mkr 1010 rimane nel setup - Troubles using Blynk.config()

Grazie domani provo devo andare a lavoro buona serata.

1 Like

Yes… as stated above. And here is an example…

Grazie a tutti per i consigli ma non riesco a modificare il mio codice che ho postato
potreste cortesemente modificare il mio codice ?
Vi ringrazio anticipatamente:pleading_face:

buona sera a tutti ho modificato il codice ma si blocca tutto errore usb

salve con arduino mkr1010 mi sembra che la funzione Blynk.config() funziona anche se dopo qualche ora si disconnette .
Ora sto provando con arduino yun ma non funziona con Blynk.config()

cosi si connette .

 #define BLYNK_PRINT Serial
#include <Bridge.h>
#include <BlynkSimpleYun.h>
char auth[] = "413f5b4a3a7535385"; 

void setup()
{
 Serial.begin(9600);

  Blynk.begin(auth);
  // You can also specify server:
 // Blynk.begin(auth, "blynk-cloud.com", 80);
  //Blynk.begin(auth, IPAddress(192,168,1,100), 8080);
}

void loop()
{
  Blynk.run();
}

invece cosi non funziona.

#define BLYNK_PRINT Serial
#include <Bridge.h>
#include <BlynkSimpleYun.h>
char auth[] = "4136"; 

void setup()
{
 Serial.begin(9600);
     Blynk.config(auth);
     Blynk.connect();
  //Blynk.begin(auth);
  // You can also specify server:
 // Blynk.begin(auth, "blynk-cloud.com", 80);
  //Blynk.begin(auth, IPAddress(192,168,1,100), 8080);
}

void loop()
{
  Blynk.run();
}

Unless someone has the same board type as you, to test your code with, all we can to is guess.

Salve non riesco a far funzionare arduino yun con la funzione
Blynk.config()
cioè se non si connette al server continua ad eseguire lo sketck

Please don’t create new topics when you already have a related topic going. I merged your post back here.

As stated in the Docs, Blynk.config() assumes you have ALREADY connected your device to your network by whatever means it can (not Blynk related). So figure out how that needs to be done… and the Blynk connection will follow.

Dove posso trovare un esempio funzionante sono 2 mesi che non riesco a far funzionare
arduino in assenza di connessione .
ho provato con arduino mkr1010,arduino yun’,arduino mega con ethernet w5100
ma niente non riesco a proseguire.
Se cortesamente potreste consigliarmi uno skecth già fatto solo da copia e incolla .

If you want to use Blynk.config() you will need to set-up your network connection manually before you call Blynk.connect().
How you do that will depend on the specific hardware (shield and Ethernet/Wi-Fi adaptor) you are using.

You will need to be clearer about EXACTLY which hardware you plant to test this with.

Pete.

@Wingames Since you already have a topic about this, I merged them together.

This is not always possible… each type of hardware device has a different way of connecting… not to mention your networking will be different then others, etc.

Blynk.config() examples are seemingly more for WiFi connections as that is the most commonly used for IoT, but it can often be used with other methods as well… But as already referenced in this topic, for someone to assist with your particular hardware, they probably need the same hardware to test… and thus provide requested code.

1 Like

Salve come già scritto ho tutti i tipi di arduino e tutti si connettono al server di Blynk
con la funzione Blynk.begin(); e riesco a settarli sia wifi che con ethernet
ma come modifico il codice con Blynk.config(); seguito da Blynk.connect();
resta bloccato nel setup.
In questo forum come posso postare il codice corretamente ?

And again we answer… this depends on your hardware…

For example with WiFi you need to set that up first…

  WiFi.begin(ssid, pass);  // This sets up the WiFi network
  Blynk.config(auth, server, port);  //  This sets up Blynk - Non-blocking if no WiFi available
  Blynk.connect();  // This attempts to connect to the Server - Non-blocking if no WiFi available

Find out how to connect your hardware to the network first, then follow up with Blynk.config() and Blynk.connect()

The process is:

  • Add the necessary libraries to allow your hardware to connect to the internet (these will vary depending on your hardware and connection method)
  • Set-up a connection to the internet (this will vary depending on your hardware, whether you are a using static or DHCP allocated IP address, whether your devices requires a MAC address to be specified etc.)
  • Define your Blynk connection credentials in Blynk.config()
  • Connect to Blynk using Blynk.connect()

After you’ve set-up the internet connection you should be able to ping the device and use the device to ping external IP addresses. You should also be able to see the device in your router admin screen.

Rather than saying “I have lots of devices, lots of connection methods, and have tried lots of code”, I would suggest that you focus on one device, one connection method and share the details and the code you’ve tried, along with any useful information such as serial monitor output, ping results etc.

Pete.

1 Like

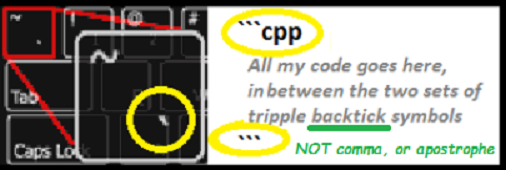
As per the Welcome Topic…

Blynk%20-%20FTFC

/*************************************************************
  Download latest Blynk library here:
    https://github.com/blynkkk/blynk-library/releases/latest

  Blynk is a platform with iOS and Android apps to control
  Arduino, Raspberry Pi and the likes over the Internet.
  You can easily build graphic interfaces for all your
  projects by simply dragging and dropping widgets.

    Downloads, docs, tutorials: http://www.blynk.cc
    Sketch generator:           http://examples.blynk.cc
    Blynk community:            http://community.blynk.cc
    Social networks:            http://www.fb.com/blynkapp
                                http://twitter.com/blynk_app

  Blynk library is licensed under MIT license
  This example code is in public domain.

 *************************************************************
  This example shows how to configure static IP with Ethernet.
  Be sure to check ordinary Ethernet example first!!!

  NOTE: Pins 10, 11, 12 and 13 are reserved for Ethernet module.
        DON'T use them in your sketch directly!

  WARNING: If you have an SD card, you may need to disable it
        by setting pin 4 to HIGH. Read more here:
        https://www.arduino.cc/en/Main/ArduinoEthernetShield

  Feel free to apply it to any other example. It's simple!
 *************************************************************/

/* Comment this out to disable prints and save space */
#define BLYNK_PRINT Serial


#include <SPI.h>
#include <Ethernet.h>
#include <BlynkSimpleEthernet.h>

// You should get Auth Token in the Blynk App.
// Go to the Project Settings (nut icon).
char auth[] = "41xxxxxxxxxxxxxxxxxxxxxxxxxxxxxxxxxxx";

//IPAddress server_ip (192, 168, 1, 100);

// Mac address should be different for each device in your LAN
byte arduino_mac[] = { 0x90, 0xA2, 0xDA, 0x10, 0x21, 0x99 };
IPAddress arduino_ip ( 192,   168,   1,  200);
IPAddress dns_ip     (  8,   8,   8,   8);
IPAddress gateway_ip ( 192,   168,   1,   1);
IPAddress subnet_mask(255, 255, 255,   0);

#define W5100_CS  10
#define SDCARD_CS 4

void setup()
{
  // Debug console
  Serial.begin(9600);

  pinMode(SDCARD_CS, OUTPUT);
  digitalWrite(SDCARD_CS, HIGH); // Deselect the SD card

  //Blynk.begin(auth, server_ip, 8080, arduino_ip, dns_ip, gateway_ip, subnet_mask, arduino_mac);
  // Or like this:
  //Blynk.begin(auth, "blynk-cloud.com", 80, arduino_ip, dns_ip, gateway_ip, subnet_mask, arduino_mac);//      con questo si connette al server
  Blynk.config(auth, "blynk-cloud.com", 80, arduino_ip, dns_ip, gateway_ip, subnet_mask, arduino_mac);//       con questo mi da sempre errore
  Blynk.connect();
}

void loop()
{
  Blynk.run();
}

Backticks, not commas… I fixed your post :wink:

When using Blynk.config(), all it is interested in is the server address, port and auth…

Blynk.config(auth, "blynk-cloud.com", 80);

The rest of the Ethernet info needs to happen first in other non-blynk commands… just as if you were connecting an Arduino to your network before ever finding out about Blynk.

Do you have any other devices on your network that you’ve allocated the same MAC address to?
Your router and Ethernet switches wont tolerate two devices on the network with the same MAC. If you’re unsure then download this and scan you network:

Pete.