Arduino doesn't connect to Blynk local server

Hi, this is my first time trying to get a local Blynk Server (0.36.5) running on my home network, and I am having problems. I have an Arduino Due+ESP-WROOM-02U. When I use the cloud Blynk sever, everything works fine, and I can communicate using the Blynk app on my iPhone X.

I am using Windows 10. I have installed Java10.
My iPhone is running Blynk version 2.20.0(3).
And I installed server-0.36.5.jar.
In a command prompt, I give the command java -jar server-0.36.5.jar -dataFolder server_data & , and I get the response “Blynk Server 0.36.5 successfully started.”
On my phone, I am able to log in the server using port 9443.
image
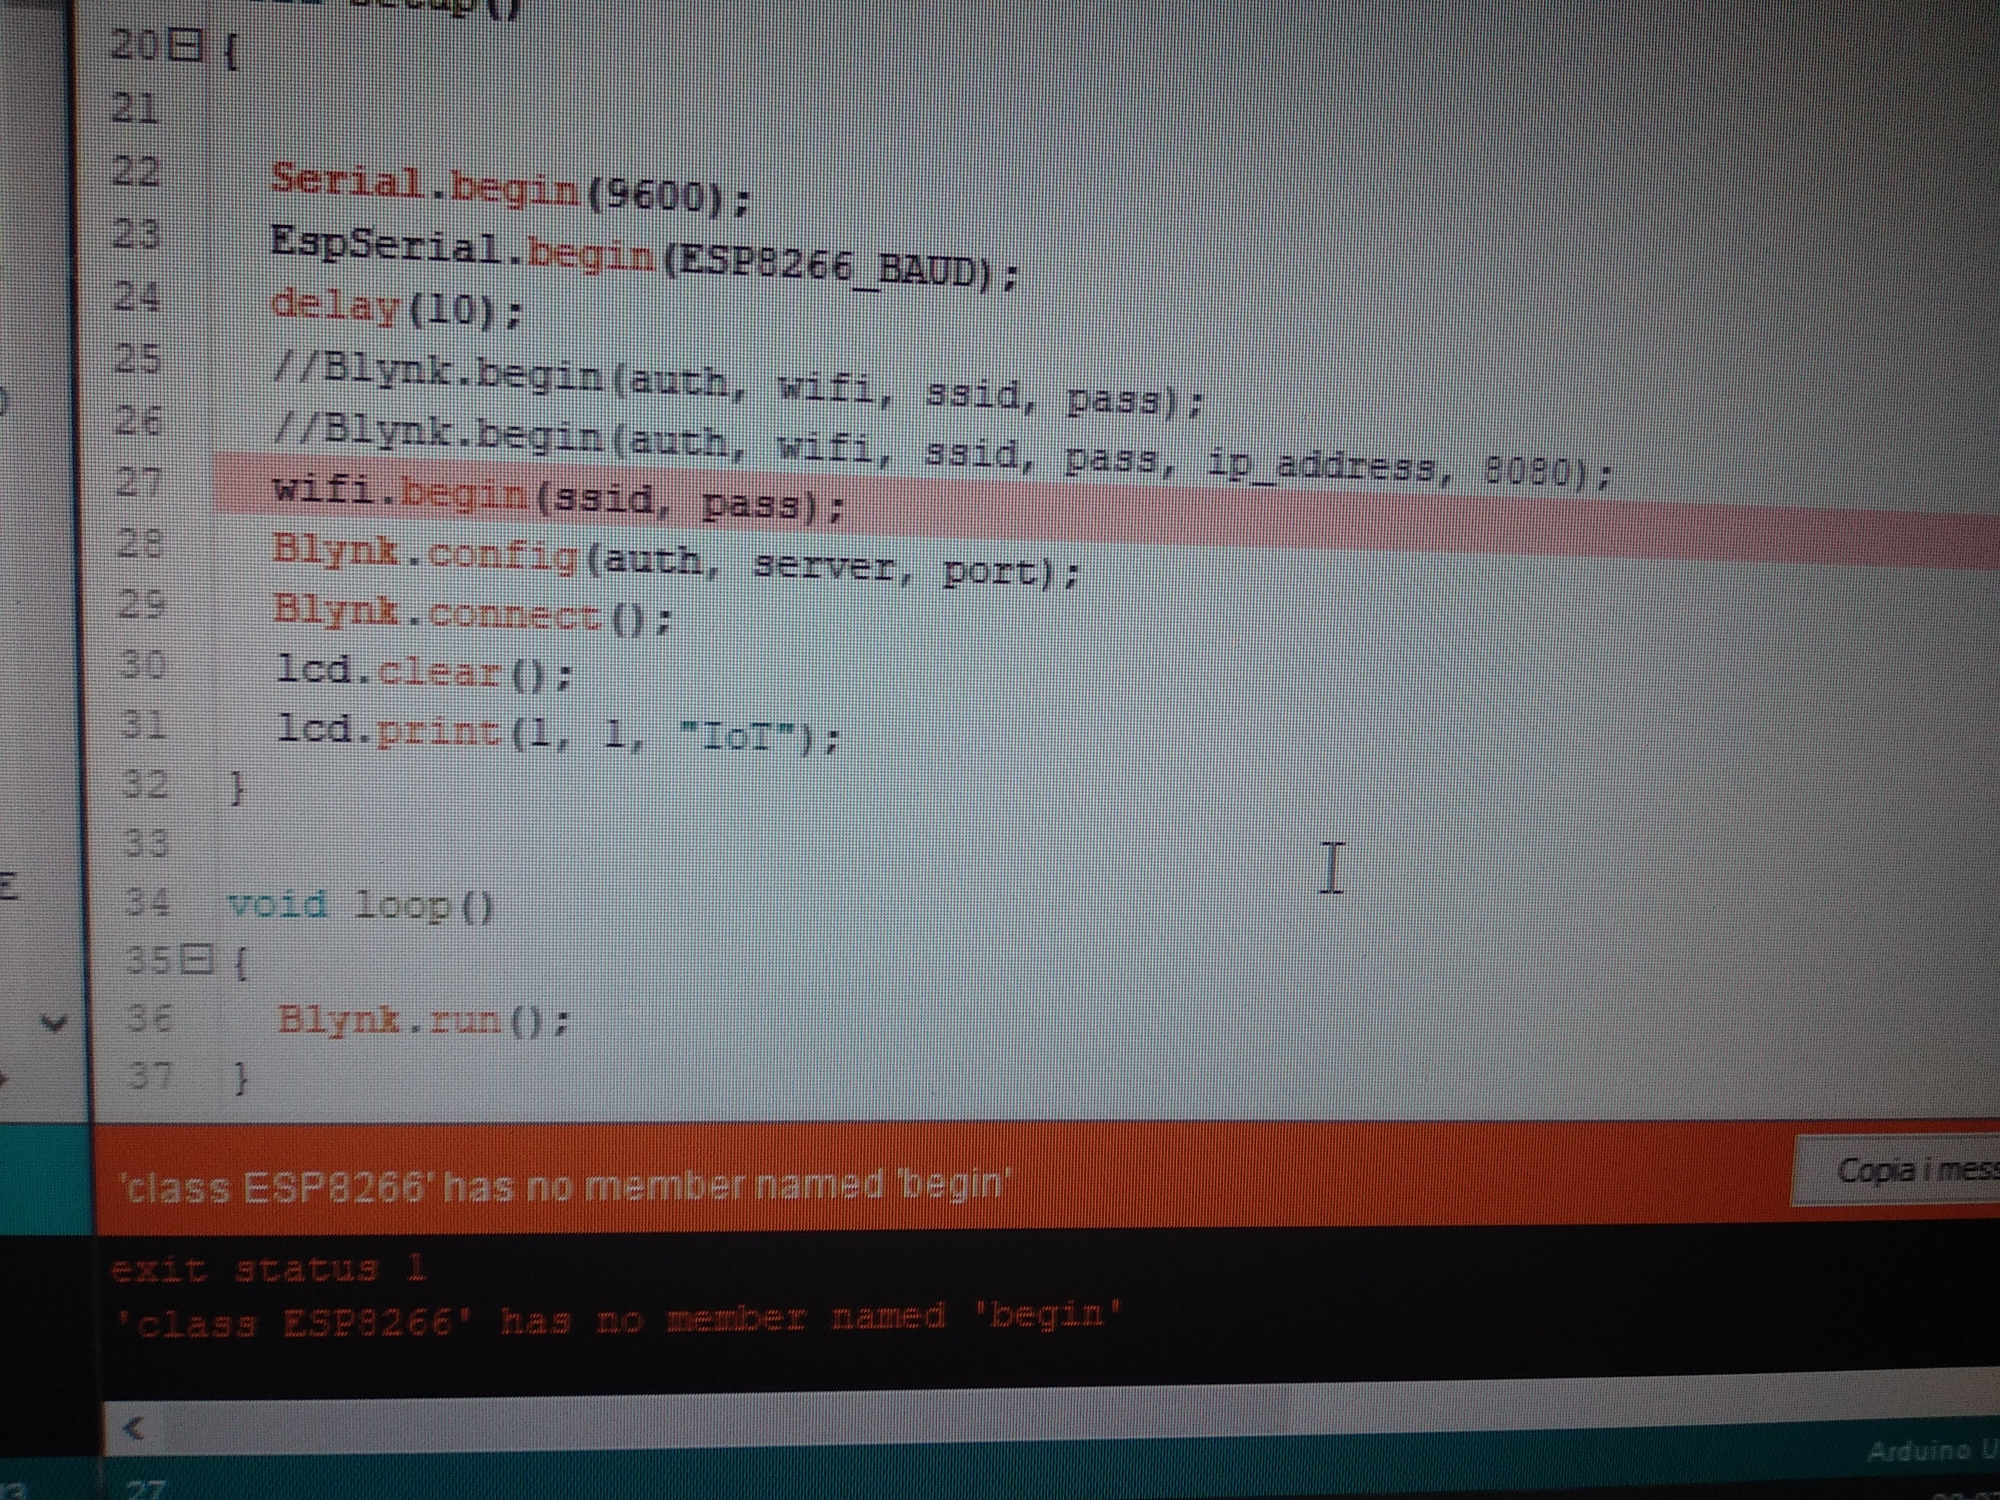
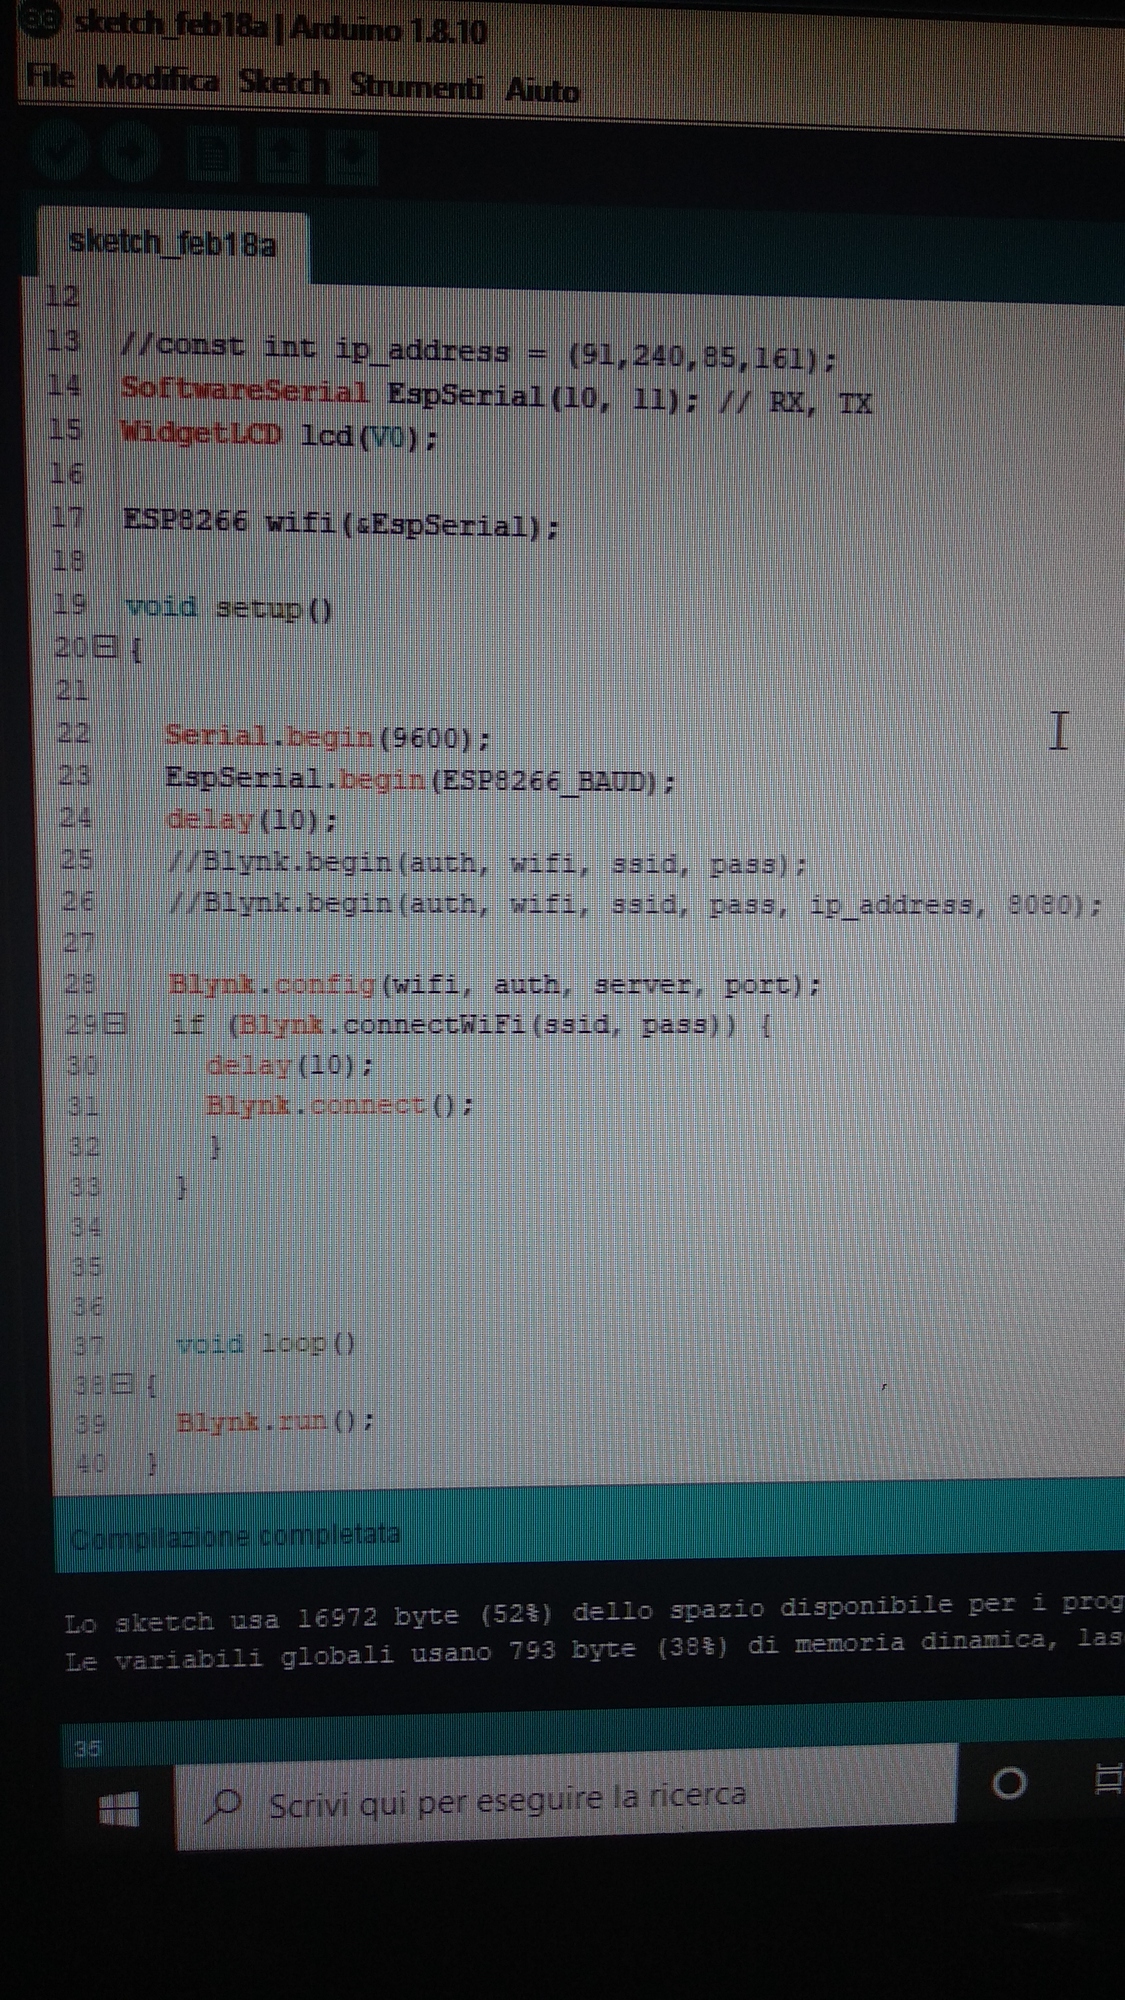
In the Arduino code, I included the Auth Token associated with the new Blynk project on my phone, and I rechecked the Auth Token three times.
I have Blynk libraries v0.5.2
My Blink.begin code looks like this:

      //Blynk.begin(auth, wifi, ssid, pass);
      // You can also specify server:
      //Blynk.begin(auth, wifi, ssid, pass, "blynk-cloud.com", 8442);
      //Blynk.begin(auth, wifi, ssid, pass, IPAddress(10,0,0,1));
      Blynk.begin(auth, wifi, ssid, pass, "10,0,0,8", 8080);

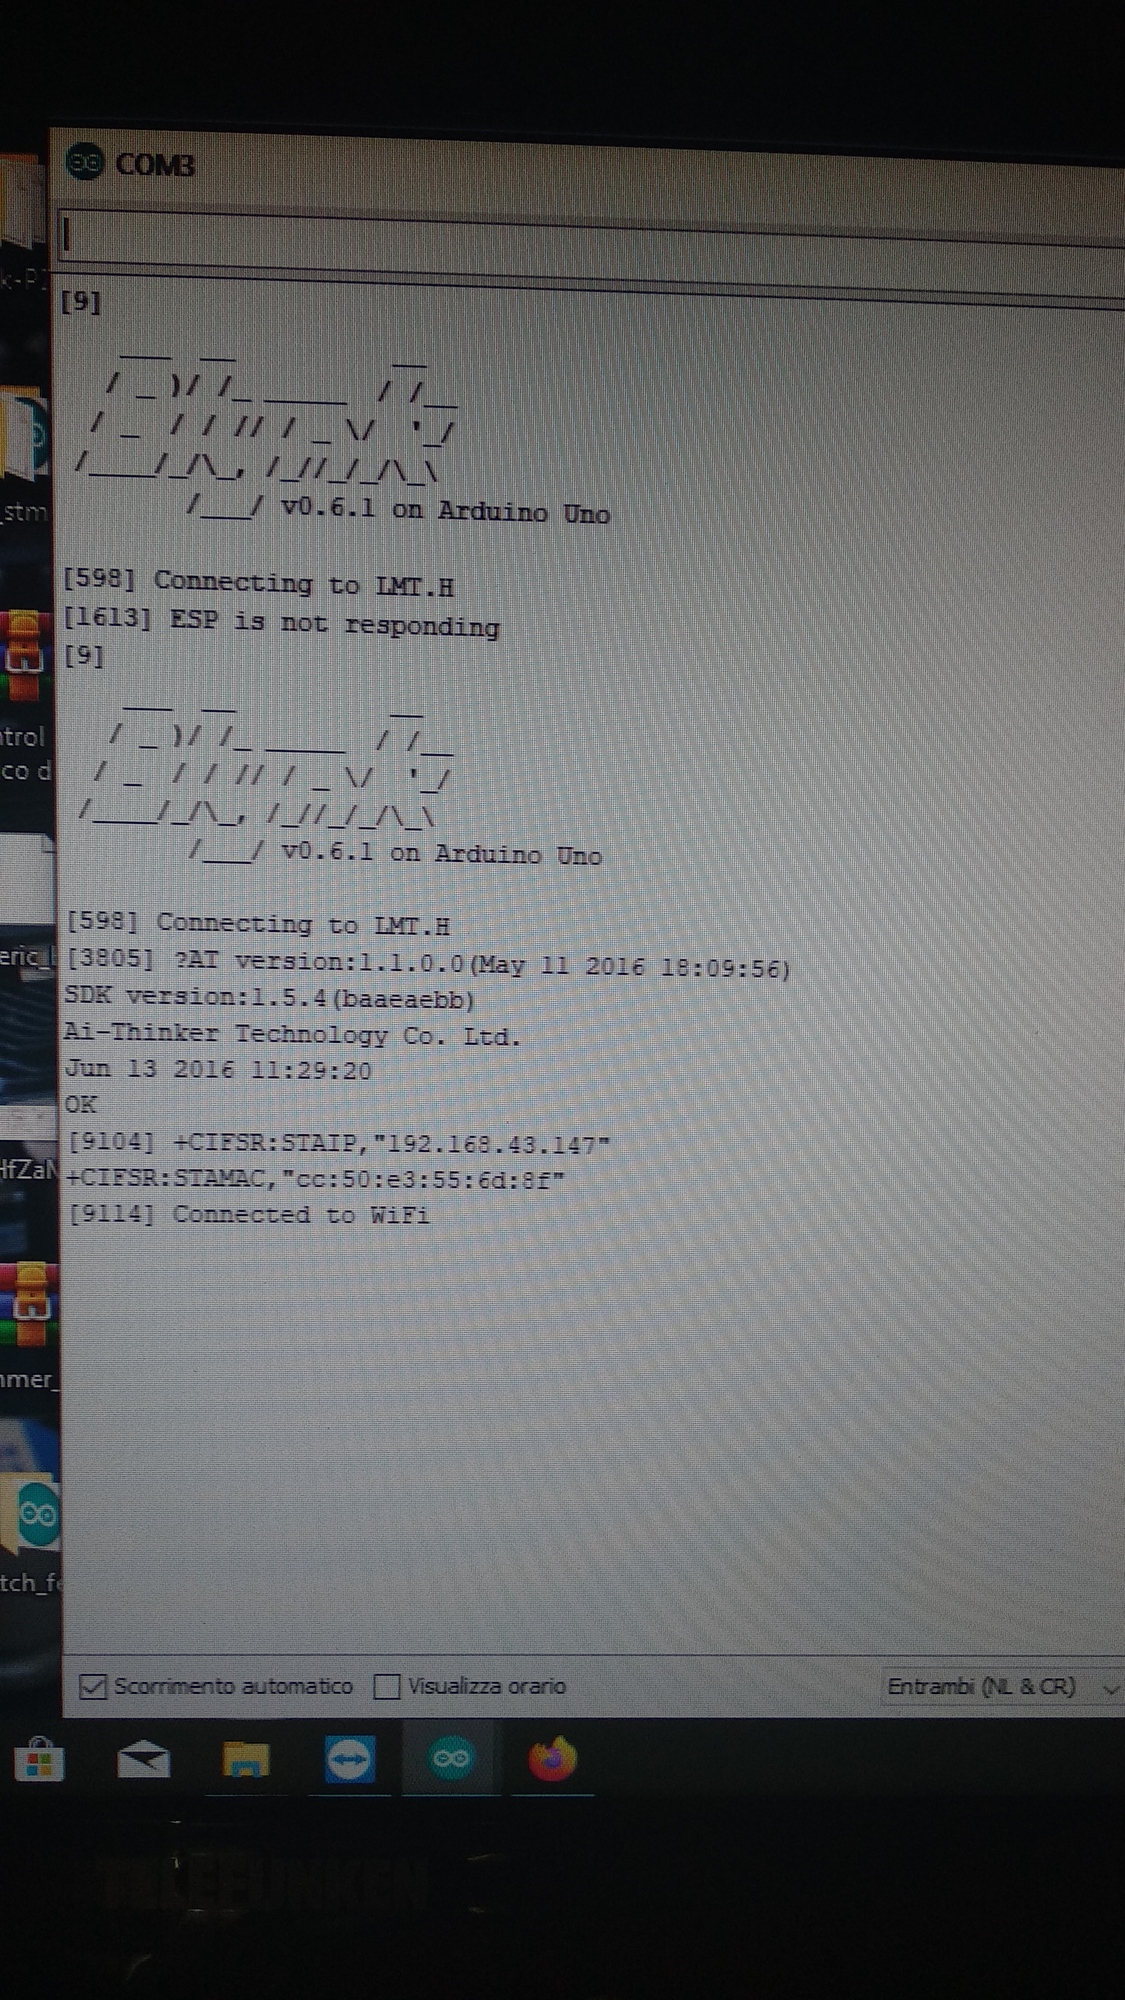
When I run the code on the Arduino, this is what I see in the Serial Monitor:

[12] 
    ___  __          __
   / _ )/ /_ _____  / /__
  / _  / / // / _ \/  '_/
 /____/_/\_, /_//_/_/\_\
        /___/ v0.4.10 on Arduino Due

    [513] Connecting to HOME-0012
    [3557] AT version:1.1.0.0(May 11 2016 18:09:56)
    SDK version:1.5.4(baaeaebb)
    Ai-Thinker Technology Co. Ltd.
    Jun 13 2016 11:29:20
    OK
    [8614] +CIFSR:STAIP,"10.0.0.26"
    +CIFSR:STAMAC,"dc:4f:22:04:db:42"
    [8614] Connected to WiFi 

On my phone, the name of my project is ServerDueLED.
I see the message “ServerDueLED is offline”:
image
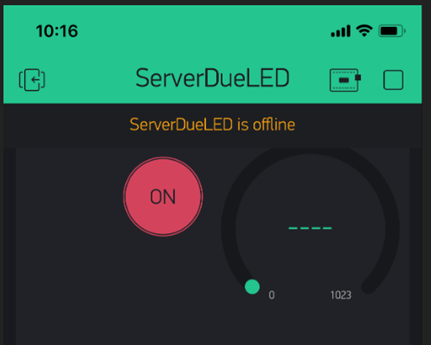
What are the likely causes for me to see this “… offline” message?

Very OLD library… latest is v0.5.2. Upgrade everything (App, Library and Server), not just one or two things.

I updated the Library to v0.5.2 .
I updated Arduino IDE from 1.7.8 to 1.8.5.
The Blynk app on my phone is 2.20.0(3)
The server is 0.36.5
Just to check my setup, I went back and tried the device on the cloud again, and it works.
I switched back to my local server. Still the same problem. My device connects to wifi, but then nothing.

[12] 
    ___  __          __
   / _ )/ /_ _____  / /__
  / _  / / // / _ \/  '_/
 /____/_/\_, /_//_/_/\_\
        /___/ v0.5.2 on Arduino Due

[513] Connecting to HOME-0012
[3557] AT version:1.1.0.0(May 11 2016 18:09:56)
SDK version:1.5.4(baaeaebb)
Ai-Thinker Technology Co. Ltd.
Jun 13 2016 11:29:20
OK
[8613] +CIFSR:STAIP,"10.0.0.26"
+CIFSR:STAMAC,"dc:4f:22:04:db:42"
[8613] Connected to WiFi

I still have the “…offline” message on my phone.

The project that you’re connecting to on the cloud server doesn’t exist on your local server. Have you created a new project whilst connected to your local server?

Pete.

1 Like

I have one project for the cloud, which works fine. I have a second project that was created while I was l logged onto the local server. The two projects have different Auth Tokens, so I uploaded different code to the Arduino depending on which server I intended to use.

Nathan

Can you confirm your Local Server is running?

Can you log into your Local Servers Administration page?

I decided to try a NodeMCU instead of the Due, and I got it to work on my server.

After many more hours, I finally figured out why the Due would not connect to the server. When coding the Blynk.begin code for the Arduino Due and Mega, we need to use dots in the IP address, not commas! In other words…

The correct syntax for Due, Mega (and probably many other boards) uses dots:

Blynk.begin(auth, wifi, ssid, pass, "192.168.1.200", 8080);

The correct syntax for NodeMCU uses commas:

Blynk.begin(auth, ssid, pass, IPAddress(192,168,1,200), 8080);

Just a suggestion: maybe the syntax with the dots should be added to the sketch builder examples or in the GitHub instructions. I did not see this documented anywhere.

Solved.

Putting the IP address in quotes makes it a string literal, which means that it does indeed need dots rather than commas for it to be a valid IP address.

Locally defining an IPAddress type variable and assigning a value to it using IPAddress(192,168,1,200) requires commas, because that’s how the IPAddress variable type works.

As far as I’m aware, both methods work with both types of boards (I don’t have boards to hand to these this with). What you can’t do is use commas with quotes, or dots when defining an IPAddress variable type.

Pete.

I have always used "xxx.xxx.xxx.xxx" for Arduino, NodeMCU, ESP-01 and ESP32. I never understood the reasoning for the IPAddress(xxx,xxx...

EDIT Thanks @PeteKnight that makes it a bit clearer… still see no reason to use it :stuck_out_tongue_winking_eye:

2nd EDIT I always tend to use this format anyhow…

char auth[] = "xxxxxxxxxx";
char ssid[] = "xxxxxxxxxx";
char pass[] = "xxxxxxxxxx";
char server[] = "xxx.xxx.xxx.xxx";
int port = 8080;

void setup() {
  WiFi.begin(ssid, pass);
  Blynk.config(auth, server, port);
  Blynk.connect();
}
1 Like

Totally agree with @Gunner. It’s much nicer to assign these to variables at the top of your code. Makes them much easier to access and update insread of digging around in the body of the code.

Pete.

Gunner’s code is cleaner. I tried it on my NodeMCU and it worked.
I tried it on a Due and Mega and it would not compile. I had to modify it like this:

char auth[] = "xxxxxxxxxx";
char ssid[] = "xxxxxxxxxx";
char pass[] = "xxxxxxxxxx";
char server[] = "xxx.xxx.xxx.xxx";
int port = 8080;

void setup() {
  //WiFi.begin(ssid, pass);
  Blynk.config(wifi, auth, server, port);
  if(Blynk.connectWiFi(ssid, pass)){
    delay(10);
    Blynk.connect();
  }
}

Oh, yes… sorry. The Arduinos do work differently and I forgot to show that :blush: I use this on my Mega… not sure I remember why I have that first line… :thinking:

  wifi.setDHCP(1, 1, 1); //Enable dhcp in station mode and save in flash of esp8266
  Blynk.config(wifi, auth, server, port);
  if (Blynk.connectWiFi(ssid, pass)) {
    Blynk.connect();
  }


Hi I followed your information, but does not want to work with Arduino Uno, by chance could you help me? thank you very much

I made the procedure described by you compile correctly, however it cannot connect to my Local Server. How can I solve it? Thank you very much for the attention

Copy & pasting text works much better than photos of the screen but if you need to include pictures of the screen then screenshots are better.

Pete.

1 Like

This video shows how I set up a local server: