Advice on room Thermostat configuration

I’ve tried to other forums and got 0 answers, so either they’re not as active as this one or I’m asking a really difficult question. Still I could really use some (expert) advice. Here goes:

I want to build a Thermostat-board with

  • ESP8266 (preferred Wemos D1)
  • T sensor
  • LCD (shield?)
  • 2 buttons (UP/Down)
  • Battery feed or more preferred: feed of mains (so an 220v AC–> 5v (or 3.3.?v) DC step down converter)
  • 220V relay (shield ?)

I don’t mind soldering a bit but preferably I click a couple of shields into one board. Problem is: what to get. I’ve been scouring over banggood and aliiexpress and there are a LOT of shields and modules and I don’t even know whether the above configuration can be attached to the ESP (most likely it will, IRC 6 pins for LCD, 2 for the buttons, one ADC for sensor).

Bottom line I’m overwhelmed by choices and underteached in compatibility, hence I’m looking for advice.

To start this off I’ve done some digging and searching myself and came to the following list:

Again, I’m quite clueless whether this is all compatible with eachother and whether these are the best choices.

Thank you!

Since you mentioned Wemos D1, I suggest you have a look at their website. https://www.wemos.cc/

They have Boards, and shields. https://wiki.wemos.cc/products:d1_mini_shields
https://wiki.wemos.cc/products:d1:d1_mini.

In the end though I think you would be better off understanding all the components you need, and coming up with a more “custom” solution. If you go the shield route you may end up sticking your fingers near the relays when pressing buttons and such.

Also, searching this site for thermostat yields quite a few results.

https://community.blynk.cc/search?q=thermostat

Maybe this can lead you to a starting point that you could easily expand on. Possibly this one:

Hi @wolph42, good choice of starting point with the Wemos D1 Mini. The dual (or even triple) bases are very handy, as is the relay shield. The multi bases have holes in them, so it makes mounting everything easier too.

My favorite environmental sensor is the BME280. This measures temperature, humidity and atmospheric pressure. Not to be confused with the BMP280 which is almost identical doesn’t measure humidity. These are digital sensors, so wouldn’t be connected to the analogue input of the Wemos.

I really like the Nextion touch screen displays. These are full colour and you can design your own graphics (I use PowerPoint) and have a very user friendly device without too much effort. There’s a bit of a learning curve with these displays, but there’s plenty of resources out there to allow you to get to grips with them easily. The Nextion uses serial communications to talk to the Wemos, so you can use hardware serial (which means you lose debug messages via the normal USB connector on the board) or software serial.

This is the approach I’ve taken with my heating/cooling controller that controls aircon, ceiling fans and wall mounted electric heaters and I think it works very well. The Nextion is intuitive to use for anyone who’s ever used a smart phone, especially if you design the user interface well. Here’s a couple of (not very good) pictures of my setup:

The Nextion uses a 5v supply, so I power the whole thing using a 240v to 5v supply.
Because the Wemos generates some heat (along with the PSU if its in the same case), you need to locate the temperature sensor remotely, otherwise you won’t get satisfactory readings. My BME280 is actually located away from the wall mounted controller and connected to its own Wemos board. It sends data to the Blynk cloud server, which is then picked-up be the main controller that has the Nextion connected to it. There are also other sensors on the roof to give outside readings as well.

Obviously this is a bit of an overkill for a straight forward thermostat, but mine started simple and seemed to mushroom into a being that developed into a life of its own! I now have Amazon Alexa integration and the next stage will be to display weather station data on another page of the Nextion display.

Once you’ve decided on your hardware, you need to give some thought to the logic behind the code you use to sample the temperature and control the relay. You need to avoid the relay switching on and off quickly when you’re at or close to your target temperature. You need some latitude so that your heater doesn’t turn on until the temperature has dropped slightly below target (say 0.2 degrees C) and the heater then stays on until the temperature has risen slightly above target. This actually mimics the way that mechanical thermostats work, as they have quite a bit of ‘inertia’.

Hope this helps, or at least doesn’t make your hardware choices too much more complicated!

PS - Before you ask, the outdoor wasn’t really 28.5 degrees when I took the photos, that was a bit of dummy data.

Pete.

@Toro_Blanco : thank you for the links, much appreciated and very useful!

In the end though I think you would be better off understanding all the components you need

well, yes obviously, which is one of the reasons I post this here. I’ve already ordered (reasonably randomly) some electronics to experiment with, but one of the issues are the extreme long delivery times. I’ve noticed that if they have no tracking they take ages… hence IF I order I have to order big and ‘big’ in this case means material for 10 thermostats. If I first order material for 1 its likely it will take 3 months before everything is in, I don’t want to wait that long so I’m reading a lot and asking others for advice, while at the same time learning the system with the few items that did arrive (among wich a sonoff TH10 with a esp8266 on board).

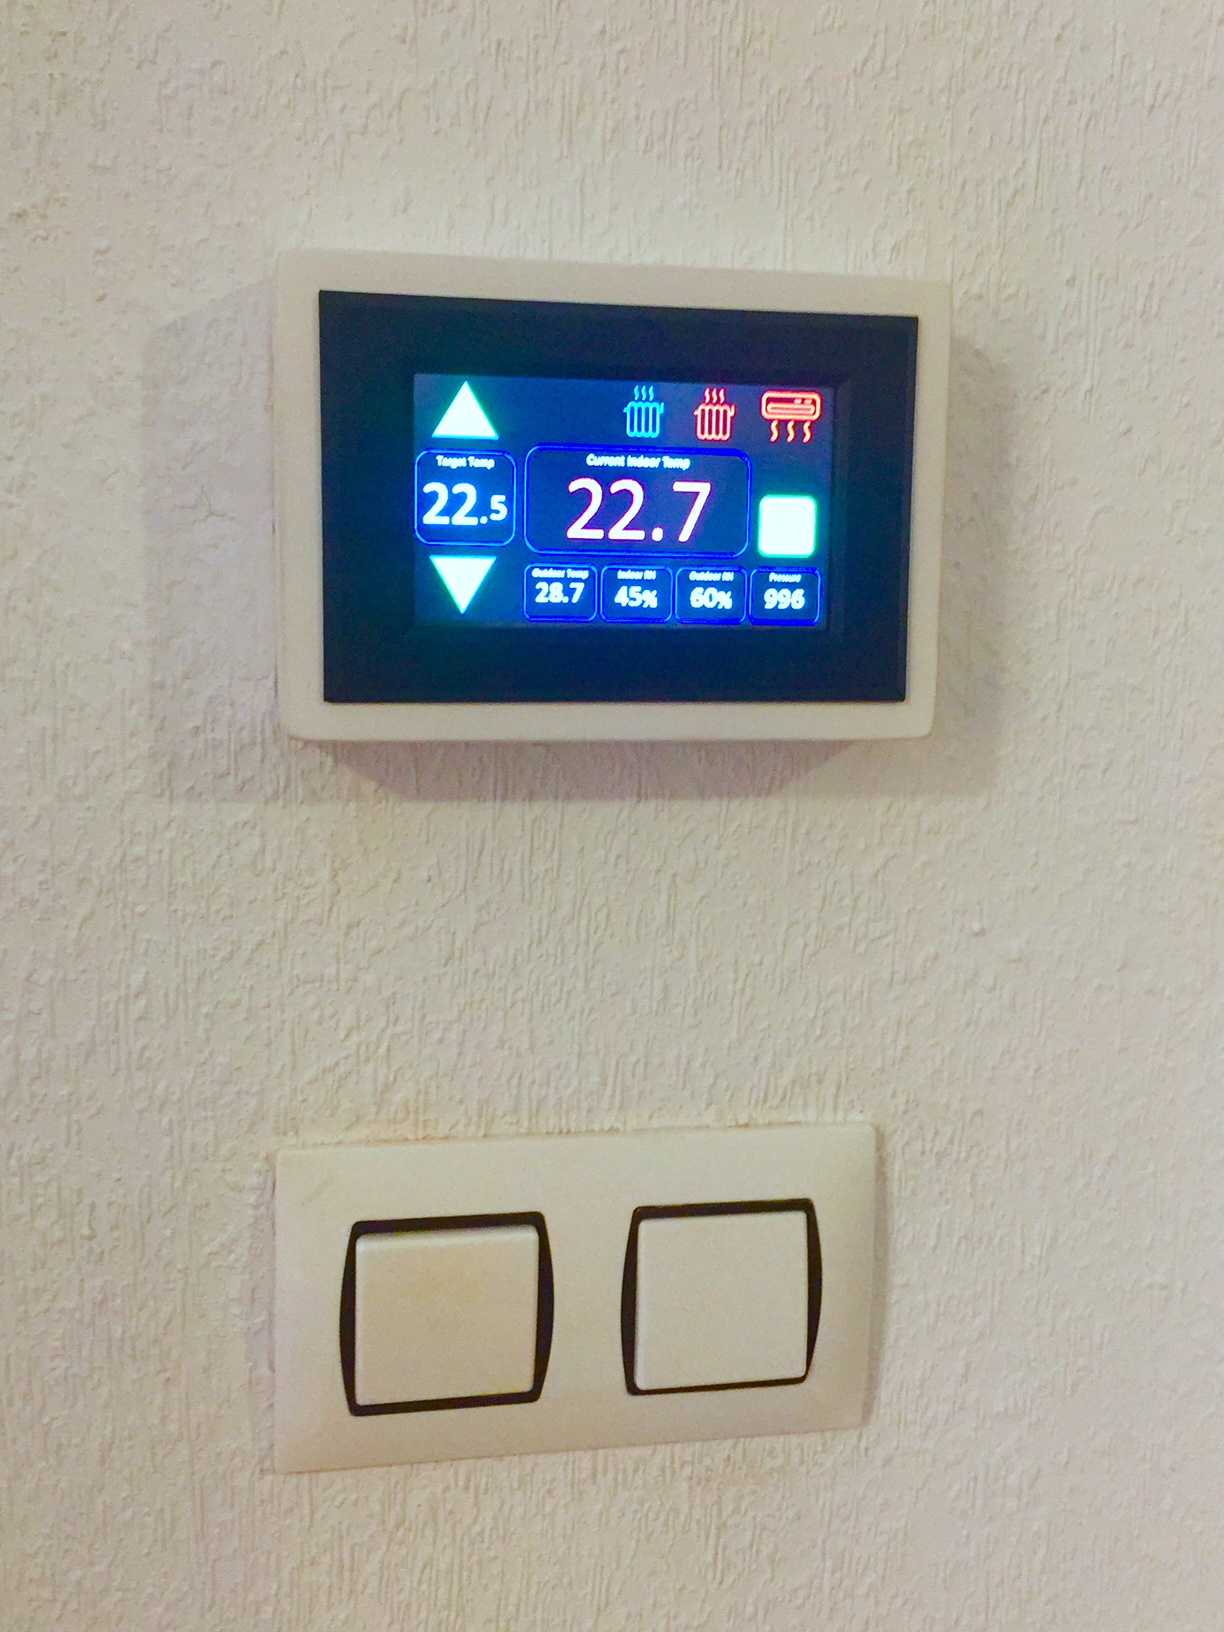
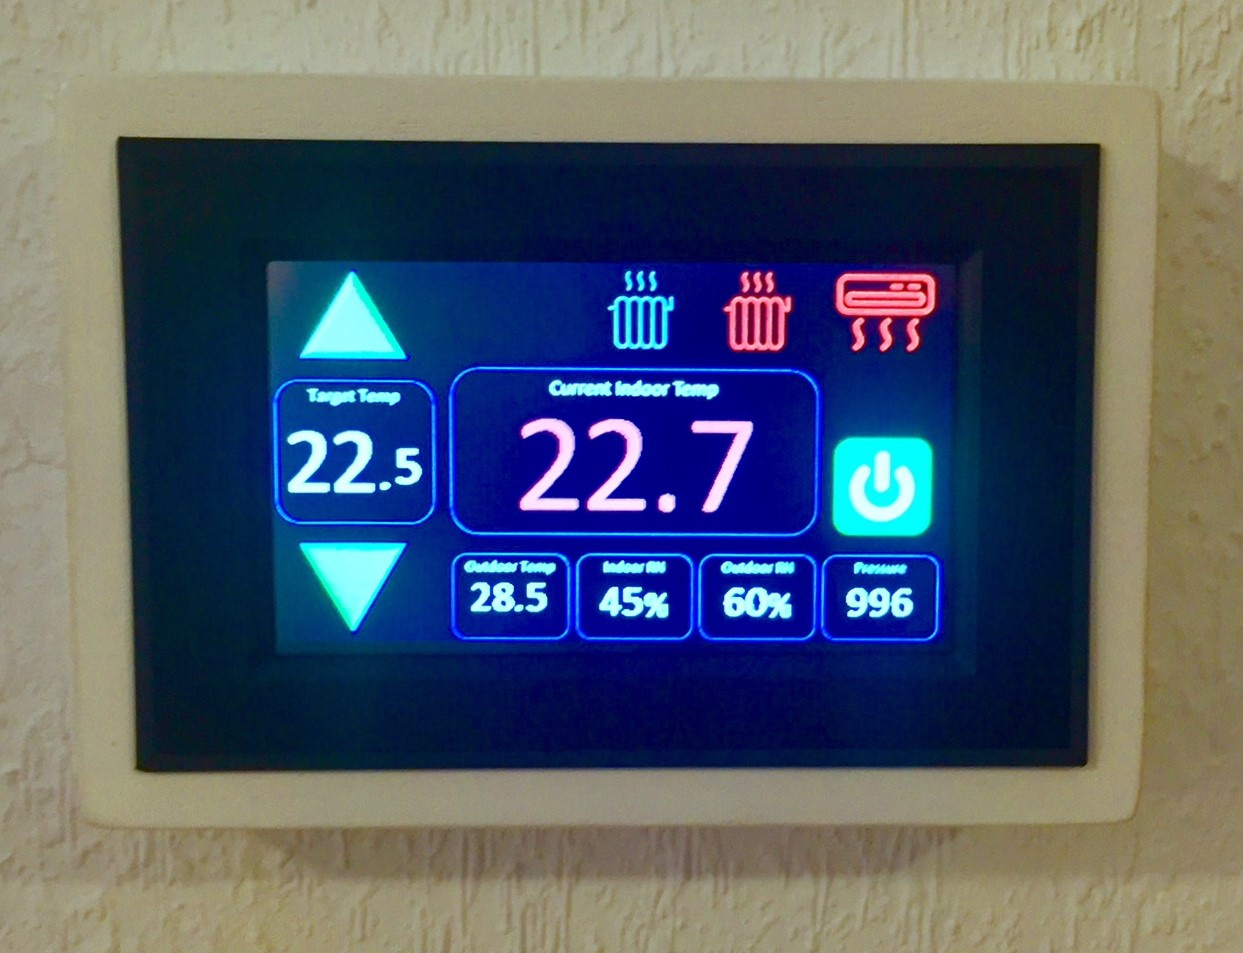
@PeteKnight: WOW! Thats really very close to what I’m looking for.
You don’t have to worry (for me) concerning the intelligence behind it I’ve got this project as a guidance, its really well thought through, including watch dog, maintenance cycles, etc. , however its completely wire (as in no wifi) and I don’t have (nor want) that luxury.
If you like to know what I’m aiming at:

That means that I need 8 thermostats in total, so I really want to get this right in one go! In a later stage I also want to add T sensors to all the pipes (11 zones in/out, so 22 sensors!) but that can be done later.

I like the touch screen concept, but I thought it would severely complicate the project. Could you share your code, so I can have a look at what I can expect?

the wemos takes 3.3v so how do you take care of that? Do you use two step downs?

Good advice, I don’t however want even more sensors in my house, which will mean I will most likely position the sensor just outside the case at the bottom (as heat goes up).

As for the case in the picture, where did you get that? One of the things I’ve been contemplating about is the casing as it will obviously not be something ‘standard’. 3D printing is always an option but that would once more complicate matters.

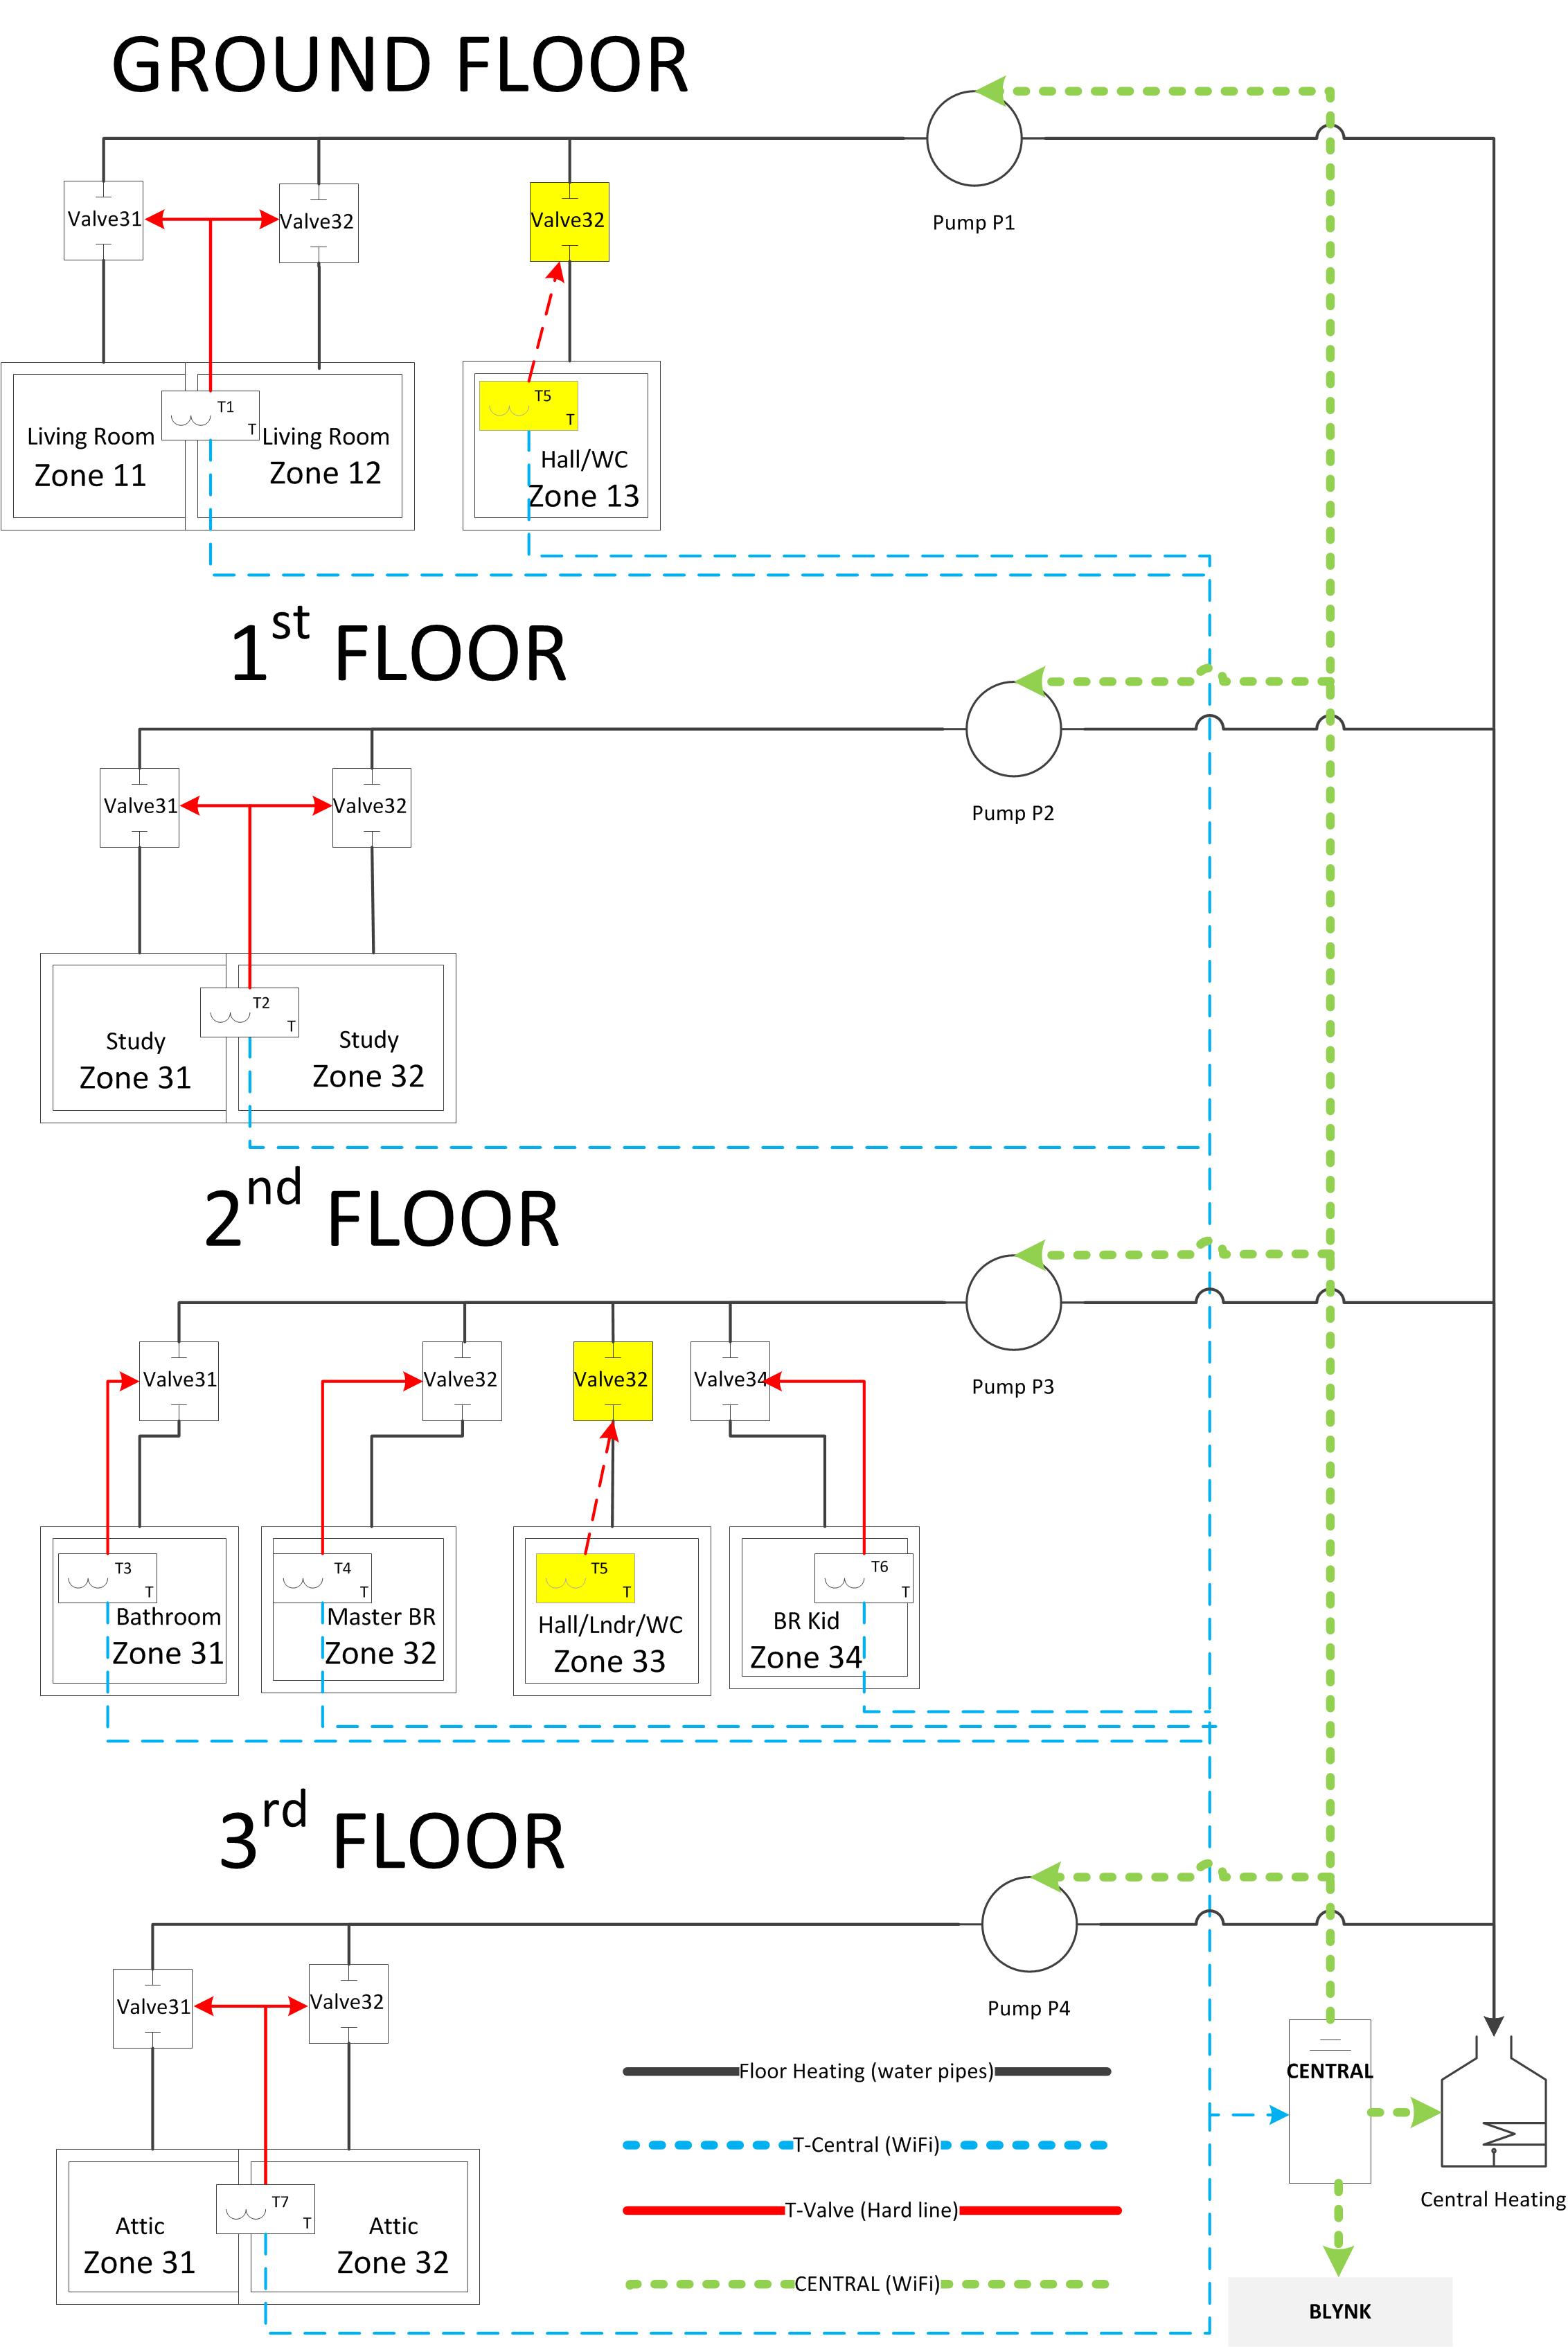
edit: to give some guidance to the schematics I attached:

  • ‘solid lines’ (red and black) is what I currently have (so the pipes and hard lines between thermostate and the valves).
  • ‘dotted lines’ is the new stuff and ONLY wifi. So this concerns two additional thermostats (no relay) one central hub with which the thermostats communicate and the hub communicates (dotted green) with the pumps (which currently run 24/7 :frowning: )

edit2: had a look at the Nextion displays but they’re too big and too expensive, i also realize that i need 9 thermostats not 8. The last one functions as the hub, operates the central heating system and senses the outside temp (as the inside temp is already measured by the zone termostat also on that floor). Given that I also want at least one spare…that means 10 thermostats.

I use Blynk in a very different way to most people. I have a Raspberry Pi running Node-Red and Mosquitto with Blynk and Amazon Alexa integration. Communication between the Pi and all the remote devices uses MQTT messaging. So, my code won’t really help or make much sense.

It also has a 5v pin, so you can power it from either 3.3 or 5v.

The plastic bezel around the display was bought on eBay. The rest of the case is made of wood.

They do make a variety of sizes, and are cheaper from AliExpress, but yes they are pricey. For me though, their functionality and useability makes them worth it.

Pete.

1 Like

once more, thank you for the reply. This evening I’ve discussed the setup with a friend and it turned out to be a VERY valuable discussion. While discussing I realised that that the thermostatic relay I had in mind also needs to feed off the same wiring, so either its on and works, but as soon as its turned off…so is the feed to the system. There is no double wiring. Its not really a big deal as I already know how to do it differently but I realised that I would have figured out AFTER i would have build the entire systeme (10 thermostats) tested it…and then when i want to connect it, would have come to realise that that setup does not work. So I’m happy I’ve waited for some solid feedback.

If there’s anything to add, feel free to do so.

I use for all my projects a 2A mobile charger that I take the circuit off the case… plenty of power!

One thing I’m not quite clear about from your description is where Blynk comes into your plans (if at all) and how the devices will communicate with each other. You say that one device will act as a Hub, but what communication protocol are you using for this?

One option is to use Blynk server to store the data (on/off status, current temperature, target temperature etc) for each zone. As you’ve posted on the Blynk forum then I guess this may be the way that you’re thinking, but you did say that you’d sought advice elsewhere before coming here, so now I’m not so sure.

If you do plan on taking this approach then you’ll need a local Blynk server, as you wouldn’t want your heating to be unusable if the cloud server, or your internet connection was down. But, I don’t see where your Hub device comes in in this scenario.

Given the number of devices in use, it might be worth you looking at MQTT as a communication protocol and running a Raspberry Pi with Node-Red as your ‘logic control centre’. You could run an MQTT server on a Wemos acting as a central hub rather than the Pi, but I don’t think that this would be a good way to go in this case.

You obviously need a central point where all zones can be switched off, or the temperature reduced to put the house into ‘vacation mode’. You’ll probably want to be able to turn zones on an off and set target temperatures without walking around each zone. You could do this from Blynk, or from a central control panel, or both.

With my setup, I use Blynk in a fairly passive way. I use Blynk cloud, and if it’s up an running and I can connect to it (which of course is the case for the VAST majority of the time) then it gives me a secondary method of controlling my heating/cooling system. Blynk really comes into its own when I’m away from home, allowing us to pre-heat or cool the house before arriving home so that everything is at a comfortable temperature when we walk in through the door. As this is a holiday home it’s also nice to be able to monitor indoor and outdoor temperature and humidity when we’re not there.

I’m not sure that I’m helping to solve your problems with this post, but hopefully it’s flagged-up some issues that you need to consider before you go too much further.

Pete.

well Blynk ofcourse, I’ve done some tests with Blynk already and it works great, its so far the ONLY part which has not troubled me, so I’m currently not really bothered by that part. I did do some extensive research into the different ‘methods’ (like home-assistent, cayenne, etc etc) and eventually I decided to choose the one with the biggest user base…which is Blynk! I’ve also noticed this as I’ve posted this particular (OP) question on several fora and this one is the ONLY one I actually got an reply. That alone is enough for me.

My plan is initially to get it running through a blynk server. Next to use the eepron of the central hub to store data in case connection gets lost. One issue I though is that I have two seperate networks in my home which I can’t get to run as a single one. This means that currently I have to make use of an external server for all devices to communicate. Obviously I do not want to be dependent of the Blynk server, but given the high learning curve I’m going that way initially…later Ill install a webserver on a rpi and go the way you suggest.