Thanks Pete, I ran out of my quota of replies yesterday so wasn’t able tor respond until now.
I appreciate the notes on the code…as you might have guessed I am not a programmer but have been cobbling together snippets from others to create a couple of specific use case solutions.
As to the code you say I shouldn’t be doing, I thought that was necessary to initiate the wifi connection so not sure what to do about that.
If you have advice on where the code you say shouldn’t be be in the void loop, I’m open to suggestions.
I am using Blynk through my PC web browser so not sure I have anything installed locally for that. I think (though could be wrong) that the image showing the “v.0.5.8 on NodeMCU” was retrieved from Blynk as part of the connection to Blynk.
Does Blynk show this based on querying my ESP8266 or is it a generic image used by the quickstart template? I was using an only slightly modified version of that when I grabbed that monitor text. The only thing I swapped out was the Template Id and Auth Token from Blynk from my water flow meter sketch to see if I could get it to connect to Blynk.
I bought 3 of these devices at the same time and have tested them succesfully but it was over a year ago since I did that and have not made any changes to them other than via the Arduino Cloud sketches.
Thanks again for your help!
No, Blynk.begin does that…
It should be in a function called with a BlynkTimer and the delays should be removed altogether.
You should read this…
This comes from the Arduino IDE when it compiles your code. If you were using a local install of the IDE you would go to Sketch > Manage Libraries and you’d see a list of installed libraries and versions.
As you appear to be using the web based version of the IDE then the process may be differ et, and you’ll need to figure that part out for yourself.
The library version number comes entirely from the library that was used to compile the sketch in the IDE. You need to ensure that it’s version 1.3.2 that is installed and used during the compilation process.
You’ve also ignored what I said about the ESP8266 core version that is being used during the compilation process.
Pete.
Hi Pete, you mentioned that this is some chines library that is installed but I’m not sure how that happened or how to include the correct library.
Is this #include <BlynkSimpleEsp8266.h> what needs to be changed? If so, what do I need to change it to. I’m really confused as this is the same libray I have been using all along and had not issues before now.
Thanks
No, as I explained before, you need to have the correct library installed in the IDE. I’ve explained how you do that if you have a local install of the Arduino IDE, and TBH if you can’t figure-out how to do that with an online version, and how to use the latest ESP8266 core with the online version, then you’d be better-off doing a local install.
Pete.
OK, since much of your advice has been for the Arduino IDE instead of the Arduino cloud, I downloaded and installed v 2.2.1, then added the NodeMCU ESP266 board, the installed Blynk v1.3.2 (along with BlynkNcpDriver v0.6.3) and the downloaded my sketch to the local Arduino IDE.
I connected my board and the serial monitor still shows the Blynk v0.5.8 image and when looking in the Library manager at the installed libraries the 2 new libraries are all that show up.
in fact, v0.5.8 does not even show up in the drop down list of available library versions.
The board connects to my wifi as it should but then all I see in the serial monitor after the Blynk image is the same Connecting to blynk-cloud.com:80 messages as before but will not connect to Blynk.
Not sure what else to do.
You need to figure-out how to turn on verbose compiler messages. In the 1.x version of the IDE you go to File > Preferences and enable it from there.
Once you do this, and re-compile your code, you’ll see lots of information as the sketch compiles. At the end, you’ll see a summary of the libraries used, and their paths.
Copy and paste just this part of the compiler message and post it here (with triple backticks of course).
Pete.
Sigh! All I wanted to do was make one tiny change that had nothing to do with Blynk or ESP8266 or anything else, just a value for the flow rate and I’ve now spent 2 days trying to get the thing working again And of course now I am getting the ISR no in Iram error you mentioned that I had never seen before. I’ve spent hours trying to research how to fi this issue and have nearly gone blind reading all the mostly BS “solutions”, none of have worked, probably because I do not really even understand the problem.
I re-flashed my NodeMCU ESP8266 v1 module with v1.5.4.1 but before all this, which did seem to help but if you can point me to an actual line of code or whatever else is needed to resolve what for me is a new issue, I would really appreciate it.
Version 1.5.4.1 of what?
Is your verbose compiler message now showing that Blynk library version 1.3.2 is being used by the compiler?
I’d suggest that you start by commenting-out the attachinterrupt line of your sketch and uploading the code, and ensuring that it successfully connects to Blynk.
As far as resolving your ISR not in IRAM, it’s actually very simple. The easiest way is to add a function prototype for your ISR and include the IRAM_ATTR command in that function prototype definition.
You do that by adding this line of code near the top of your sketch (it needs to be before the existing pulseCounter() function, and before void setup where you use the attachInterrupt command)…
// Function prototypes for the functions that use interrupts...
void IRAM_ATTR pulseCounter();
Pete.
Making Progress! The void IRAM_ATTR line seems to have stopped the dreaded ISR not in IRAM error! Yay!
Sorry, I should have added some explanation around the ESP8266 v1.5.4.1 firmware. At one point I was getting no response at all from the ESP8266 so I used a Flasher to bring the module to factory defaults with the latest firmware.
After that of course I went back to using the Arduino IDE to upload sketches, including the original Quickstart just to make sure the hardware was working. I modified the Quickstart with the Blynk Firmware configuration and it connected to Blynk and even showed that device to be online (in the web console but still not being discovered by the app console).
Yes the verbose compiler message now shows Using library ESP8266WiFi at version 1.0 and Using library Blynk at version 1.3.2.
I commented out both instances of the attachinterrupt line and uploaded the code again. Now the serial monitor shows it is connecting to wifi and oddly the Blynk web console shows the it is Online, but I didn’t get any indication in the serial monitor that it connected to Blynk (an image etc) like I used to see. Is that no longer a thing or am I still missinng something?
Thanks again Pete!
quick update. I uncommented the 2 instances of attachinterrupt and uploaded to the ESP8266 it does not connect to Blynk (dashboard after a few minutes shows offline).
I then commented them again and reloaded. This time it connected to wifi and Blynk dashboard once again shows Online.
What did you want me to do now?
TBH your description of the steps you’ve taken jumps around from one thing to another, and is extremely difficult to follow.
A more structured approach would make it much easier to follow where you’re currently at with your project.
You referred to an image of a serial monitor, but you didn’t post that image. This is probably a good thing, as I’d be asking you to delete it and replace it with the text from your serial monitor, formatted with triple backticks.
What you should do next depends largely on where you’ve got to at the moment, and I’m not clear where that is.
BTW, it’s better to use the noInterrupts(); and interrupts(); commands rather than detaching and re-attaching your interrupt.
Pete.
BTW, when you did this…
that sketch you uploaded overwrote the firmware you uploaded when you did this…
If you suffer this issue again…
the simplest solution is usually to press the RST button on the ESP8266 board connect the power cable, then release the RST button.
If that doesn’t work, closing the IDE, and maybe rebooting your PC will often solve the problem.
In the past 6 or 7 years that I’ve been using ESP8266 boards I’ve never had to re-flash the device with the factory firmware in order to be able to upload code to it.
Pete.
Apologies as you are entirely correct. Bad habit of mine but it’s the way my pea brain works ![]()
At this point and with your help, I now have the ESP8266 and code for the flow meter connecting to Blynk again. Now I just have to adjust the calibration variable(s) to match the actual 5 gallon bucket fill test. This was all I wanted to do in the first place.
I’m not familiar with how these work but will do some research. Appreciate the advice.
Understood and thanks for the clarification
So That’s how it works! Very helpful in case it happens again.
So now that I have made all these changes the devices all seem to show online and offline states in the Blynk web dashboard again, though I didn’t do anything to change the original device that was not reflecting those states correctly so not sure how it happened, but happy it is working again anyway.
Sadly I am still not seeing the flow meter device in the app dashboard which is really inconvenient. Any more ideas on how to get this to work?
If you create a device from a template in the web console, it should automatically (and immediately) appear in the web dashboard.
If that isn’t happening then the only solution may be to create a new device from the same template and use the three lines of firmware configuration from that device in your sketch.
Pete.
Hi Pete,
I may not have been clear or I’m not understanding your reply.
I did create the templates (there are 2 that wont show in mobile app) using the web dashboard and they are of course working just fine from the we dashboard. The problem is they will not show up in the mobile app at all.
I have Blynk mobile app v1.13.3 installed on my Samsung S22 Ultra android phone and the very first template I created last year on my web dashboard did show up then in the Blynk mobile app as expected.
I have tried everything to get the other 2 templates to show up in the mobile app including trying to manually create a template in the mobile app using the same tempate name as the one I created in the web dashboard named Solar Actuator, but the mobile apps shows a message saying my organization already has a template with that name.
So apparently the mobile app can read whatever data store is being used which really surprises me as the templates in question will not show up in the mobile app.
I even deleted the Blynk mobile app, re-installed it and logged back in. The one template and device that showed up before still shows up, but neither of the other 2 templates do.
I really need to be able to create these devices on my phone as running up and down these hills to my PC is killing me.
I talked about creating a new DEVICE from your existing template, and you’ve talked about creating new templates.
Have you tried what I suggested?
If you have, and it didn’t work, then I’d suggest posting screenshots of the template and device screens in both the web console and app screens (4 screenshots in total).
Pete.
I CAN’T create a new device from an existing template in the mobile app because neither the templates nor the devices are showing up.
This is the part I was confused about for the reasons stated above.
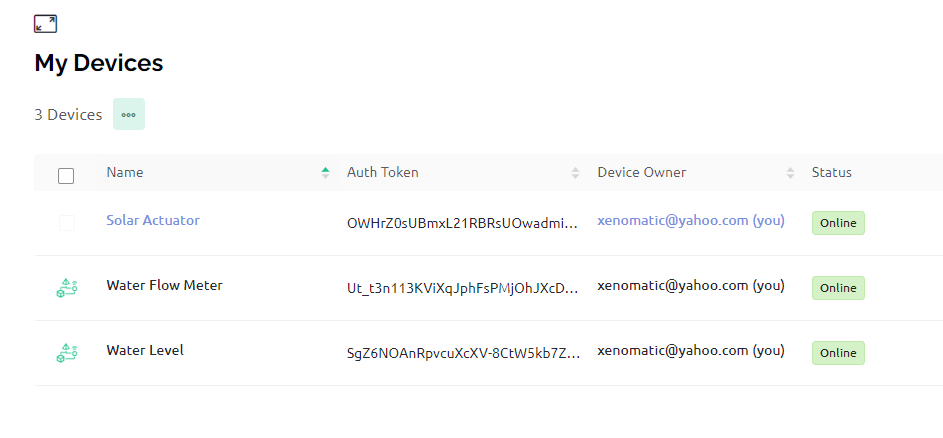
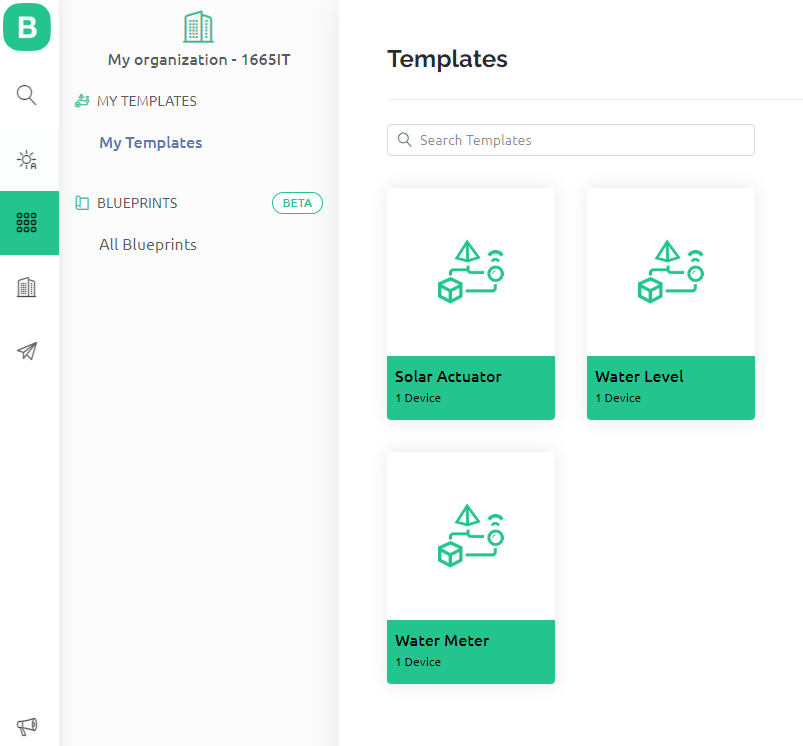
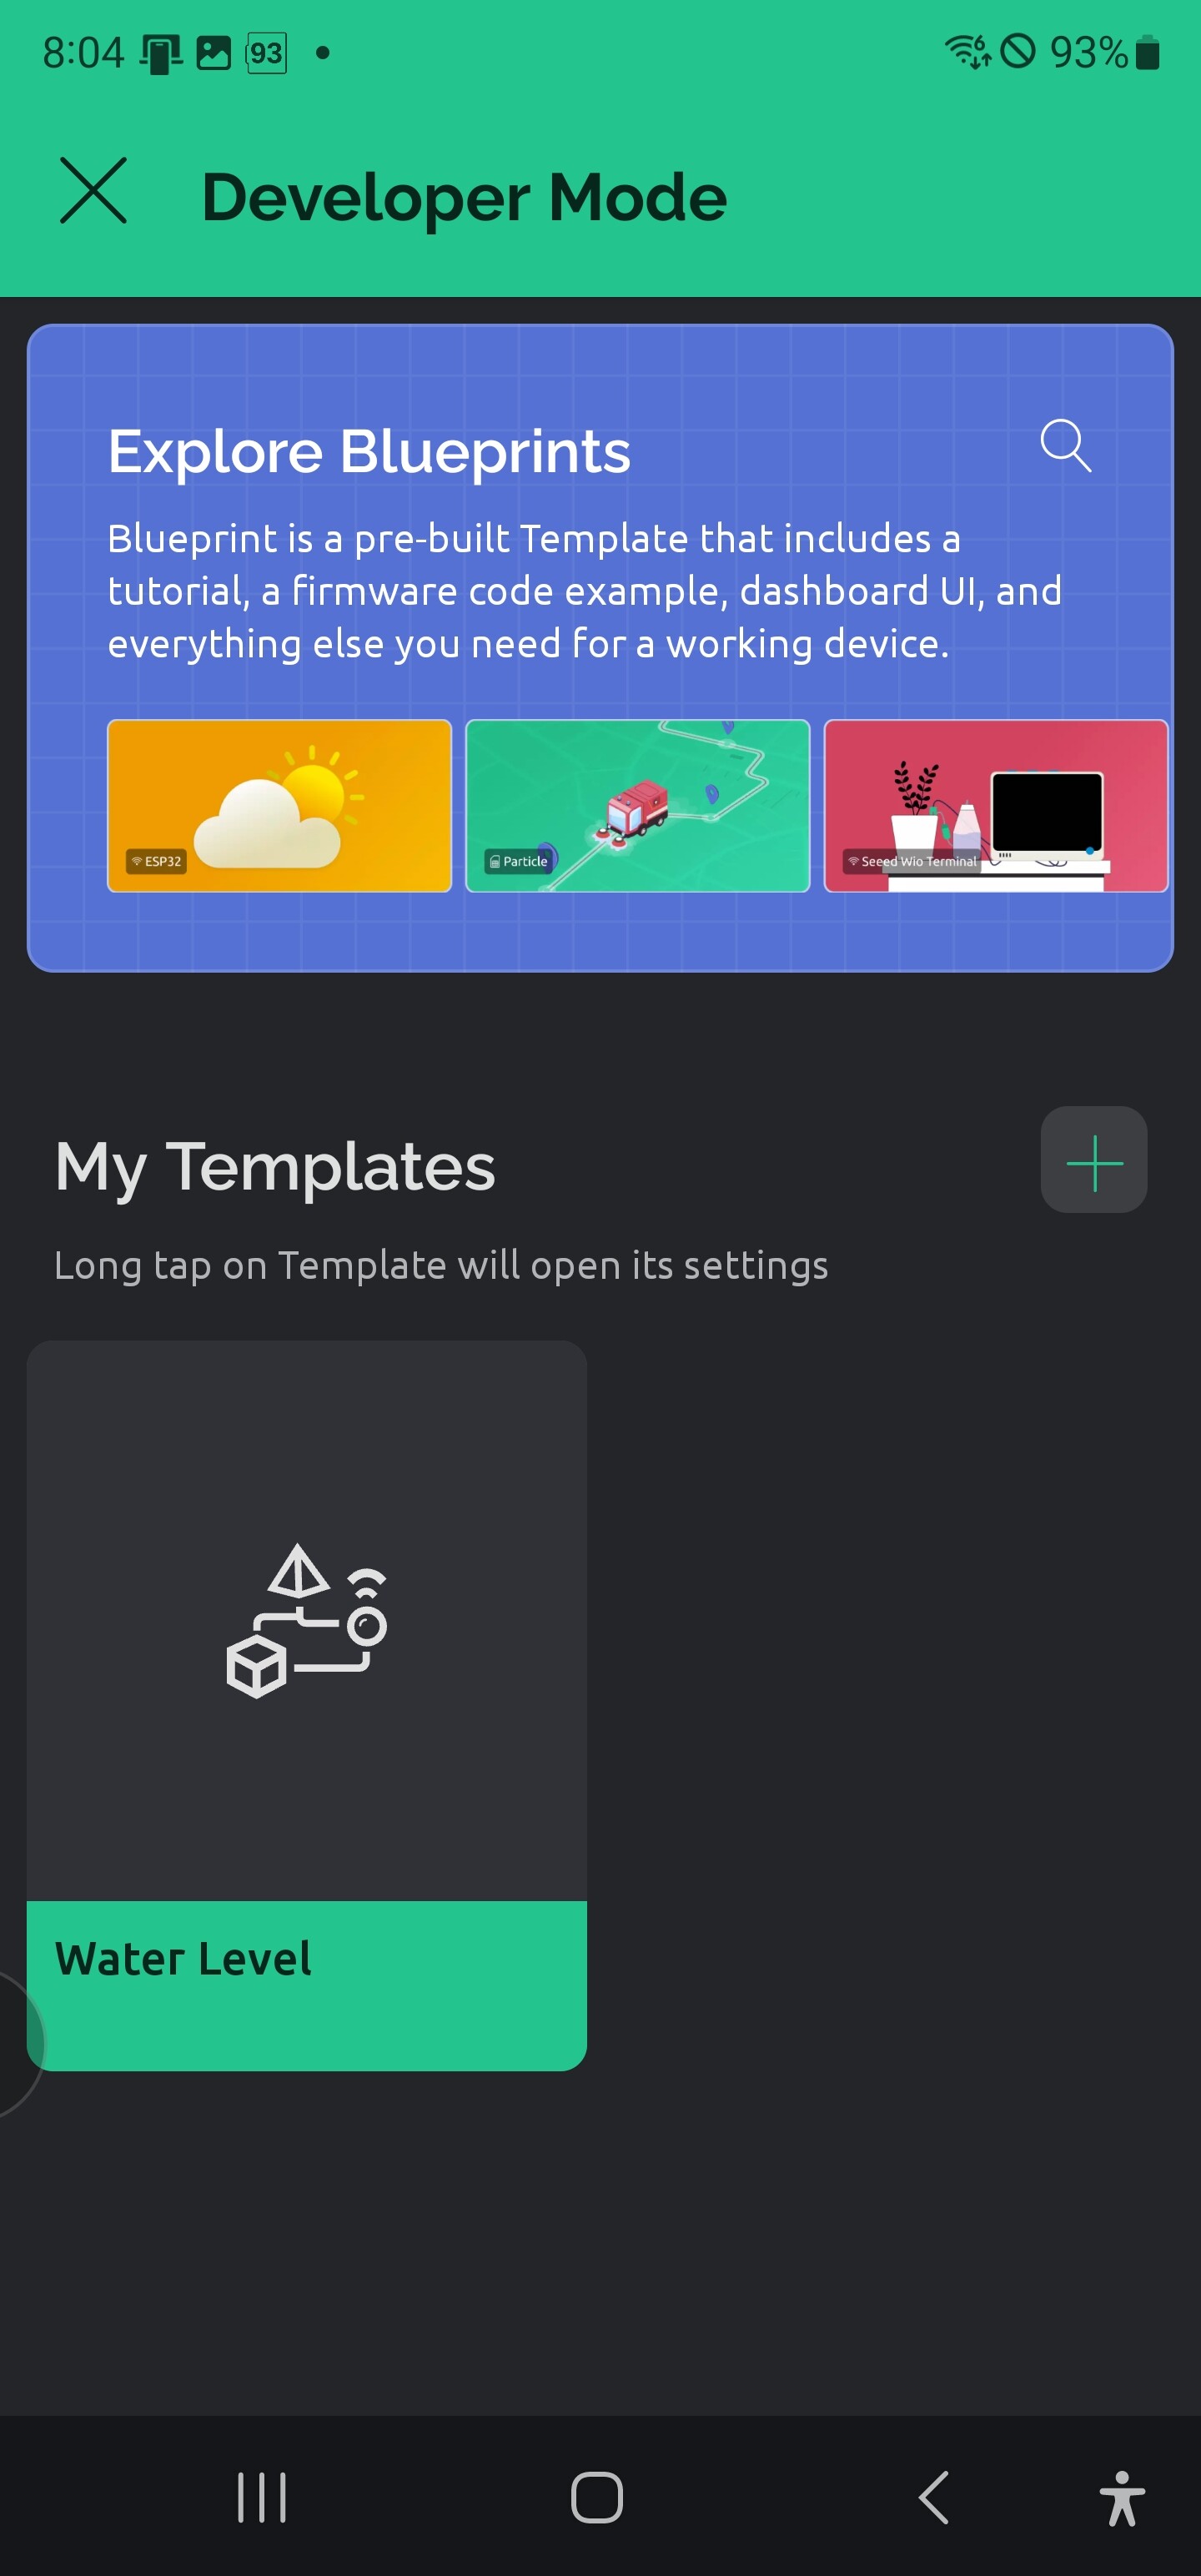
Please see the 4 screenshots from the Devices and Templates screens on both my web dashboard and the mobile app. As you can see, only one of the 3 items are showing up in the mobile app.

That’s why I was talking about doing it in the web console!
Pete.
I just literally created the Solar Actuator Device in the web console (under template of the same name) last week.
I can’t see how recreating that device again is going to fix the issue that the templates created in the web console are not showing up as they are supposed to in the mobile app.
Any other suggestions?
I didn’t say that you should re-create the device, but you’re obviously not interested in my suggestions, so I’ll step back and let you figure it out for yourself.
Good luck with your project.
Pete.