[SOLVED] Issues Installing (and running) Blynk (client) on RPi

I figured it was again time to install Blynk on my old RPi B 2.0, but with intent to actually learn how to use it.

I did run into this when first starting out with Blynk, late last year, and made a post about it, but it was a bit of a hack what with combining suggestions and directions from multiple Google references… so I am not going to reference it here. Besides, I honestly don’t remember if I ever got it working properly back then (probably just gave up and switched to Arduino, which I understand a bit better :wink: )

Unfortunately I think the instructions in the DOCs are still out-dated, as I am still getting these errors, although it appears to install:

pi@raspberrypi:/ $ sudo npm install -g onoff
npm WARN npm npm does not support Node.js v0.12.6
npm WARN npm You should probably upgrade to a newer version of node as we
npm WARN npm can’t make any promises that npm will work with this version.
npm WARN npm You can find the latest version at https://nodejs.org/
/usr/local/lib
└── onoff@1.1.1

pi@raspberrypi:/ $ sudo npm install -g blynk-library
npm WARN npm npm does not support Node.js v0.12.6
npm WARN npm You should probably upgrade to a newer version of node as we
npm WARN npm can’t make any promises that npm will work with this version.
npm WARN npm You can find the latest version at https://nodejs.org/
/usr/local/bin/blynk-client -> /usr/local/lib/node_modules/blynk-library/bin/blynk-client.js
/usr/local/bin/blynk-ctrl -> /usr/local/lib/node_modules/blynk-library/bin/blynk-ctrl.js
/usr/local/lib
└── blynk-library@0.4.5

And this statement (in the DOCs) appears to be outdated:

Run Blynk test script (put your auth token):

blynk.js 715f8cafe95f4a91bae319d0376caa8c

As one would now have to use:

blynk-client 715f8cafe95f4a91bae319d0376caa8c

And so I managed to get connected (using my own auth code and Cloud Server - as I couldn’t figure out how to connect to my Local Server from the terminal - again, all references appear to be outdated).

pi@raspberrypi:/ $ blynk-client xxxxxxxxxxxxxxxxxxxxx
OnOff mode
Connecting to: blynk-cloud.com 8441
SSL authorization...
Connected
Authorized
Blynk ready.

However, when I moved a slider, linked to Digital 18 (which had an LED wired to it and GND)… nothing happens.

So then I added a display widget to Digital 17 to see if I could at least see if it went HIGH or LOW (with a jumper to ground or 3.3v), but as soon as I start the app (with the display widget added in the app, but nothing physically connected to the pin) the client crashed:

Disconnect blynk
REARMING DISCONNECT
Connecting to: blynk-cloud.com 8441
SSL authorization...
Connected
Disconnect blynk
Connecting to: blynk-cloud.com 8441
SSL authorization...
Connected
Disconnect blynk

And it would keep this up until l Ctrl-C out on the terminal and remove the display widget from the app (ver 2.8.1).

And so here I am, looking for insight and assistance on these issues:

1 - How to properly update whatever version of Node - or Node.js - I am supposed to have installed, in-order to get ONOFF to work correctly (assuming that is even the issue)

2 - What is the correct command format to connect to my Local Server, over Ethernet, from a RPi terminal.

3 - Why would the client crash just because of a display widget in the app?

Oh, and please update the DOCs if necessary :slight_smile:

++++++++++++++++++++++++++++++++

EDIT and UPDATE - after much trial, I ended up going the wiring PI method - if you don’t want to read everything below, then just start here :wink:

Go here for install directions:

The after getting that installed, first make sure you are in the correct directory (or include it in the command - see how I have done both, for reference, in the picture below) and then run sudo ./blynk --token= (don’t include the <>) when using cloud server. I am unsure if you need the ./ or just / before blynk… probably depends on the directory or path.

If you have your own Local Server then you need to add the IP and port.

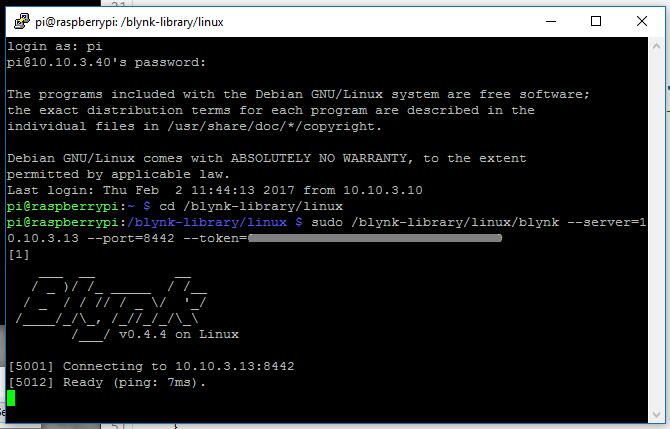
And we are in like Flynn :sunglasses:

Enjoy!

++++++++++++++++++++++++++++++++

1 Like

Soooo, how did you install it? Can’t quite work that out from the above…

Did you use the github instructions? Or what?

I thought this would have been clear enough?

But to clarify… since there are too many slightly different how-to’s spread out around the ‘tubes’, I went with the supposed official way…

Where’d you download local server from?

You still haven’t stated how you installed it, you just said you followed the docs…

@Dave1829 I appreciate your attempt to assist, but please read what I have already said in the initial post… I try very hard to be clear and concise (you should see it before editing :stuck_out_tongue: )

My local server is installed on another system, and is not the issue (hence the word CLIENT in the title)… and I installed Node, ONOFF, Blynk, etc following the documented instructions as per the link in my other answer.

I have no idea what you are trying to do but i found the github instructions to be the most up to date…

@Gunner I’m not sure what the official syntax is for connecting to your own server rather than the cloud but this is my hack:

Edit the file called blynk-node.js in /usr/local/lib//node_modules/blynk-library. There are 2 entries for blynk-cloud.com, change them to the ip of your local Blynk server.

If your script, in the blynk-library directory, is called test.js edit it to start with the following lines:

#!/usr/bin/env node
var Blynk = require('blynk-library');
var AUTH = 'PUT_YOUR_TOKEN_HERE';

var blynk = new Blynk.Blynk(AUTH, options = {
  connector : new Blynk.TcpClient()
});

Then run the script with:

node /usr/local/lib//node_modules/blynk-library/test.js

This will give you a TCP connection rather than a SSL connection but this should be fine for a local server.

That is apparent :stuck_out_tongue:

I am trying to set up simple control of the direct GPIO manipulation (to start) of a Raspberry Pi, via Blynk app, using widgets, referencing Digital pins. Then eventually working my way up to writing my own scripts and utilizing virtual pins and so on.

Basically the RPi equivalent of this (for use on an Arduino).

#include <SPI.h>
#include <Ethernet2.h>
#include <BlynkSimpleEthernet2.h>

char auth[] = "YourAuthToken";

void setup()
{
  Blynk.begin(auth, IPAddress(192,168,1,100), 8442);
}

void loop()
{
  Blynk.run();
}

@Costas

Thank you for that suggestion… It is a little beyond me right now… but once I get things working properly, via cloud server, I will try out your “hack” :smiley:

This is where your IP will go when you want to use your local server.

@Costas Thanks… I caught that after posting my reply :wink:

Right now, I am trying to determine how to do it from the terminal command line.

When I try to upgrade node, it claims I am already at the latest version…

pi@raspberrypi:~ $ sudo apt-get upgrade node
Reading package lists... Done
Building dependency tree
Reading state information... Done
Calculating upgrade... node is already the newest version.
Done

So I still cannot get a simple slider to control the single PMW pin on the RPi.

If I connect any widget display to a digital pin, it crashes the blynk-client upon play.

I still haven’t determined the correct way to connect blynk to my local server FROM the CLI (not trying through a script yet… trying to keep it simple to start). e.g. it once seem to be done like this: sudo ./blynk --server=192.168.1.101 --port=8555 --token=AuthToken but now I need to start with blynk-client and the rest gets ignored.

Is there a “Blynk Approved” version of node?

Is this an ONOFF issue?

Why does everything RPi related seem so complicated :stuck_out_tongue:

@vshymanskyy Ok, I know you are busy, but I am reaching out for assistance.

A) I have tried to follow the DOC on installing for RPi - It didn’t work (see above errors).

B) I have opened this post - but it has probably become clouded by some replies leading to obfuscation (sorry if my English is getting in the way :wink: )

C) I have tried different node installations; nodejs.org installed without causing NPM or ONOFF errors, but then Blynk wouldn’t acknowledge ONOFF

pi@raspberrypi:~ $ blynk-client xxxxxxAUTHxxxxxxx
Connecting to: blynk-cloud.com 8441
SSL authorization...
Connected
Authorized
Blynk ready.
No direct pin operations available.
Maybe you need to install mraa or onoff modules?

D) And finally… I have noticed that the new Blynk (for RPi) examples seem to utilize wiringPi but I am unable to make any sense out of the examples. How do I install libraries in RPi, or even run the examples, etc?

I have used nano to create a file, copy pasted from the examples, edited in my auth, server and port info. But I can’t seem to get the file to run?

I am way past having fun now :confounded: Please let me know if there is an easier way to use Blynk on a RPi (as a client). Thank you.

Well… that was a journey… I finally stumbled upon an older post that had the final key. Although I was concerned that is was old data that had been since replaced with new methods… may even still be that way??

But alas… https://github.com/blynkkk/blynk-library/blob/master/linux/README.md had the final pieces.

I added these lines (into terminal on my RPi) onto my past efforts:

git clone https://github.com/blynkkk/blynk-library.git
cd blynk-library/linux
make clean all target=raspberry

And now it even connects to my Local Server with the ‘proper’ command:
sudo ./blynk --server=10.10.3.204 --port=8442 --token=xxxxxxx

So I guess some of the DOCs aren’t completely wrong… just missing much info! :unamused: or may include unnecessary info… Is installing Node & ONOFF even required steps due too the inclusion of wiringPi?

Now to figure out how to create and edit sketches, properly, on the RPi…

Glad you got there in the end @Gunner

Not sure what OS you are using on your main computer but a decent cross platform editor is notepad++.

For Windows, many Pi users have WinSCP in addition to Putty FAQ (Frequently Asked Questions) :: WinSCP
WinSCP allows you to browse the directories on your Pi and double clicking the files will bring them up in notepad++ for editing.

You will need to make one minor mod to the Pi to grant root access via SSH over WinSCP.
sudo nano /etc/ssh/sshd_config

change this line
PermitRootLogin without-password
to
PermitRootLogin yes
restart ssh service with
/etc/init.d/ssh restart
set a root password on the Pi
sudo passwd root

Credit ssh - How to login as root remotely? - Raspberry Pi Stack Exchange

1 Like

it did? :astonished:

:blush:

glad you got it working and probably learned a fair bit too that’s going to benefit others following your path… :slight_smile:

That is like telling Captain Ahab that there are whales in the ocean :wink:

As far as I can tell there are TWO different clients for the Pi.

There is the wiringPi route and the node.js route.

The sudo ./blynk … you have is the wiringPi route and that is running a compiled cpp file.
If you look in the Blynk/linux directory you will see the blynk executable, Makefile and main.cpp etc.
The Makefile shows notes at the top that to compile a new blynk executable you type:

make target=raspberry

The build that you will have at the moment, made from main.cpp and other files, has just 4 “significant” lines in the main.cpp file:

BLYNK_WRITE(V1)
{
  printf("Got a value: %s\n", param[0].asStr());
}

So if you put a slider in your project tied to V1, and move the slider, console will show something like this:

Got a value: 74
Got a value: 29

Other than direct access to the Pi GPIO’s and a slider on V1 the compiled blynk will not do anything else.

So, this route 1, means you modify main.cpp to include what you need for your project and then re-build the executable and run it. This might be your preferred choice as you will see that the main.cpp has a familiar look and feel for Arduino / ESP users.

For some people rebuilding the executable over and over again might not be their preferred option.

This is where node.js comes in. You have a js file, make the changes and save it. No compiling / rebuilding etc. Perhaps I will say more about node.js another time.

Yes, I had finally figured that one out :stuck_out_tongue: However I just could not get the node.js option to work: Wrong version node errors with ONOFF: No errors, but no GPIO action: No simple way to connect to Local Server and manipulate pins, etc. That is where some new effort in documentation might help… but I understand that is is probably a very low priority due to minimal RPi client usage.

Besides, the wiringPi method installed in mere minutes… some of those node/npm/onoff routines took over 1/2 hour to process… a real pain in the :poop: when trying and retrying to get it to work :unamused:

Actually, I am now able to use the RPi just like an Arduino or other MCU that has the basic Blynk sketch and single blynk.run() command in the main loop: Full, direct, read/right pin control just by placing widgets in my app project… I am fading & toggling LEDs and switching pins HIGH and LOW with no issues. No, not particularly useful for real projects, but no different than any other MCU client without the extra coding.

That “familiar look” is my personal preference as I have enough bouncing around in my head as it is :confounded:

However, I have gotten the clear impression that it is not much different than say, creating a sketch and uploading it to MCU… just creating a sketch then compiling it into an executable, that then runs.

And you just make as many executables as you want and choose which one to run at any given time. Of course, as I haven’t gone much past the samples, time will confirm or deny that impression :wink:

Thus, my vote is the wiringPI method all the way! :smiley:

Thank you for taking the time to follow in this journey @Costas … Your comments are always helpful, thought provoking and appreciated!!

LED’s are not my thing but may I ask how you fade them without any coding in a bare Blynk “sketch”?

Heretic… we can’t talk anymore… :stuck_out_tongue:

Oh, all right ;)… Actually as there is only one PWM pin on the RPi I have (GP18). It is the only one I can directly fade an LED or move a servo with, using a slider widget.