Robotdyn atmega2560+esp8266 connection via wifi using blynk app

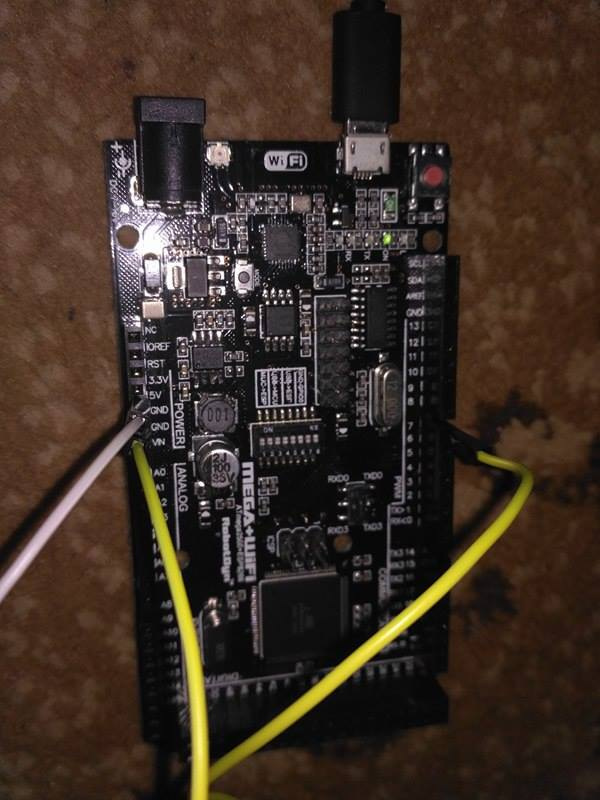
Hello dear, im using a very rare arduino board called Atmega2560+ESP8266 ,It’s a single board with built in espr8266 , i’m trying to connect it with blynk app via internet like when we do it for single ship ex. esp8266 ( i tried ESP_STANDALONE) example for my another ship (ESP8266) ,

LET BACK TO MY ATMega5260+ESP8266 i got a connection to blynk app it tell me that ur device is online ( selected ATmega2560 hardware to my project , but the problem that i cant see any output changes on the pins

#define BLYNK_PRINT Serial    // Comment this out to disable prints and save space
#include <ESP8266WiFi.h>
#include <BlynkSimpleEsp8266.h>

// You should get Auth Token in the Blynk App.
// Go to the Project Settings (nut icon).
char auth[] = "f798cd6dba894b96a5f55de9233f282c";

// Your WiFi credentials.
// Set password to "" for open networks.
char ssid[] = "Bezeq";
char pass[] = "18121993";

void setup()
{
  Serial.begin(9600);
  Blynk.begin(auth, ssid, pass);
}

void loop()
{
  Blynk.run();
}

this is uploded to the board when it’s selected to work as esp8266

/**************************************************************
 * Blynk is a platform with iOS and Android apps to control
 * Arduino, Raspberry Pi and the likes over the Internet.
 * You can easily build graphic interfaces for all your
 * projects by simply dragging and dropping widgets.
 *
 *   Downloads, docs, tutorials: http://www.blynk.cc
 *   Blynk community:            http://community.blynk.cc
 *   Social networks:            http://www.fb.com/blynkapp
 *                               http://twitter.com/blynk_app
 *
 * Blynk library is licensed under MIT license
 * This example code is in public domain.
 *
 **************************************************************
 * This example shows how to use Arduino WiFi shield
 * to connect your project to Blynk.
 *
 * Please update your shield firmware:
 *   https://www.arduino.cc/en/Hacking/WiFiShieldFirmwareUpgrading
 *
 * Feel free to apply it to any other example. It's simple!
 *
 **************************************************************/
bool D7;
#define R1 D7
#define BLYNK_PRINT Serial    // Comment this out to disable prints and save space
#include <SPI.h>
#include <WiFi.h>
#include <BlynkSimpleWifi.h>


bool r1;
// You should get Auth Token in the Blynk App.
// Go to the Project Settings (nut icon).
char auth[] = "f798cd6dba894b96a5f55de9233f282c";

// Your WiFi credentials.
// Set password to "" for open networks.
char ssid[] = "Bezeq";
char pass[] = "18121993";

void setup()
{
  Serial.begin(9600);
  Blynk.begin(auth, ssid, pass);
  pinMode (R1,OUTPUT );
  // Or specify server using one of those commands:
  //Blynk.begin(auth, ssid, pass, "blynk-cloud.com", 8442);
  //Blynk.begin(auth, ssid, pass, server_ip, port);
}
BLYNK_WRITE (V0)
{
  r1 = param.asInt();
  digitalWrite(R1,r1);
}

void loop()
{
  Blynk.run();
}

and this when selected as atmega , u have to know that the hardware is selected to be ATmega8266
and it gave me online , but i tried to control relay or even led i didn’t see any changes

thanks for ur correction
bare in mind that the board have a dip switch which change the mode of it’s operation (USB>ESP)(USB>MCU) (MUC>ESP)

Please post your code and serial monitor output. Thanks

 * This example shows how to use Arduino WiFi shield
 * to connect your project to Blynk.
 *
 * Please update your shield firmware:
 *   https://www.arduino.cc/en/Hacking/WiFiShieldFirmwareUpgrading
 *
 * Feel free to apply it to any other example. It's simple!
 *
 **************************************************************/
bool D7;
#define R1 D7
#define BLYNK_PRINT Serial    // Comment this out to disable prints and save space
#include <SPI.h>
#include <WiFi.h>
#include <BlynkSimpleWifi.h>


bool r1;
// You should get Auth Token in the Blynk App.
// Go to the Project Settings (nut icon).
char auth[] = "f798cd6dba894b96a5f55de9233f282c";

// Your WiFi credentials.
// Set password to "" for open networks.
char ssid[] = "Bezeq";
char pass[] = "18121993";

void setup()
{
  Serial.begin(9600);
  Blynk.begin(auth, ssid, pass);
  pinMode (R1,OUTPUT );
  // Or specify server using one of those commands:
  //Blynk.begin(auth, ssid, pass, "blynk-cloud.com", 8442);
  //Blynk.begin(auth, ssid, pass, server_ip, port);
}
BLYNK_WRITE (V0)
{
  r1 = param.asInt();
  digitalWrite(R1,r1);
}

void loop()
{
  Blynk.run();
}

thus for when acting ATmega2560

Please format your code correctly before anymore support can be provided.

```cpp
CODE
```

1 Like
#define BLYNK_PRINT Serial    // Comment this out to disable prints and save space
#include <ESP8266WiFi.h>
#include <BlynkSimpleEsp8266.h>

// You should get Auth Token in the Blynk App.
// Go to the Project Settings (nut icon).
char auth[] = "f798cd6dba894b96a5f55de9233f282c";

// Your WiFi credentials.
// Set password to "" for open networks.
char ssid[] = "Bezeq";
char pass[] = "18121993";

void setup()
{
  Serial.begin(9600);
  Blynk.begin(auth, ssid, pass);
}

void loop()
{
  Blynk.run();
}

this is uploded to the board when it’s selected to work as esp8266


/**************************************************************
 * Blynk is a platform with iOS and Android apps to control
 * Arduino, Raspberry Pi and the likes over the Internet.
 * You can easily build graphic interfaces for all your
 * projects by simply dragging and dropping widgets.
 *
 *   Downloads, docs, tutorials: http://www.blynk.cc
 *   Blynk community:            http://community.blynk.cc
 *   Social networks:            http://www.fb.com/blynkapp
 *                               http://twitter.com/blynk_app
 *
 * Blynk library is licensed under MIT license
 * This example code is in public domain.
 *
 **************************************************************
 * This example shows how to use Arduino WiFi shield
 * to connect your project to Blynk.
 *
 * Please update your shield firmware:
 *   https://www.arduino.cc/en/Hacking/WiFiShieldFirmwareUpgrading
 *
 * Feel free to apply it to any other example. It's simple!
 *
 **************************************************************/
bool D7;
#define R1 D7
#define BLYNK_PRINT Serial    // Comment this out to disable prints and save space
#include <SPI.h>
#include <WiFi.h>
#include <BlynkSimpleWifi.h>


bool r1;
// You should get Auth Token in the Blynk App.
// Go to the Project Settings (nut icon).
char auth[] = "f798cd6dba894b96a5f55de9233f282c";

// Your WiFi credentials.
// Set password to "" for open networks.
char ssid[] = "Bezeq";
char pass[] = "18121993";

void setup()
{
  Serial.begin(9600);
  Blynk.begin(auth, ssid, pass);
  pinMode (R1,OUTPUT );
  // Or specify server using one of those commands:
  //Blynk.begin(auth, ssid, pass, "blynk-cloud.com", 8442);
  //Blynk.begin(auth, ssid, pass, server_ip, port);
}
BLYNK_WRITE (V0)
{
  r1 = param.asInt();
  digitalWrite(R1,r1);
}

void loop()
{
  Blynk.run();
}

and this when selected as atmega , u have to know that the hardware is selected to be ATmega8266
and it gave me online , but i tried to control relay or even led i didn’t see any changes

thanks for ur correction
bare in mind that the board have a dip switch which change the mode of it’s operation (USB>ESP)(USB>MCU) (MUC>ESP)

i have already operated the board with Aurduino_wifi example, and then it gave me that it’s online , i just now i need a code or a modification to my code to see the change in o/p pins

Code snippets should be formatted. Please edit your initial post:

How to do that:


 ``` cpp <--put 3 backticks BEFORE your code starts  ("cpp" means C++ language) 

   //Put your code here
   //..................
   //..................

 ``` <--insert 3 backticks AFTER your code

**This makes your code readable and with highlighted syntax, like this

↓↓↓↓↓↓↓↓↓↓↓↓↓↓↓↓↓↓↓↓↓↓↓↓↓↓↓↓↓↓↓↓↓↓↓↓↓↓↓↓↓↓↓↓↓↓↓↓↓↓↓↓↓↓↓↓↓↓↓↓↓↓↓

//comment goes here 
void helloWorld() { 
   String message =  "hello" + "world"; 
}

also post your serial monitor output

thank u dear