Forget the Robot IR issue and an editing the libraries, it doesn’t relate to your hardware.
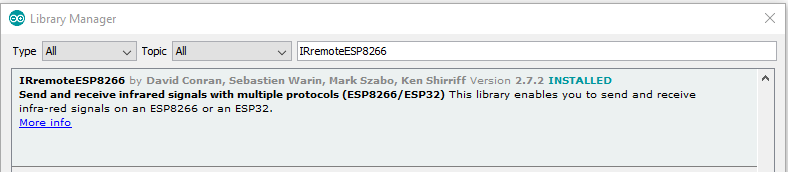
So you are using version 2.7.2 of someone’s IRremoteESP8266 library, which you may or may not have installed from a .zip file?
That version of the library may not be from the same author as the one that the code was written for. So the question remains unanswered, was the library installed via the IDE’s library manager?
You find your IDE core version from Boards, Board Manager and scroll down to the bottom of the list and look for ESP by ESP Community and check which version you have.
Yes, I may have installed IRremoteESP8266 library directly.
I did not document my steps.
ESP8266 by ESP8266 Community version 2.6.3 (says it’s the latest).
Here is my Blynk RC Demo sketch that runs on the UNO. Works perfectly, no disconnects from the Blynk Server. Try to compile it for an 8266 on your IDE.
The Ellis “All your Remotes to your Smartphone” is already supposed to compile for an 8266 module if there are no library problems.
Back at you in about 12 hours.
Cheers,
Mike
/*************************************************************
  Download latest Blynk library here:
    https://github.com/blynkkk/blynk-library/releases/latest

  Blynk is a platform with iOS and Android apps to control
  Arduino, Raspberry Pi and the likes over the Internet.
  You can easily build graphic interfaces for all your
  projects by simply dragging and dropping widgets.

    Downloads, docs, tutorials: http://www.blynk.cc
    Sketch generator:           http://examples.blynk.cc
    Blynk community:            http://community.blynk.cc
    Follow us:                  http://www.fb.com/blynkapp
                                http://twitter.com/blynk_app

  Blynk library is licensed under MIT license
  This example code is in public domain.

 *************************************************************
  WARNING!
    It's very tricky to get it working. Please read this article:
    http://help.blynk.cc/hardware-and-libraries/arduino/esp8266-with-at-firmware

  This example shows how value can be pushed from Arduino to
  the Blynk App.

  NOTE:
  BlynkTimer provides SimpleTimer functionality:
    http://playground.arduino.cc/Code/SimpleTimer

 *************************************************************/

/* Comment this out to disable prints and save space */
#define BLYNK_PRINT Serial
/* Turn on verbose messaging */
#define BLYNK_DEBUG // Debug - enable verbose mode
#define BLYNK_HEARTBEAT 30
#define BLYNK_NO_FLOAT // Disable floating point operations

#include <ESP8266_Lib.h>
#include <BlynkSimpleShieldEsp8266.h>
#include <IRremote.h>

// You should get Auth Token in the Blynk App.
// Go to the Project Settings (nut icon).
char auth[] = "MyAuthToken";

// WiFi credentials:
char ssid[] = "mySSID";
char pass[] = "myPassword";

// Hardware Serial on Mega, Leonardo, Micro...
//#define EspSerial Serial1
// or Software Serial on Uno, Nano...
#include <SoftwareSerial.h>
SoftwareSerial EspSerial(10, 11); // WiFi RX, TX

// Your ESP8266 baud rate:
#define ESP8266_BAUD 9600

ESP8266 wifi(&EspSerial);
BlynkTimer timer;

int RECV_PIN = 2; // IR receiver
IRrecv irrecv(RECV_PIN);
int XMIT_PIN = 3; // IR transmitter
IRsend irsend;
#define LEDpin 13

// This function sends Arduino's up-time every X seconds to
// Virtual Pin (21). In the app, the Widget's reading frequency
// should be set to PUSH. This means that you define how often
// to send data to Blynk App.
void myTimerEvent()
{
  // You can send any value at any time.
  // Don't send more that 10 values per second.
  // Blynk.virtualWrite(V21, millis() / 1000);
}

// These functions will be called every time Button Widgets
// in Blynk app write values to their Virtual Pin.
BLYNK_WRITE(V1)
{
  SendNECirCode(0xFFA25D); // "1"
  //Serial.println("1V1");
}
BLYNK_WRITE(V2)
{
  SendNECirCode(0xFF629D); // "2"
  //Serial.println("2V2");
}
BLYNK_WRITE(V3)
{
  SendNECirCode(0xFFE21D); // "3"
  //Serial.println("3V3");
}
BLYNK_WRITE(V4)
{
  SendNECirCode(0xFF22DD); // "4"
  //Serial.println("4V4");
}

BLYNK_WRITE(V5)
{
  SendNECirCode(0xFF02FD); // "5"
  //Serial.println("5V5");
}

BLYNK_WRITE(V6)
{
  SendNECirCode(0xFFC23D); // "6"
  //Serial.println("6V6");
}
BLYNK_WRITE(V7)
{
  SendNECirCode(0xFFE01F); // "7"
  //Serial.println("7V7");
}
BLYNK_WRITE(V8)
{
  SendNECirCode(0xFFA857); // "8"
  //Serial.println("8V8");
}
BLYNK_WRITE(V9)
{
  SendNECirCode(0xFF906F); // "9"
  //Serial.println("9V9");
}
BLYNK_WRITE(V10)
{
  SendNECirCode(0xFF9867); // "0"
  //Serial.println("0V10");
}
BLYNK_WRITE(V11)
{
  if ( param.asInt() != 0 ) { // debounce
    SendNECirCode(0xFF18E7);// "UP"
  }
}
BLYNK_WRITE(V12)
{
  if ( param.asInt() != 0 ) { // debounce
    SendNECirCode(0xFF6897); // "ASTERICK"
  }
}
BLYNK_WRITE(V13)
{
  if ( param.asInt() != 0 ) { // debounce
    SendNECirCode(0xFF10EF); // "LEFT"
  }
}
BLYNK_WRITE(V14)
{
  if ( param.asInt() != 0 ) { // debounce
    SendNECirCode(0xFF38C7); // "OK"
  }
}
BLYNK_WRITE(V15)
{
  if ( param.asInt() != 0 ) { // debounce
    SendNECirCode(0xFF5AA5); // "RIGHT"
  }
}
BLYNK_WRITE(V16)
{
  if ( param.asInt() != 0 ) { // debounce
    SendNECirCode(0xFFB04F); // "#"
  }
}
BLYNK_WRITE(V17)
{
  if ( param.asInt() != 0 ) { // debounce
    SendNECirCode(0xFF4AB5); // "DOWN"
  }
}

void SendNECirCode(long hexcode)
{
  irsend.sendNEC(hexcode, 32); // or
  //irsend.send(NEC, hexcode, 32);
  //digitalWrite(LEDpin, HIGH); // trigger D13
  //delay(50); // wait a bit
  //digitalWrite(LEDpin, LOW); // reset
  //irrecv.resume(); // Restart IR receiver if used
}

void setup()
{
  // Set debug console
  Serial.begin(9600);
  Serial.println(F("Push Data Demo 1/17/2020"));

  // Set ESP8266 baud rate
  EspSerial.begin(ESP8266_BAUD);
  delay(50);

  Blynk.begin(auth, wifi, ssid, pass);
  // You can also specify server:
  //Blynk.begin(auth, wifi, ssid, pass, "blynk-cloud.com", 80);
  //Blynk.begin(auth, wifi, ssid, pass, IPAddress(192,168,1,100), 8080);

  // Setup a function to be called every one second
  //timer.setInterval(1000L, myTimerEvent);
}

void loop()
{
  Blynk.run();   // Fireup the engines ...
  //timer.run(); // Initiate BlynkTimer (not used)
}
Here is the same code modified for the ESP8266 platform with the 8266 libraries:
/*************************************************************
  Download latest Blynk library here:
    https://github.com/blynkkk/blynk-library/releases/latest

  Blynk is a platform with iOS and Android apps to control
  Arduino, Raspberry Pi and the likes over the Internet.
  You can easily build graphic interfaces for all your
  projects by simply dragging and dropping widgets.

    Downloads, docs, tutorials: http://www.blynk.cc
    Sketch generator:           http://examples.blynk.cc
    Blynk community:            http://community.blynk.cc
    Follow us:                  http://www.fb.com/blynkapp
                                http://twitter.com/blynk_app

  Blynk library is licensed under MIT license
  This example code is in public domain.

 *************************************************************
  WARNING!
    It's very tricky to get it working. Please read this article:
    http://help.blynk.cc/hardware-and-libraries/arduino/esp8266-with-at-firmware

  This example shows how value can be pushed from Arduino to
  the Blynk App.

  NOTE:
  BlynkTimer provides SimpleTimer functionality:
    http://playground.arduino.cc/Code/SimpleTimer

 *************************************************************/

/* Comment this out to disable prints and save space */
#define BLYNK_PRINT Serial
/* Turn on verbose messaging */
#define BLYNK_DEBUG // Debug - enable verbose mode
#define BLYNK_HEARTBEAT 30
#define BLYNK_NO_FLOAT // Disable floating point operations

// Sketch definitions to run in Arduino:
//#include <ESP8266_Lib.h>
//#include <BlynkSimpleShieldEsp8266.h>
//#include <IRremote.h>
//---------------------------//

// Sketch definitions to run in ESP8266:
#include <ESP8266WiFi.h>
#include <BlynkSimpleEsp8266.h>
#include <IRremoteESP8266.h>
//---------------------------//

// You should get Auth Token in the Blynk App.
// Go to the Project Settings (nut icon).
char auth[] = "MyAuthString"; // 1/11/2020

// WiFi credentials:
char ssid[] = "mySSID";
char pass[] = "myPassword";

BlynkTimer timer;
IRsend irsend(0); ///an IR led is connected to GPIO 0 --> D4

// Hardware Serial on Mega, Leonardo, Micro...
//#define EspSerial Serial1
// or Software Serial on Uno, Nano...
//#include <SoftwareSerial.h>
//SoftwareSerial EspSerial(10, 11); // WiFi RX, TX

// Your ESP8266 baud rate:
// #define ESP8266_BAUD 9600

//ESP8266 wifi(&EspSerial);
//BlynkTimer timer;

//int RECV_PIN = 2; // Uno IR receiver
//IRrecv irrecv(RECV_PIN);
//int XMIT_PIN = 3; // Uno IR transmitter
//#define LEDpin 13

// This function sends Arduino's up-time every X seconds to
// Virtual Pin (21). In the app, the Widget's reading frequency
// should be set to PUSH. This means that you define how often
// to send data to Blynk App.
void myTimerEvent()
{
  // You can send any value at any time.
  // Don't send more that 10 values per second.
  Blynk.virtualWrite(V21, millis() / 1000);
}

// These functions will be called every time Button Widgets
// in Blynk app write values to their Virtual Pin.
BLYNK_WRITE(V1)
{
  SendNECirCode(0xFFA25D); // "1"
  //Serial.println("1V1");
}
BLYNK_WRITE(V2)
{
  SendNECirCode(0xFF629D); // "2"
  //Serial.println("2V2");
}
BLYNK_WRITE(V3)
{
  SendNECirCode(0xFFE21D); // "3"
  //Serial.println("3V3");
}
BLYNK_WRITE(V4)
{
  SendNECirCode(0xFF22DD); // "4"
  //Serial.println("4V4");
}

BLYNK_WRITE(V5)
{
  SendNECirCode(0xFF02FD); // "5"
  //Serial.println("5V5");
}

BLYNK_WRITE(V6)
{
  SendNECirCode(0xFFC23D); // "6"
  //Serial.println("6V6");
}
BLYNK_WRITE(V7)
{
  SendNECirCode(0xFFE01F); // "7"
  //Serial.println("7V7");
}
BLYNK_WRITE(V8)
{
  SendNECirCode(0xFFA857); // "8"
  //Serial.println("8V8");
}
BLYNK_WRITE(V9)
{
  SendNECirCode(0xFF906F); // "9"
  //Serial.println("9V9");
}
BLYNK_WRITE(V10)
{
  SendNECirCode(0xFF9867); // "0"
  //Serial.println("0V10");
}
BLYNK_WRITE(V11)
{
  if ( param.asInt() != 0 ) { // debounce
    SendNECirCode(0xFF18E7);// "UP"
  }
}
BLYNK_WRITE(V12)
{
  if ( param.asInt() != 0 ) { // debounce
    SendNECirCode(0xFF6897); // "ASTERICK"
  }
}
BLYNK_WRITE(V13)
{
  if ( param.asInt() != 0 ) { // debounce
    SendNECirCode(0xFF10EF); // "LEFT"
  }
}
BLYNK_WRITE(V14)
{
  if ( param.asInt() != 0 ) { // debounce
    SendNECirCode(0xFF38C7); // "OK"
  }
}
BLYNK_WRITE(V15)
{
  if ( param.asInt() != 0 ) { // debounce
    SendNECirCode(0xFF5AA5); // "RIGHT"
  }
}
BLYNK_WRITE(V16)
{
  if ( param.asInt() != 0 ) { // debounce
    SendNECirCode(0xFFB04F); // "#"
  }
}
BLYNK_WRITE(V17)
{
  if ( param.asInt() != 0 ) { // debounce
    SendNECirCode(0xFF4AB5); // "DOWN"
  }
}

void SendNECirCode(long hexcode)
{
  irsend.sendNEC(hexcode, 32); // or
  //irsend.send(NEC, hexcode, 32);
  //digitalWrite(LEDpin, HIGH); // trigger D13
  //delay(50); // wait a bit
  //digitalWrite(LEDpin, LOW); // reset
  //irrecv.resume(); // Restart IR receiver if used
}

void setup()
{
  // Set debug console
  Serial.begin(9600);
  Serial.println(F("Push Data Demo NodeMCU 1/19/2020"));

  //Blynk.begin(auth, wifi, ssid, pass); // for Uno
  Blynk.begin(auth, ssid, pass);
  // You can also specify server:
  //Blynk.begin(auth, wifi, ssid, pass, "blynk-cloud.com", 80);
  //Blynk.begin(auth, wifi, ssid, pass, IPAddress(192,168,1,100), 8080);

  // Setup a function to be called every one second
  timer.setInterval(1000L, myTimerEvent);
}

void loop()
{
  Blynk.run();   // Fireup the engines ...
  timer.run(); // Initiates BlynkTimer
}
The compilation error output is: Multiple libraries were found for "ESP8266WiFi.h"
** Used: C:\Users\mstod\AppData\Local\Arduino15\packages\esp8266\hardware\esp8266\2.6.3\libraries\ESP8266WiFi** Multiple libraries were found for "BlynkSimpleEsp8266.h"
** Used: C:\Users\mstod\Documents\Arduino\libraries\Blynk** Multiple libraries were found for "IRremoteESP8266.h"
** Used: C:\Users\mstod\Documents\Arduino\libraries\IRremoteESP8266** exit status 1 Error compiling for board WeMos D1 R1. ------------------------------------ Thanks for looking, Mike
Okay, I’m back in our hotel room and I’ve fired-up my laptop and compiled your code.
I get the same error message.
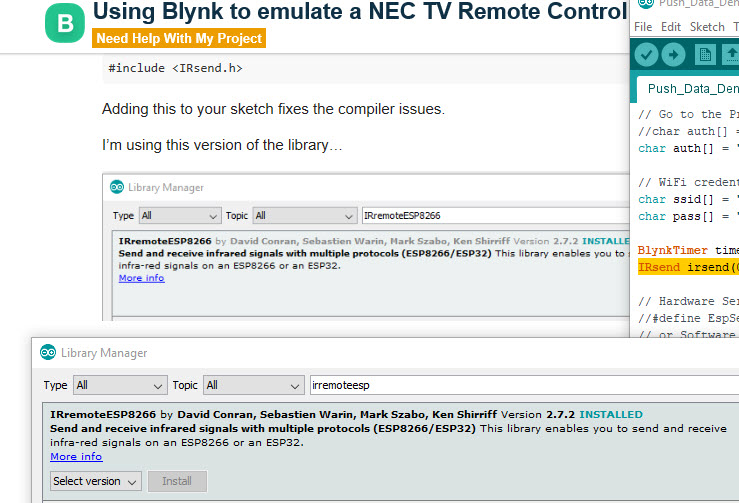
Looking at the IRremoteESP8266 examples its clear that the IRSend demo sketch has this extra include:
#include <IRsend.h>
Adding this to your sketch fixes the compiler issues.
We’re closer. I don’t get any “IRsend does not name a type” error on the “IRsend irsend(0); ///an IR led is connected to GPIO 0 --> D4” statement when IRsend.h is added, but still can’t get a clean compile when compiling for any 8266 platform. I did verify we are using the same version of IRremote8266.lib version 2.7.2:
This is the compilation error; one of my libraries is trying to redefine class IRsend:
Arduino: 1.8.10 (Windows 10), Board: "WeMos D1 R1, 80 MHz, Flash, Legacy (new can return nullptr), All SSL ciphers (most compatible), 4MB (FS:2MB OTA:~1019KB), v2 Lower Memory, Disabled, None, Only Sketch, 921600"
In file included from C:\Users\mstod\Documents\Arduino\Push_Data_Demo_NodeMCU\Push_Data_Demo_NodeMCU.ino:51:0:
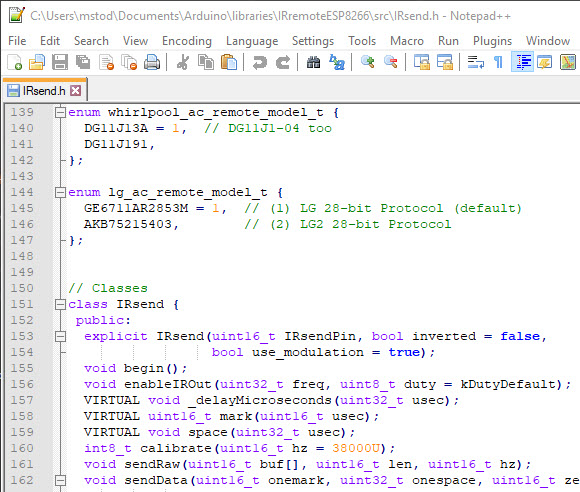
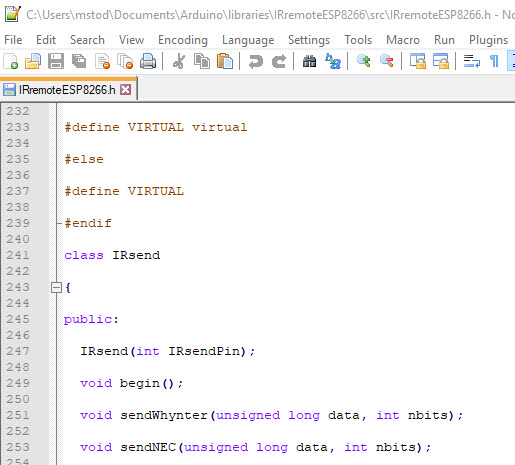
C:\Users\mstod\Documents\Arduino\libraries\IRremoteESP8266\src/IRsend.h:151:7: error: redefinition of 'class IRsend'
class IRsend {
^
In file included from C:\Users\mstod\Documents\Arduino\Push_Data_Demo_NodeMCU\Push_Data_Demo_NodeMCU.ino:50:0:
C:\Users\mstod\Documents\Arduino\libraries\IRremoteESP8266\src/IRremoteESP8266.h:241:7: error: previous definition of 'class IRsend'
class IRsend
^
Multiple libraries were found for "ESP8266WiFi.h"
Used: C:\Users\mstod\AppData\Local\Arduino15\packages\esp8266\hardware\esp8266\2.6.3\libraries\ESP8266WiFi
Multiple libraries were found for "BlynkSimpleEsp8266.h"
Used: C:\Users\mstod\Documents\Arduino\libraries\Blynk
Multiple libraries were found for "IRremoteESP8266.h"
Used: C:\Users\mstod\Documents\Arduino\libraries\IRremoteESP8266
exit status 1
Error compiling for board WeMos D1 R1.
I put it at the end of the #include <filename.h> list after the other #include files.
I moved it to the head of my list on 3 separate sketches; same error, redifinition of IRsend.
I have a travel Notebook that I’ve never done any Arduino development on. I’m going to move my sketches over to it and see what happens. There has never been any manually installed headers or libraries on it. I’ll be back when I’m done testing.
Update: I note that IRremote8266.h and IRsend.h both have a class definition for the IRsend() function on my system; that’s where the re-definition occurs:
Okay, I might get more time to look at it tonight (in around 10 hours).
The laptop I have with me at the moment has an old version of the IDE and ESP Core, and as I have limited internet access I didn’t upgrade them, but the code did compile okay after I added the extra include.
You might find that turning on verbose compiler messages may give more info, but the clean install sounds good.
Running on the Notebook: Progress !!
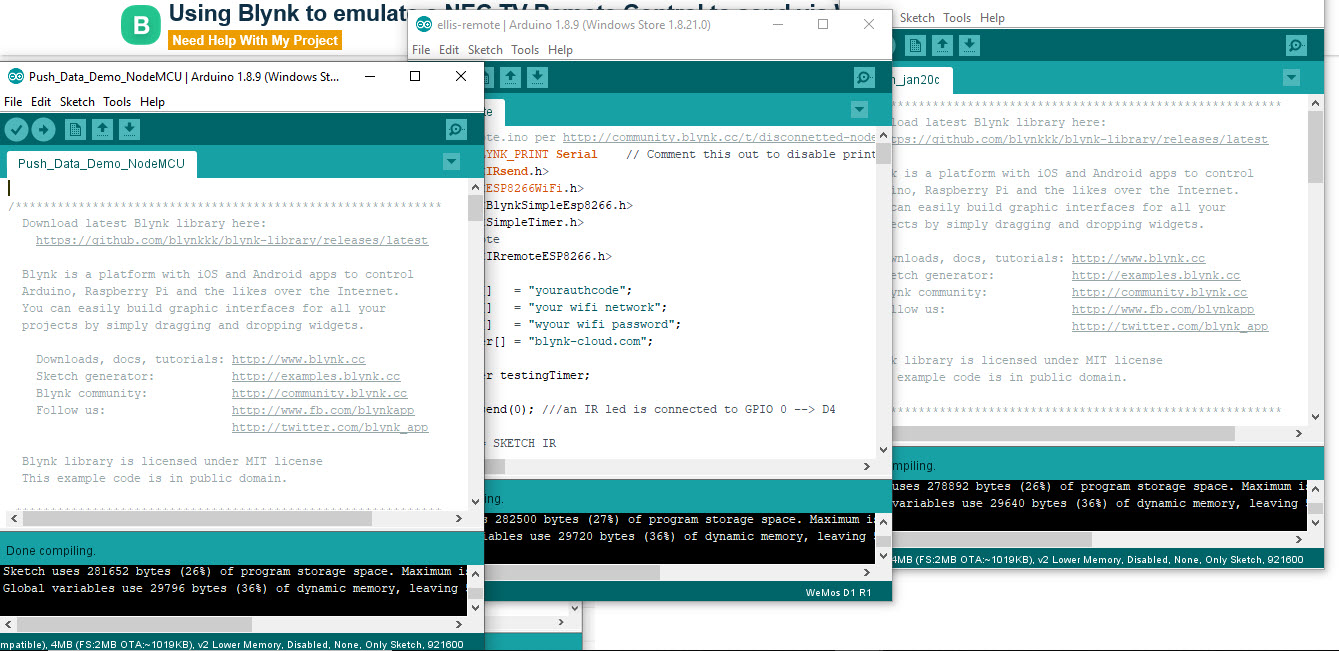
Using IDE 1.8.9 already loaded here. Compiled Ellis sketch first (the hardest); I had to add the #include <IRsend.h> line like you did. Also had to comment out the two lines using the SendRaw function not defined in my libraries. Then I got a clean compile for the Wemos D1 ESP8266; see picture below. No errors posted after “Done Compiling”. Compiled a Blynk Push Data sketch, and finally my NEC TV code. Success with all three, no errors.
Update: I moved the 4 header/lib zips over to my laptop; everything compiled there as well. I tested uiploading to an Adafruit Huzzah, NodeMCU, and a Wemos D1; OK - no errors. I cannot upload to a Wemos D1 Mini yet; I get timeout & disconnect errors. That is the ESP module I wanted to do my testing on. Still investigating. There is a tiny reset button on the side that flashes the blue LED and that’s all. Maybe it needs jumpers like the ESP-01?
Good, glad to see you’ve made progress. I didn’t get chance to update my laptop’s version of the IDE last night as the internet was too slow.
Uploading to the Wemos D1 Mini should br very straightforward, just like the NodeMCU. No jumpers required.
What board are you choosing when you compile the code for the D1 Mini? I think the latest Core calls it a LOLIN Wemos D1/R1 or something similar, but in reality compiling for the NodeMCU should work too with the D1 Mini.
You could try lowering the upload speed, or pressing and holding the little reset button as you apply the power.
I’m using the Lolin (Wemos) board definition.I tried the reset button before power applied; no luck. Dropped the baud rate from 921,600 to 115,200 to 57,600; no luck Disconnected the ESP Rx/Tx plug-wires going into a serial monitor to use for debugging; success! Changed the baud rate back to the original 921,600; again success! Looks like the upload worked fine. Below are the compilation/upload results. Scroll down to the upload and the hard reset. Now to start the code testing /debugging process to see what it does inside the Wemos D1 instead of the UNO.
Compilation messages (truncated):
prefs=runtime.tools.mkspiffs.path=C:\Users\mstod\AppData\Local\Arduino15\packages\esp8266\tools\mkspiffs\2.5.0-4-b40a506 -prefs=runtime.tools.mkspiffs-2.5.0-4-b40a506.path=C:\Users\mstod\AppData\Local\Arduino15\packages\esp8266\tools\mkspiffs\2.5.0-4-b40a506 -verbose

"C:\\Users\\mstod\\AppData\\Local\\Arduino15\\packages\\esp8266\\tools\\python3\\3.7.2-post1/python3" "C:\\Users\\mstod\\AppData\\Local\\Arduino15\\packages\\esp8266\\hardware\\esp8266\\2.6.3/tools/sizes.py" --elf "C:\\Users\\mstod\\AppData\\Local\\Temp\\arduino_build_407558/Push_Data_Demo_NodeMCU.ino.elf" --path "C:\\Users\\mstod\\AppData\\Local\\Arduino15\\packages\\esp8266\\tools\\xtensa-lx106-elf-gcc\\2.5.0-4-b40a506/bin"
Executable segment sizes:

IROM   : 250004          - code in flash         (default or ICACHE_FLASH_ATTR)

IRAM   : 27988   / 32768 - code in IRAM          (ICACHE_RAM_ATTR, ISRs...)

DATA   : 1316  )         - initialized variables (global, static) in RAM/HEAP

RODATA : 2344  ) / 81920 - constants             (global, static) in RAM/HEAP

BSS    : 26136 )         - zeroed variables      (global, static) in RAM/HEAP

Multiple libraries were found for "IRsend.h"
 Used: C:\Users\mstod\Documents\Arduino\libraries\IRremoteESP8266-master
Multiple libraries were found for "ESP8266WiFi.h"
 Used: C:\Users\mstod\AppData\Local\Arduino15\packages\esp8266\hardware\esp8266\2.6.3\libraries\ESP8266WiFi
Multiple libraries were found for "BlynkSimpleEsp8266.h"
 Used: C:\Users\mstod\Documents\Arduino\libraries\blynk-library-0.6.1
Using library IRremoteESP8266-master at version 2.7.2 in folder: C:\Users\mstod\Documents\Arduino\libraries\IRremoteESP8266-master
Using library ESP8266WiFi at version 1.0 in folder: C:\Users\mstod\AppData\Local\Arduino15\packages\esp8266\hardware\esp8266\2.6.3\libraries\ESP8266WiFi
Using library blynk-library-0.6.1 at version 0.6.1 in folder: C:\Users\mstod\Documents\Arduino\libraries\blynk-library-0.6.1
"C:\\Users\\mstod\\AppData\\Local\\Arduino15\\packages\\esp8266\\tools\\xtensa-lx106-elf-gcc\\2.5.0-4-b40a506/bin/xtensa-lx106-elf-size" -A "C:\\Users\\mstod\\AppData\\Local\\Temp\\arduino_build_407558/Push_Data_Demo_NodeMCU.ino.elf"

Sketch uses 281652 bytes (26%) of program storage space. Maximum is 1044464 bytes.
Global variables use 29796 bytes (36%) of dynamic memory, leaving 52124 bytes for local variables. Maximum is 81920 bytes.
esptool.py v2.8
Serial port COM4
Connecting....
Chip is ESP8266EX
Features: WiFi
Crystal is 26MHz
MAC: b4:e6:2d:67:b3:f9
Uploading stub...
Running stub...
Stub running...
Configuring flash size...
Auto-detected Flash size: 4MB
Compressed 285808 bytes to 207264...

Writing at 0x00000000... (7 %)
Writing at 0x00004000... (15 %)
Writing at 0x00008000... (23 %)
Writing at 0x0000c000... (30 %)
Writing at 0x00010000... (38 %)
Writing at 0x00014000... (46 %)
Writing at 0x00018000... (53 %)
Writing at 0x0001c000... (61 %)
Writing at 0x00020000... (69 %)
Writing at 0x00024000... (76 %)
Writing at 0x00028000... (84 %)
Writing at 0x0002c000... (92 %)
Writing at 0x00030000... (100 %)
Wrote 285808 bytes (207264 compressed) at 0x00000000 in 36.3 seconds (effective 63.0 kbit/s)...
Hash of data verified.
Leaving...
Hard resetting via RTS pin...
I’m a bit confused about your hardware setup. You just need a single micro USB cable connected from your PC to the Wemos D1 Mini to provide power, upload and serial debugging all in one. No external FTDI adapter is needed, as it’s all onboard. Same applies to the NodeMCU.
Yes, I have a USB cable to provide power and upload. I have a separate serial monitor laying around now (my Notebook), so I don’t have to keep flipping from IDE to serial monitor on my laptop. I use PuTTY as my serial monitor on the laptop; works with all the ESP modules I tested.
Recap: All three test sketches compiled without errors after the “#include <irsend.h>” was added and the irsend.sendRaw lines in the Ellis-remote sketch were commented out.
I uploaded my compiled Push Data sketch to the Wemos D1 Mini, absolutely nothing happened when I pushed the keys on my Blynk virtual remote control. But I could see on the serial monitor the Wifi module was receiving my key presses correctly.
Instead of writing a “Hello World” sketch to test LED triggering, I wrote Hello World 123" to send 3 NEC key clicks over and over. Nothing again, so I started changing the irsend.sendNEC code to 4 until I got a LED trigger on the Wemos Mini pin D2. See sketch listing below.
Finally, I uploaded my Push Data sketch after changing the pin code, and hit the keys on my Blynk remote control. Success! All virtual RC keys worked. I could see the key clicks on the serial monitor from the WiFi module, and the resultant action on my NEC TV IR Receiver simulator to match them.
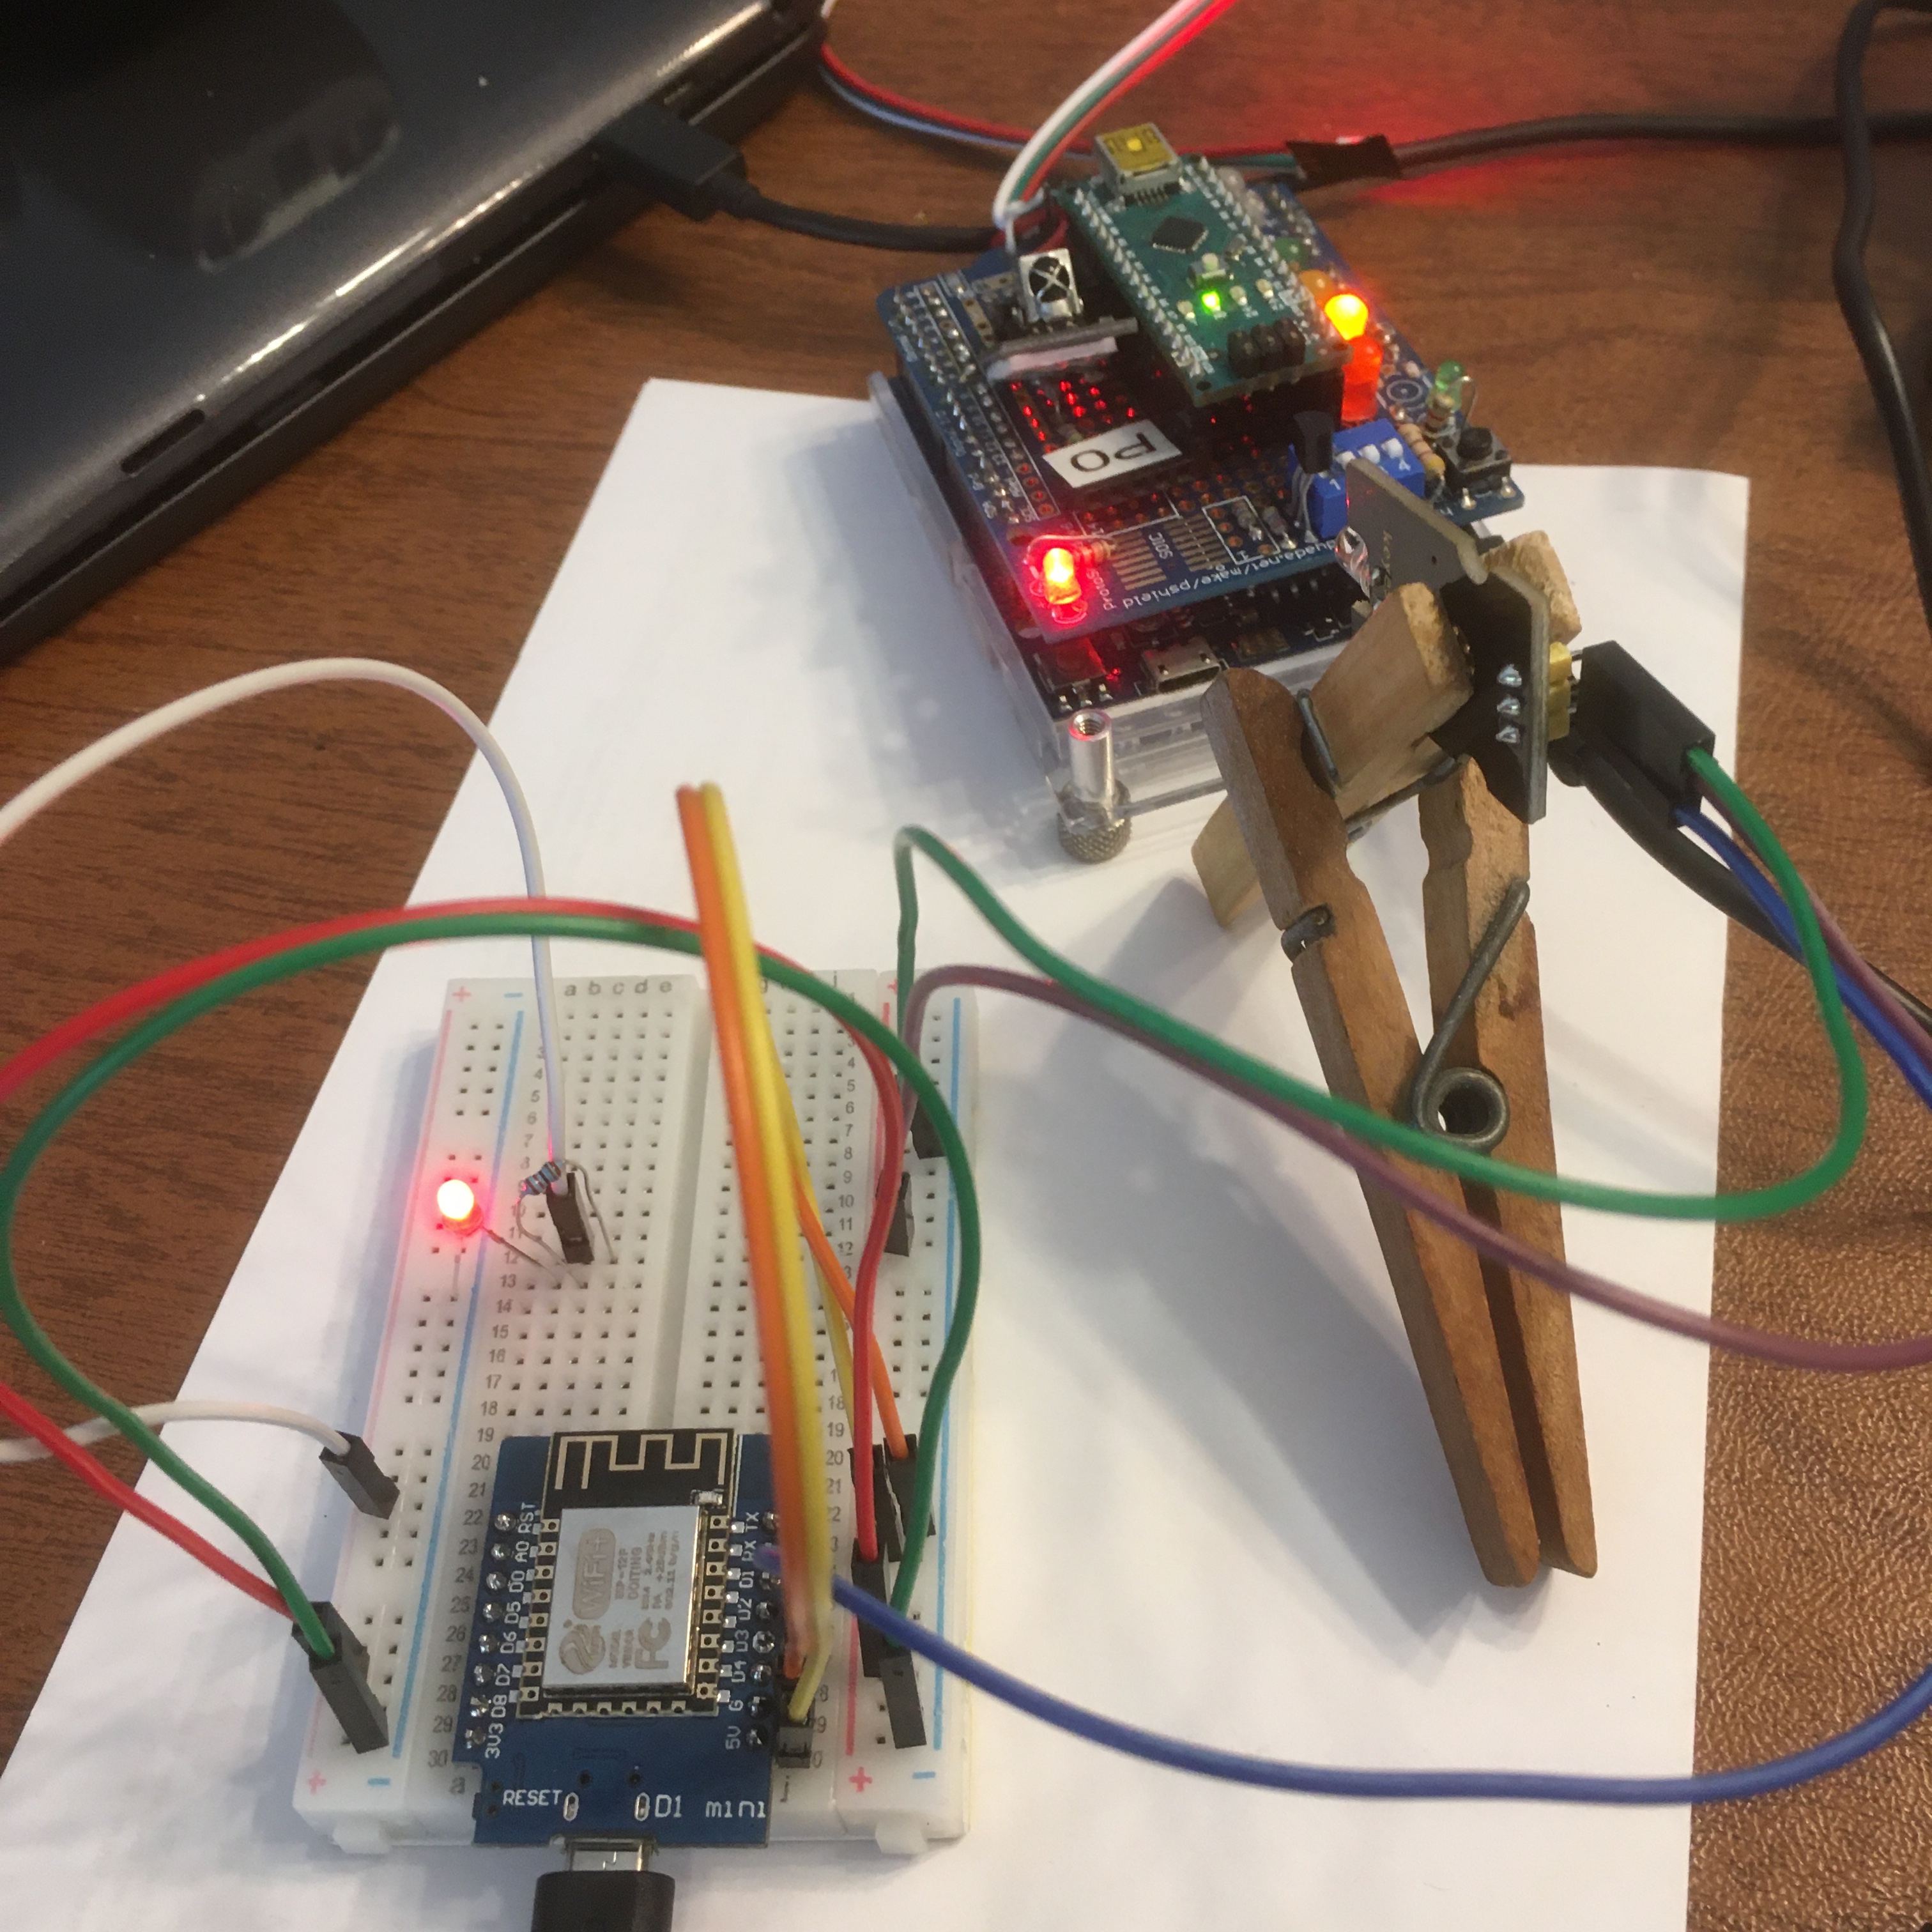
That original haystack prototype with the ESP-01, all those plug-board wires, and the UNO were reduced to just the Wemos D1 Mini module, a red power LED, and an IR module in the two-clothespin holder pointed at the NEC TV IR Receiver simulator. See picture below.
Pete, I give you credit for being the right person to bounce ideas back and forth and to collaborate with. They all worked.
// Sketch definitions to run in ESP8266:
#include <ESP8266WiFi.h>
#include <BlynkSimpleEsp8266.h>
#include <IRremoteESP8266.h>
#include <IRsend.h>

// You should get Auth Token in the Blynk App.
// Go to the Project Settings (nut icon).
char auth[] = "auth";
// WiFi credentials:
char ssid[] = "ssid";
char pass[] = "password";

IRsend irsend(4); // Finally figured out an IR led can be connected to:
                            // Wemos D1 Mini code 4 -> pin D2

void setup()
{
  irsend.begin(); // Fireup the Blynk engines
  Serial.begin(9600);
  delay(50);
  Serial.println(F("Hello ESP8266 World 123 test 1/23/2020"));
  delay(50);
  Blynk.begin(auth, ssid, pass); // connect to WiFi
}

void loop() {
  Blynk.run();   // Here we go ...

  Serial.println("NEC 1");
  delay(50);
  irsend.sendNEC(0xFFA25D, 32);
  delay(2000);
  Serial.println("NEC 2");
  delay(50);
  irsend.sendNEC(0xFF629D, 32);
  delay(2000);
  Serial.println("NEC 3");
  delay(50);
  irsend.sendNEC(0xFFE21D, 32);
  delay(2000);
}
'''
Seems surreal that this 123 test sketch was compiled on 1/23 ...
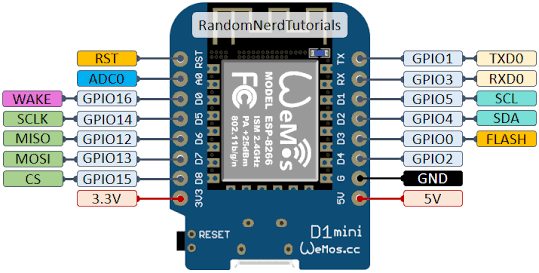
That web page with the ESP pinouts was nice. Here are the pinouts for the Wemos D1 Wifi card it was missing (below). It has the footprint of an Arduino Uno, the same mounting dimensions and power/USB connections. It fits nicely in a low-profile Arduino acrylic project case. Gone are all the plug-board wires; there are only 3 extra connections to a (KeyStudio) LED module that has a nice SMD LED to show you when it gets triggered by the Blynk code running inside the WiFi chip on the Wemos board. I don’t need to do a custom PCB board for the Wemos Mini; this will work just fine.
Project completed.
Your next mission (should you choose to accept it) is to add OTA update capability.
You include the OTA library and a few lines of code, then install Python on your PC.
When you’ve done that, the board doesn’t need to be physically connected to your PC’s serial port, you upload the new code wirelessly, over your local network.
For me, this is one of the major advantages of the ESP based boards. It means that you can box them up and tuck them neatly away out of sight and when you want to make a small tweak to the code you don’t have to pull everything apart to re-flash them.
Sure, I’ll go to the next Jedi level; send me a few links on what’s to do.
I won’t get to it immediately, because I’m playing with my new
NEC Remote Control WiFi to IR transceiver project just completed.
Thanks,
Mike