Emulate an Arduino remote control & send WiFi signals to an IR transceiver

You’re approaching this from the wrong angle.
The way to do it is to use Button widgets, set to Push mode and each connected to a different virtual pin.
The button will send a “1” when pressed and a “0” when released by default, and there’s no need to change this default behaviour.

The code running on the MCU will include a BLYNK_WRITE(Vpin) callback for each button widget. You will only want to take action when the button is pressed (not released) so you’ll start by only proceeding if the received value is a “1”.
At that point you can take whatever action you want, such as calling a function with a parameter which sends the specified IR code.

There are quite a few projects around where this has already been done. Here is one:

I’ve not studied the code in this example, and as it was written by a newcomer it may well have some serious flaws, but doing more searches will probably deliver something you can work with.

Pete.

1 Like

Thanks, Pete, I’ll take a look. I already have everything working on BlueTooth using the iPhone Tatco “Arduino IR Kit” App from them, but I want to try a new App like Blynk for the WiFi phase.
Cheers,
Mike

Here is the Blynk layout for my virtual remote control - all the keys on the original one plus some test push-buttons. For a full-sized layout like this you can’t take a full-sized screen snapshot off an iPhone without getting the top button row chopped.

Update: Project completed, @Pavel. How can I get a full-screen App snapshot of my Blynk RC layout without the Project status bar at the top of the screen chopping off the first row of keys?

Adafruit also has a great writeup on sending and receiving IR codes;
it has project details and complete code sketches.

So I built these two WiFi-to-IR prototypes, one based on the ESP-01 chip and the other on a NodeMCU. I wrote a sketch, uploaded it into both of them, and also uploaded the Blynk “Push Data” sketch. Like Alice who stumbled into the rabbit hole, I quickly realized I was in for an adventurous ride. I could only enable one key on my Blynk virtual remote control (see above post). As soon as I enabled more, I encountered the dreaded “Cmd error” message after putting the 8266 into verbose debugging mode to read all the messaging from the UNO to the 8266. The Blynk Cloud WiFi connection was broken !

09:35:31.746 -> BlynkIR V1.0 1/12/20
09:35:31.781 -> [10] 
09:35:31.781 ->     ___  __          __
09:35:31.814 ->    / _ )/ /_ _____  / /__
09:35:31.848 ->   / _  / / // / _ \/  '_/
09:35:31.848 ->  /____/_/\_, /_//_/_/\_\
09:35:31.883 ->         /___/ v0.6.1 on Arduino Uno
09:35:31.918 -> 
09:35:32.359 -> [612] Connecting to MyHomeRouter
09:35:35.585 -> [3826] AT version:1.3.0.0(Jul 14 2016 18:54:01)
09:35:35.619 -> SDK version:2.0.0(5a875ba)
09:35:35.653 -> Farylink Technology Co., Ltd. v1.0.0.2
09:35:35.687 -> May 11 2017 22:23:58
09:35:35.721 -> OK
09:35:40.883 -> [9139] +CIFSR:STAIP,"192.168.1.67"
09:35:40.916 -> +CIFSR:STAMAC,"84:f3:eb:dd"
09:35:40.950 -> [9146] Connected to WiFi
09:35:51.160 -> [19417] <[1D|00|01|00] _tN
09:35:51.397 -> [19657] >[00|00|01|00|C8]
09:35:51.432 -> [19657] Ready (ping: 54ms).
09:35:51.465 -> [19658] Free RAM: 566
09:35:51.499 -> [19682] >[14|00|01|00|16]
09:35:51.499 -> [19700] >pm[00]14[00]out[00]15[00]out[00]4[00]out
09:35:51.566 -> [19762] <[11|00|02|00]fver[00]0.6.1[00]h-beat[00]10[00]buff-in[00]256[00]dev
09:36:01.669 -> [29922] Cmd error **<<<<<<<<=======  <<<<<=====  <<<<<=====**

It seems to happen right after the keep-alive “heartbeat” to keep the WiFi connection up. Back off to just one RC key defined in the sketch, and there is no performance error. Mind you, I’m running this as a sketch inside the UNO. Others ahead of me have to compiled the code to run in native mode inside the 8266 WiFi chip. I hope that is not my only choice. Heading the advice of others, I downloaded the latest libraries, the latest IDE, kept my VOID loop to only two statements: Blynk.run() and timer.run().
I am using these three libraries:
#include <ESP8266_Lib.h>
#include <BlynkSimpleShieldEsp8266.h> and
#include <IRremote.h>
I know the IDE will indicate low memory when the RAM memory is below 500; I’m at 566. My sketch uses only 19,568 bytes, which is 60% of the available. I will continue testing and the discovery process.
Those plastic sleds the Arduinos are shipped in make great breadboard bases, right?

The NodeMCU on its own, without the Uno, is by far the better solution. The NodeMCU is far more powerful than the Uno and using it as an AT Wi-Fi modem for the Uno is a bit like using a cart horse to tow a Ferrari.
Read this for more info:

I use a Wemos D1Mini with a couple of IR LEDs connected to control my aircon and fans. I don’t even bother with the resistors, so have just 3 wires plus the power connection.

You could probably do the same with the ESP-01, but I prefer the convenience of a dev board with an onboard debut port.

The issues you are facing with your current setup may be caused by the communication speed with the ESPs via SoftwareSerial, or poor coding, but without seeing your code it’s difficult to say.

Using breadboards for long-term projects isn’t the way to go. They are notoriously bad at maintaining good connections over time and tracking down the fault is a case of wiggling wires to figure-out where the dodgy contact is - not good for your sanity!
As I said earlier, you only really need two wires to drive your LED, plus an in-line resistor if that’s the way you want to go (the resistor value will be lower when using the ESP’s GPIO pins, as they operate on 3.3v logic levels rather than the 5v used by the Arduino).

Pete.

These WiFi breadboards are just temporary test stations. All my finished units get PCB’s I design using Autodesk Eagle and uploaded to JLCPCB, and a crystal project case.
Serial baud-rate anomalies? Yes, like many others, I had problems running at 115,200 baud on both units (garbled characters in the serial monitor), so I re-flashed them to 9600 baud.
Problem not solved, just eliminated.
Finally, NodeMCU vs. UNO - Your point taken, I will recompile and move my code into the Node out of the UNO and go from there. I was able to run my BlueTooth Remote Control inside the UNO without any problems, but it does look like in order to use Blynk I will have to move it. I’m way past the “Hello World” (watch the LED flash) milestone a year ago.


Ah! A clue! More breadcrumbs down the rabbit hole to digest …
I’m getting the same heartbeat block message followed by the “Cmd error”.
Thanks, @Jamin.


Finally reached the end of the tunnel. All is working as I envisioned. My RC sketch is running inside the Arduino Uno, all 20 virtual Blynk keys on my iPhone App are being processed, and I got rid of the “cmd error” timeout problem. Threading thru all the Blynk postings and seeing what others who approached the problem did, I made the following very simple changes:

  1. Added these three statements to my Sketch:
    #define BLYNK_DEBUG
    #define BLYNK_HEARTBEAT 30
    #define BLYNK_NO_FLOAT
    (Verbose) Debug mode allowed me to see all the messaging to and from the Blynk Cloud Server. “Heartbeat 30” changes the timeout from 10 seconds to 30 seconds. The “No Float” statement saves code-space internally; I have no way to accurately measure.
  2. The final fix that made it totally work was to remove all Serial.println calls inside each Blynk.Write() subroutine, and remove all Delay() statements that were unnecessary. This allowed me to jump from enabling just 4 Blynk RC keys to enabling all of them without the “cmd error” timeout. My goal was to get this working (part-time) by the end of the month; I did it in 15 days. I still intend to recompile the sketch so it will run in native mode inside the NodeMCU. This picture shows a working WiFi-to-IR breadboard on the left and a pseudo IR remote control receiver on the right. Each time it receives a new valid NEC code, the plastic sled base glows a new color.

If you’re still struggling with available memory (you can tell this when you compile the code, it tells you at the end) then you can use the so-called “F Macro” with your serial print statements.
Serial.println(“Hello World”);
Would become:
Serial.println(F(“Hello World”));

This only works with string literals, not variables, and it saves a small amount of memory each time - although will stop being an issue when you swap to the NodeMCU.

Pete.

Hey, thanks, Pete. Every byte helps ……

OK, Pete, this looks to be a good article on flashing the ESP-01, now that I have a working sketch that runs in the Arduino UNO. Do you have a better starting point?

https://www.diyhobi.com/flash-program-esp-01-using-usb-serial-adapter/

To be honest, I’d start with using a NodeMCU as your replacement for the Arduino/ESP-01 combination.
The reason being that the NodeMCU has a built-in TTL to Serial adaptor, which is easy to access via the onboard USB connector, and it has lots of useable GPIO pins. It’s also much easier to flash, as you don’t have to mess around manually putting it onto flash mode by pulling GPIO0 low.

The ESP-01 on the other hand is trickier to use as it has no TTL to serial adaptor, limited GPIOs and is more difficult to flash. The adaptors shown in the article you linked solve some of these issues, but not the limited GPIOs.
If you work with the NodeMCU first then getting it working will be much easier, and you’ll have good access to the serial debug data. If you then want to do the same thing with the ESP-01 the what you’ve learned with the NodeMCU will be helpful and make your life easier.

You should also read this:

Pete.

2 Likes

2020-01-19_15-56-07%20IRsend%20type%20error

Next brain-teaser: I tried compiling the Ellis “All remotes from your Smartphone” example mentioned above just to see what it would say on my IDE. Looks like I have some library conflicts between the Uno & ESP8266 module libraries resulting in this error: “IRsend does not name a type”. The Internet has hundreds of opinions and comments about this error. I’m going to have to fix the library conflict. Compiling for the UNO, this was not a problem when <IRremote.h> was used, but for the 8266 environment, <IRremoteESP8266.h> there seems to be something missing. Some people say going to go back to a previous IDE 1.0.6, others say it’s a conflict between C++ and C coded routines, and a few say to delete misbehaving “RobotIRRemote” files.

That is a VERY old version of the IDE and may have been an appropriate fix at the time, but certainly isn’t the solution now.

The first thing is to post your full code, so we can see if you’re doing anything wrong elsewhere.

Secondly, post a link to the exact IRremoteESP8266 library that you installed, as there are multiple flavours that have been hacked/modified by people along the way. It’s always good practice to add a URL to the exact library in your code, along with a note about the version that you successfully used.

What version of the ESP core are you using?

Pete.

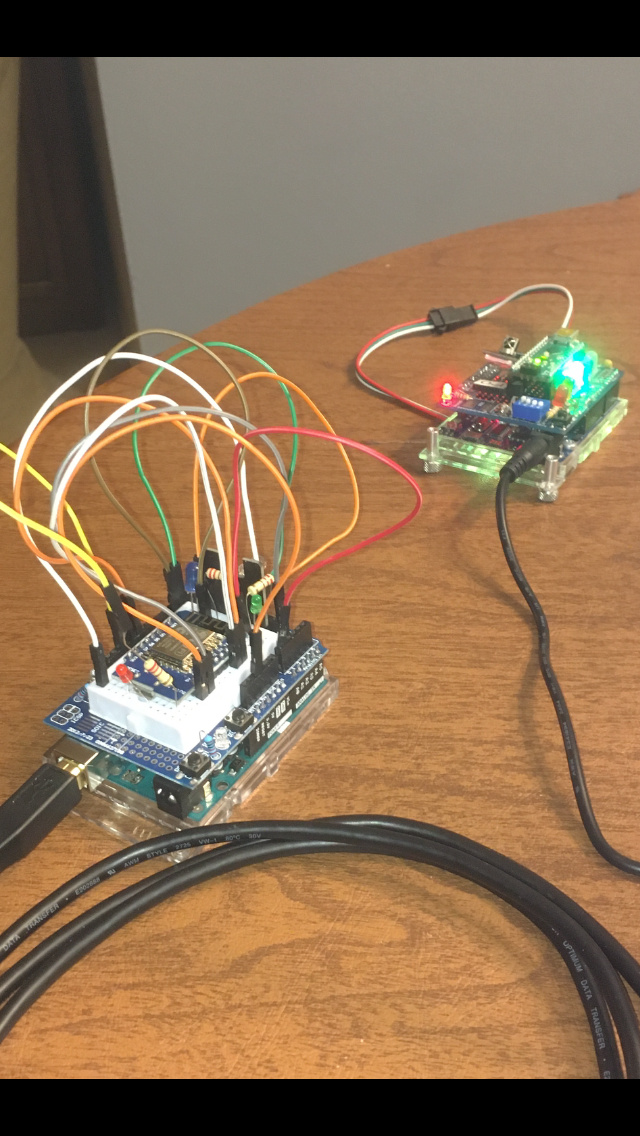
This is the Ellis “All your Remotes to Smartphone” sketch you referenced; this is the one as well as my code that gets the IRsend() error when compiling.
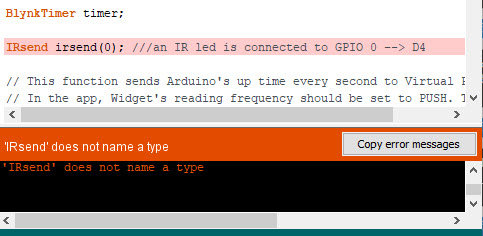
Compile it on your IDE and see if you get the same error —

#define BLYNK_PRINT Serial    // Comment this out to disable prints and save space
#include <ESP8266WiFi.h>
#include <BlynkSimpleEsp8266.h>
#include <SimpleTimer.h>
// IR remote
#include <IRremoteESP8266.h>

char auth[]   = "yourauthcode";
char ssid[]   = "your wifi network";
char pass[]   = "your wifi password";
char server[] = "blynk-cloud.com";

SimpleTimer testingTimer;

IRsend irsend(0); ///an IR led is connected to GPIO 0 --> D4

// ======= SKETCH IR

int pinValueV1;
int pinValueV4;
int pinValueV5;
unsigned int ScreenUp[63] = {1400, 400, 1400, 400, 1400, 400, 1400, 400, 500, 1200, 500, 1200, 500, 1200, 500, 1200, 500, 1200, 500, 1200, 500, 1200, 1350, 400, 500, 1200, 500, 1200, 500, 1200, 1400, 400, 1400, 400, 1400, 400, 500, 1200, 1350, 400, 1350, 400, 1350, 400, 500, 1200, 1400, 400, 1400, 400, 1400, 400, 500, 1200, 1400, 400, 1400, 400, 1350, 400, 1350, 400, 500};
unsigned int ScreenDown[63] = {1400, 400, 1350, 400, 1400, 400, 1400, 400, 500, 1200, 500, 1200, 500, 1200, 500, 1200, 500, 1200, 1350, 400, 500, 1200, 500, 1200, 500, 1200, 500, 1200, 500, 1200, 1400, 400, 1400, 400, 1400, 400, 1400, 400, 550, 1200, 1350, 400, 1350, 400, 1400, 400, 550, 1200, 500, 1200, 500, 1200, 500, 1200, 1400, 400, 1400, 400, 1400, 400, 1400, 400, 1400};

// ====== DEVICE SELECTOR

void mySetPropertyFunction1notneeded(){
  Blynk.setProperty(V2, "color", "#23C48E"); //GREEN
  Blynk.setProperty(V4, "color", "#23C48E"); //GREEN
  Blynk.setProperty(V5, "color", "#23C48E"); //GREEN
  Blynk.setProperty(V6, "color", "#23C48E"); //GREEN
}
void mySetPropertyFunction1(){
  Blynk.setProperty(V7, "color", "#23C48E"); //GREEN
  Blynk.setProperty(V13, "color", "#23C48E"); //GREEN
  Blynk.setProperty(V14, "color", "#23C48E"); //GREEN
  Blynk.setProperty(V15, "color", "#23C48E"); //GREEN
}

void mySetPropertyFunction2notneeded(){
   Blynk.setProperty(V2, "color", "#D3435C"); //RED POWER
   Blynk.setProperty(V3, "color", "#D3435C"); //RED SOURCE
   Blynk.setProperty(V3, "label", "HOME");
   Blynk.setProperty(V4, "color", "#D3435C"); //RED SOURCE
}
void mySetPropertyFunction2(){
   Blynk.setProperty(V4, "label", "LEFT/RIGHT");
   Blynk.setProperty(V5, "color", "#D3435C"); //RED SOURCE
   Blynk.setProperty(V13, "color", "#D3435C"); //RED SOURCE
   Blynk.setProperty(V15, "color", "#D3435C"); //RED SOURCE
}
 

BLYNK_WRITE(V1) {
  switch (param.asInt())
  {
    case 1:               // Item 1 - TV LIVING
      pinValueV1 = 1;
      Blynk.setProperty(V2, "color", "#23C48E"); //GREEN
      Blynk.setProperty(V4, "color", "#23C48E"); //GREEN
      Blynk.setProperty(V5, "color", "#23C48E"); //GREEN
      Blynk.setProperty(V6, "color", "#23C48E"); //GREEN
       testingTimer.setTimeout(300,mySetPropertyFunction1); // perform the second function 400ms later
      break;

    case 2:               // Item 2 - DVD
      pinValueV1 = 2;
      Blynk.setProperty(V2, "color", "#D3435C"); //RED POWER
      Blynk.setProperty(V3, "color", "#D3435C"); //RED SOURCE
      Blynk.setProperty(V3, "label", "HOME");
      Blynk.setProperty(V4, "color", "#D3435C"); //RED SOURCE
      testingTimer.setTimeout(300,mySetPropertyFunction2); // perform the second function 400ms later 
      break;

    case 3:               // Item 3 - AUX
      pinValueV1 = 3;
      Blynk.setProperty(V2, "color", "#04C0F8"); //BLU
      Blynk.setProperty(V4, "color", "#04C0F8"); //BLU
      delay(1000);
      break;

    case 4:
      pinValueV1 = 4;
      
      break;

    case 5:             // Item 5 - Projector Screen
      pinValueV1 = 5;
      Blynk.setProperty(V15, "color", "#ED9D00"); //YELLOW
      
      break;

  }
}

// ========== END DEVICE SELECTOR


BLYNK_WRITE(V2) // ON/OFF
{
  if ( param.asInt() && pinValueV1 == 1 )  // ON/OFF TV
  { irsend.sendNEC(0xFB38C7, 32);
  } else if ( param.asInt()   && pinValueV1 == 2 ) // ON/OFF DVD
  { irsend.sendSAMSUNG(0xB4B40CF3, 32);
  } else if ( param.asInt()   && pinValueV1 == 3 ) // ON/OFF AUX
  { irsend.sendNEC(0x7E8154AB, 32);
  }
}


BLYNK_WRITE(V3) // SOURCE
{
  if ( param.asInt() && pinValueV1 == 1 )
  { irsend.sendNEC(0xFBE817, 32); //
  } else if ( param.asInt()   && pinValueV1 == 2 ) // SAMSUNG
  { irsend.sendSAMSUNG(0xB4B4E619, 32);
  }
}


BLYNK_WRITE(V4) // AUDIO + / -
{
  pinValueV4 = V4  ;
  if ( param.asInt()  == 4 && pinValueV1 == 1 )
  { irsend.sendNEC(0xFBD22D, 32); // + AUDIO
  } else if ( param.asInt()  == 3 && pinValueV1 == 1 )
  { irsend.sendNEC(0xFBF20D, 32); // - AUDIO
  } else if ( param.asInt()  == 3 && pinValueV1 == 3 )  // AUDIO AUX -
  { irsend.sendNEC(0x5EA1D827, 32); // - AUDIO
  } else if ( param.asInt()  == 3 && pinValueV1 == 3 )  // AUDIO AUX +
  { irsend.sendNEC(0x5EA158A7, 32); // - AUDIO
  } else if ( param.asInt()  == 3 && pinValueV1 == 2 )  // DVD Left
  { irsend.sendSAMSUNG(0xB4B49A65, 32); // - AUDIO
  } else if ( param.asInt()  == 3 && pinValueV1 == 2 )  // DVD Right
  { irsend.sendSAMSUNG(0xB4B45AA5, 32); // - AUDIO
  }
}


BLYNK_WRITE(V5) // CHANNELS + / -
{
  pinValueV5 = V5  ;
  if ( param.asInt()  == 4 && pinValueV1 == 1 )
  { irsend.sendNEC(0xFB906F, 32); // + CH
  } else if ( param.asInt()  == 3 && pinValueV1 == 1 )
  { irsend.sendNEC(0xFBA05F, 32); // - CH
  } else if ( param.asInt()  == 3 && pinValueV1 == 2 )  // DVD CH -
  { irsend.sendSAMSUNG(0xB4B41EE1, 32); // - CH
  } else if ( param.asInt()  == 4 && pinValueV1 == 2 )    // DVD CH +
  { irsend.sendSAMSUNG(0xB4B4EE11, 32); // - CH
  }

}

BLYNK_WRITE(V6) // TXT
{
  if ( param.asInt() && pinValueV1 == 1 )
  { irsend.sendNEC(0xFB807F, 32); //
  } else {
    //LOW - OFF
  }
}

BLYNK_WRITE(V7) // INFO
{
  if ( param.asInt() && pinValueV1 == 2 )
  { irsend.sendNEC(0xFB1AE5, 32); //
  } else {
    //LOW - OFF
  }
}

BLYNK_WRITE(V8) // Rewind
{
  if ( param.asInt() && pinValueV1 == 2 )
  { irsend.sendSAMSUNG(0xB4B44CB3, 32); //
  } else {
    //LOW - OFF
  }
}

BLYNK_WRITE(V9) // Play
{
  if ( param.asInt() && pinValueV1 == 2 )
  { irsend.sendSAMSUNG(0xB4B48C73, 32); //
  } else {
    //LOW - OFF
  }
}

BLYNK_WRITE(V10) // Stop
{
  if ( param.asInt() && pinValueV1 == 2 )
  { irsend.sendSAMSUNG(0xB4B49C63, 32); //
  } else {
    //LOW - OFF
  }
}


BLYNK_WRITE(V11) // Forward
{
  if ( param.asInt() && pinValueV1 == 2 )
  { irsend.sendSAMSUNG(0xB4B44CB3, 32); //
  } else {
    //LOW - OFF
  }
}


BLYNK_WRITE(V12) // Eject
{
  if ( param.asInt() && pinValueV1 == 2 )
  { irsend.sendSAMSUNG(0xB4B46C93, 32); //
  } else {
    //LOW - OFF
  }
}


BLYNK_WRITE(V13) // OK
{
  if ( param.asInt() && pinValueV1 == 1 )
  { irsend.sendNEC(0xFB609F, 32); //
  } else if ( param.asInt()   && pinValueV1 == 2 ) // SAMSUNG
  { irsend.sendSAMSUNG(0xB4B41AE5, 32);
  }
}

BLYNK_WRITE(V14) // KO
{
  if ( param.asInt() && pinValueV1 == 1 )
  { irsend.sendNEC(0xFB50AF, 32); //
  } else {
    // LOW - OFF
  }
}

BLYNK_WRITE(V15) // UP/DOWN-
{
  pinValueV5 = V15  ;
  if ( param.asInt()  == 4 && pinValueV1 == 1 ) //+ CH
  { irsend.sendNEC(0xFB58A7, 32); //
  } else if ( param.asInt()  == 3 && pinValueV1 == 1 ) // - CH
  { irsend.sendNEC(0xFB12ED, 32); //
  } else if ( param.asInt()  == 3 && pinValueV1 == 2 )  // DVD UP
  { irsend.sendSAMSUNG(0xB4B4E21D, 32); //
  } else if ( param.asInt()  == 4 && pinValueV1 == 2 )    // DVD DOWN
  { irsend.sendSAMSUNG(0xB4B412ED, 32); //
  } else if ( param.asInt()  == 3 && pinValueV1 == 5 )    // SCREEN UP
  { irsend.sendRaw(ScreenUp, 63, 32);
  } else if ( param.asInt()  == 4 && pinValueV1 == 5 )    // SCREEN DOWN
  { irsend.sendRaw(ScreenDown, 63, 32);
  }
}

// ========LOOP
void setup()
{
  Serial.begin(115200);
  Serial.println();
  Serial.println(F("Started"));
  irsend.begin();
   Blynk.begin(auth, ssid, pass, server); 
  Blynk.syncAll();
  
}

void loop()
{
  Blynk.run();
  testingTimer.run();
}

Yeah, going back to the old IDE is not an option. And I’m not using any RobotIRRemote files mentioned either. I tried compiling for the Wemos D1 R1 and the generic ESP8266 module; same result. I’m using latest IDE 1.8.10.

What IRremoteESP8266 library do you have installed? Where did you get it from and what version is it?
Did you install it directly from the IDE library manager, or as a .zip file from a GitHub or similar site?

What version of the ESP Core do you have installed?

Pete.

Here is a problem discovered with the bad IR remote files and the fix.
One of the libraries has to be manually replaced:

  1. Some of the headers I have used were installed from folders at GitHub rather than via Library Manager in order to get another project working. I may have to back them out.

  2. Here are my libraries:

Multiple libraries were found for "ESP8266WiFi.h"
 Used: C:\Users\mstod\AppData\Local\Arduino15\packages\esp8266\hardware\esp8266\2.6.3\libraries\ESP8266WiFi
Multiple libraries were found for "BlynkSimpleEsp8266.h"
 Used: C:\Users\mstod\Documents\Arduino\libraries\Blynk
Multiple libraries were found for "SimpleTimer.h"
 Used: C:\Users\mstod\Documents\Arduino\libraries\SimpleTimer
Multiple libraries were found for "IRremoteESP8266.h"
 Used: C:\Users\mstod\Documents\Arduino\libraries\IRremoteESP8266
Using library ESP8266WiFi at version 1.0 in folder: C:\Users\mstod\AppData\Local\Arduino15\packages\esp8266\hardware\esp8266\2.6.3\libraries\ESP8266WiFi 
Using library Blynk at version 0.6.1 in folder: C:\Users\mstod\Documents\Arduino\libraries\Blynk 
Using library SimpleTimer in folder: C:\Users\mstod\Documents\Arduino\libraries\SimpleTimer (legacy)
Using library IRremoteESP8266 at version 2.7.2 in folder: C:\Users\mstod\Documents\Arduino\libraries\IRremoteESP8266 

Thanks,
Mike

Forget the Robot IR issue and an editing the libraries, it doesn’t relate to your hardware.

So you are using version 2.7.2 of someone’s IRremoteESP8266 library, which you may or may not have installed from a .zip file?
That version of the library may not be from the same author as the one that the code was written for. So the question remains unanswered, was the library installed via the IDE’s library manager?

You find your IDE core version from Boards, Board Manager and scroll down to the bottom of the list and look for ESP by ESP Community and check which version you have.

Pete.

  1. Yes, I may have installed IRremoteESP8266 library directly.
    I did not document my steps.
  2. ESP8266 by ESP8266 Community version 2.6.3 (says it’s the latest).
  3. Here is my Blynk RC Demo sketch that runs on the UNO. Works perfectly, no disconnects from the Blynk Server. Try to compile it for an 8266 on your IDE.
  4. The Ellis “All your Remotes to your Smartphone” is already supposed to compile for an 8266 module if there are no library problems.

Back at you in about 12 hours.
Cheers,
Mike

/*************************************************************
  Download latest Blynk library here:
    https://github.com/blynkkk/blynk-library/releases/latest

  Blynk is a platform with iOS and Android apps to control
  Arduino, Raspberry Pi and the likes over the Internet.
  You can easily build graphic interfaces for all your
  projects by simply dragging and dropping widgets.

    Downloads, docs, tutorials: http://www.blynk.cc
    Sketch generator:           http://examples.blynk.cc
    Blynk community:            http://community.blynk.cc
    Follow us:                  http://www.fb.com/blynkapp
                                http://twitter.com/blynk_app

  Blynk library is licensed under MIT license
  This example code is in public domain.

 *************************************************************
  WARNING!
    It's very tricky to get it working. Please read this article:
    http://help.blynk.cc/hardware-and-libraries/arduino/esp8266-with-at-firmware

  This example shows how value can be pushed from Arduino to
  the Blynk App.

  NOTE:
  BlynkTimer provides SimpleTimer functionality:
    http://playground.arduino.cc/Code/SimpleTimer

 *************************************************************/
 
/* Comment this out to disable prints and save space */
#define BLYNK_PRINT Serial
/* Turn on verbose messaging */
#define BLYNK_DEBUG // Debug - enable verbose mode
#define BLYNK_HEARTBEAT 30
#define BLYNK_NO_FLOAT // Disable floating point operations

#include <ESP8266_Lib.h>
#include <BlynkSimpleShieldEsp8266.h>
#include <IRremote.h>

// You should get Auth Token in the Blynk App.
// Go to the Project Settings (nut icon).
char auth[] = "MyAuthToken";

// WiFi credentials:
char ssid[] = "mySSID";
char pass[] = "myPassword";

// Hardware Serial on Mega, Leonardo, Micro...
//#define EspSerial Serial1
// or Software Serial on Uno, Nano...
#include <SoftwareSerial.h>
SoftwareSerial EspSerial(10, 11); // WiFi RX, TX

// Your ESP8266 baud rate:
#define ESP8266_BAUD 9600

ESP8266 wifi(&EspSerial);
BlynkTimer timer;

int RECV_PIN = 2; // IR receiver
IRrecv irrecv(RECV_PIN);
int XMIT_PIN = 3; // IR transmitter
IRsend irsend;
#define LEDpin 13

// This function sends Arduino's up-time every X seconds to 
// Virtual Pin (21). In the app, the Widget's reading frequency 
// should be set to PUSH. This means that you define how often 
// to send data to Blynk App.
void myTimerEvent()
{
  // You can send any value at any time.
  // Don't send more that 10 values per second.
  // Blynk.virtualWrite(V21, millis() / 1000);
}

// These functions will be called every time Button Widgets
// in Blynk app write values to their Virtual Pin.
BLYNK_WRITE(V1)
{
  SendNECirCode(0xFFA25D); // "1"
  //Serial.println("1V1");
}
BLYNK_WRITE(V2)
{
  SendNECirCode(0xFF629D); // "2"
  //Serial.println("2V2");
}
BLYNK_WRITE(V3)
{
  SendNECirCode(0xFFE21D); // "3"
  //Serial.println("3V3");
}
BLYNK_WRITE(V4)
{
  SendNECirCode(0xFF22DD); // "4"
  //Serial.println("4V4");
}

BLYNK_WRITE(V5)
{
  SendNECirCode(0xFF02FD); // "5"
  //Serial.println("5V5");
}

BLYNK_WRITE(V6)
{
  SendNECirCode(0xFFC23D); // "6"
  //Serial.println("6V6");
}
BLYNK_WRITE(V7)
{
  SendNECirCode(0xFFE01F); // "7"
  //Serial.println("7V7");
}
BLYNK_WRITE(V8)
{
  SendNECirCode(0xFFA857); // "8"
  //Serial.println("8V8");
}
BLYNK_WRITE(V9)
{
  SendNECirCode(0xFF906F); // "9"
  //Serial.println("9V9");
}
BLYNK_WRITE(V10)
{
  SendNECirCode(0xFF9867); // "0"
  //Serial.println("0V10");
}
BLYNK_WRITE(V11)
{
  if ( param.asInt() != 0 ) { // debounce
    SendNECirCode(0xFF18E7);// "UP"
  }
}
BLYNK_WRITE(V12)
{
  if ( param.asInt() != 0 ) { // debounce
    SendNECirCode(0xFF6897); // "ASTERICK"
  }
}
BLYNK_WRITE(V13)
{
  if ( param.asInt() != 0 ) { // debounce
    SendNECirCode(0xFF10EF); // "LEFT"
  }
}
BLYNK_WRITE(V14)
{
  if ( param.asInt() != 0 ) { // debounce
    SendNECirCode(0xFF38C7); // "OK"
  }
}
BLYNK_WRITE(V15)
{
  if ( param.asInt() != 0 ) { // debounce
    SendNECirCode(0xFF5AA5); // "RIGHT"
  }
}
BLYNK_WRITE(V16)
{
  if ( param.asInt() != 0 ) { // debounce
    SendNECirCode(0xFFB04F); // "#"
  }
}
BLYNK_WRITE(V17)
{
  if ( param.asInt() != 0 ) { // debounce
    SendNECirCode(0xFF4AB5); // "DOWN"
  }
}

void SendNECirCode(long hexcode)
{
  irsend.sendNEC(hexcode, 32); // or
  //irsend.send(NEC, hexcode, 32);
  //digitalWrite(LEDpin, HIGH); // trigger D13
  //delay(50); // wait a bit
  //digitalWrite(LEDpin, LOW); // reset
  //irrecv.resume(); // Restart IR receiver if used
}

void setup()
{
  // Set debug console
  Serial.begin(9600);
  Serial.println(F("Push Data Demo 1/17/2020"));

  // Set ESP8266 baud rate
  EspSerial.begin(ESP8266_BAUD);
  delay(50);

  Blynk.begin(auth, wifi, ssid, pass);
  // You can also specify server:
  //Blynk.begin(auth, wifi, ssid, pass, "blynk-cloud.com", 80);
  //Blynk.begin(auth, wifi, ssid, pass, IPAddress(192,168,1,100), 8080);

  // Setup a function to be called every one second
  //timer.setInterval(1000L, myTimerEvent);
}

void loop()
{
  Blynk.run();   // Fireup the engines ...
  //timer.run(); // Initiate BlynkTimer (not used)
}