The missing widgets

since I started to program with Blynk, I often need nice widgets.
So I am starting this new topic to share my code with you.
hope this helps someone :wink:
big thanks @Gunner

1 RSSI signal
2 Progressbar
2 Progressbar NEW
3 Blynktimer LED Panel
4 UNLOCK BUTTON
5 Flashing Led twice without blocking blynk
.
.
.
.
.

currently under development.

– widget matrix ------------------- value display ledWidget --------------------- LCD progressBar ----------------

Video_00281 ---------------- Video_00282-------Video_00284

—SSI Signal Widget -------------------------------------------------- Blynktimer LED Panel -------
Video_00280 ------------------------------------Video_00288

7 Likes

1 RSSI Signal Widget

Video_00280

the code :slight_smile:

/*************** signal init ***************/
String S0 = "no signal";
String S1 = "\u2581" ; //▁
String S2 = "\u2581 \u2583"; //▁ ▃
String S3 ="\u2581 \u2583 \u2585" ; //▁ ▃ ▆
String S4 = "\u2581 \u2583 \u2585 \u2587" ; //▁ ▃ ▆ ▇
String S5 ="\u2581 \u2583 \u2585 \u2587 \u2588" ; //▁ ▃ ▆ ▇ █
int Signal=0;
String SGN ;

void setup()
{
.
.
  timer.setInterval(1000, WifiSgn);
.
.
}

void WifiSgn() {
  int Signal =(WiFi.RSSI());

  if (Signal >= -30) {
    SGN = S5;
  }
  else if (Signal <= -31 && Signal > -67) {
    SGN = S4;
  }
  else if (Signal <= -67 && Signal > -70) {
    SGN = S3;
  }
  else if (Signal <= -70 && Signal > -80) {
    SGN = S2;
  }
  else if (Signal <= -80 && Signal > -90) {
    SGN = S1;
  }
  else {
    SGN = S0;
  }

  Blynk.virtualWrite(V1, SGN ); // labeled value settings
  Blynk.virtualWrite(V2, "RSSI " + String(Signal));// label value
 
}

V1
24-021956

15 Likes

15 posts were split to a new topic: Comments about “The missing widgets” topic

2 posts were merged into an existing topic: Comments about “The missing widgets” topic

4 posts were split to a new topic: Level Widget (vertical) labeling

2 : WidgetLCD with double progressBar

use to time, level, etc …
easy to adapt
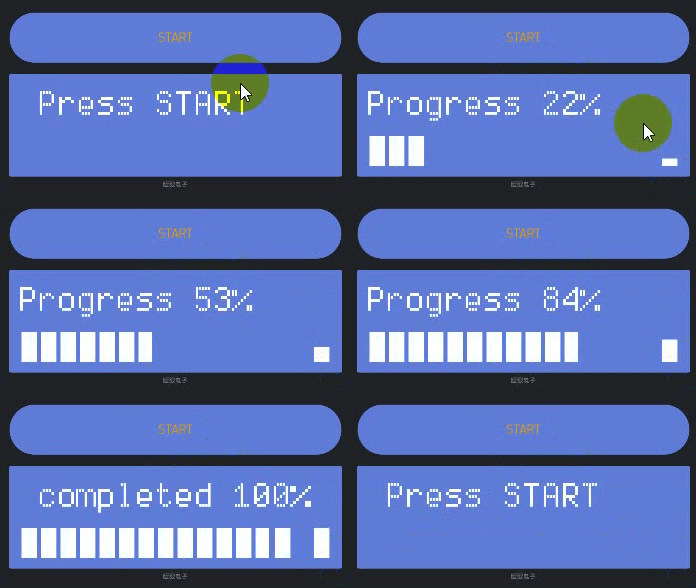
Video_00287

/*************** Progress bar init ***************/
int Progress = 0;
int col=0;                //(col from 0 to 15 LCD)
int Flag = 0;
int Flag1=0;
boolean PgrsTimer ;
WidgetLCD lcd(V18);

String C1 = "\u258F";
String C2 = "\u258E";
String C3 = "\u258D";
String C4 = "\u258C";
String C5 = "\u258B";     // HORIZONTAL BAR
String C6 = "\u258A";
String C7 = "\u2589";
String C8 = "\u2588";


String E1 = "\u2581";
String E2 = "\u2582"; // 
String E3 = "\u2583" ; //
String E4 = "\u2584" ; //
String E5 = "\u2585" ;      //VERTICAL BAR
String E6 = "\u2586" ; //
String E7 = "\u2587" ; //
String E8 = "\u2588" ; //


void setup()
{
...
  PgrsTimer = timer.setInterval(100L, ProgressBar); 
  timer.disable(PgrsTimer);

 /***************** Initialize LCD *****************/
  Start();

.....
}

/*********************** start button ************************/
  BLYNK_WRITE(V18) {// progressbar start
  timer.enable(PgrsTimer);
}


/************************* ProgressBar ******************/
void ProgressBar() {

  if (Progress < 100.01) {
    lcd.print(0, 0, "Progress " + String(Progress) + "%  ");

    Flag++; // HORIZONTAL BAR
    
    switch (col) {
      case 0 :
        lcd.print(15 , 1, E1);
        break;
      case 2 :
        lcd.print(15 , 1, E2);
        break;
      case 4 :
        lcd.print(15 , 1, E3);
        break;
      case 6 :
        lcd.print(15 , 1, E4);
        break;
      case 8 :
        lcd.print(15 , 1, E5);
        break;
      case 10 :
        lcd.print(15 , 1, E6);
        break;
      case 12 :
        lcd.print(15 , 1, E7);
        break;
      case 13 :
        lcd.print(15 , 1, E8);
        break;
    }


    switch (Flag) {      //VERTICAL BAR
      case 1:
        lcd.print(col , 1, C1);
        break;
      case 2:
        lcd.print(col , 1, C2);
        break;
      case 3 :
        lcd.print(col , 1, C3);
        break;
      case 4:
        lcd.print(col , 1, C4);
        break;
      case 5:
        lcd.print(col , 1, C5);
        break;
      case 6:
        lcd.print(col , 1, C6);
        break;
      case 7:
        lcd.print(col , 1, C7);
        break;
      case 8:
        lcd.print(col , 1, C8);
        Flag = 0;
        col++;
        break;
    }

    Progress++;


  } else {
    lcd.print(col , 1, C8);
    lcd.print(15 , 1, E8);
    col = 0;
    Progress = 0;
    timer.disable(PgrsTimer); // end , stop timer
    timer.setTimer(500L, Completion, 10);  // Pulse msg  times
    timer.setTimer(6000L, Start,1);  // Start, new message
    }
}

/****************** blink msg *********************/
void Completion() {
  if (Flag1 == 0) {
    lcd.print(0, 0, " completed 100% ");
    Flag1 = 1;
  }
  else {
    lcd.print(0, 0, "                ");
    Flag1 = 0;
  }
}

/**************** press Start ***************/
void Start() {
  lcd.clear();
  lcd.print(1, 0, "Press START");
}
7 Likes

if you use a bool var will be more simple:

bool Flag1=true;
....
void Completion() 
{
    lcd.print(0, 0, (Flag1)?" completed 100% ":"                ");
    Flag1 = !Flag1;
}

And before you call Completion() ensure that the Flag1 is true…

1 Like

Can be changed to this:

String C[8]={"\u258F","\u258E","\u258D","\u258C","\u258B","\u258A","\u2589","\u2588"};
.....
        lcd.print(col , 1, C[Flag-1]);
        if (Flag==8) 
        {
                Flag = 0;
                col++;
        }

You can change the switch(col) too…

1 Like

oh thank you, I’ll try ASAP
good idea !
this will help me for other projects!
:kissing_smiling_eyes:

this my new code, thanks to @trystan4861

/*************** Progress bar ***************/
int Progress = 0;
int col;
int Flag = 0;
int Flag2 = 0;
bool Flag1 = true;
boolean PgrsTimer ;
WidgetLCD lcd(V18);

/************ VERTICAL BAR ******************/
String C[8] = {"\u258F","\u258E","\u258D","\u258C","\u258B","\u258A","\u2589","\u2588"}; 

/***********  HORIZONTAL BAR ***************/
String E[8] = {"\u2581","\u2582","\u2583","\u2584","\u2585","\u2586","\u2587","\u2588"} ;

void setup()
{
  PgrsTimer = timer.setInterval(100L, ProgressBar); 
  timer.disable(PgrsTimer);

 /***************** Initialize LCD *****************/
  Start();
}

/*********************** start button ************************/
  BLYNK_WRITE(V18) {// progressbar start
  timer.enable(PgrsTimer);
}

/************************* ProgressBar ******************/
void ProgressBar() {

  if (Progress < 100.01) {
    lcd.print(0, 0, "Progress " + String(Progress) + "%  ");
    Flag++;

/*******************  HORIZONTAL BAR ****************/
    lcd.print(col , 1, C[Flag - 1]);
    if (Flag == 8)
    {

/******************** VERTICAL BAR ******************/
      Flag2++;
      lcd.print(15 , 1, E[Flag2 - 1]);
      Flag = 0;
      col++;
    }

    Progress++;

  } else {
    lcd.print(13 , 1, C[7]);
    lcd.print(15 , 1, E[7]);
    col = 0;
    Flag=0;
    Flag2=0;
    Progress = 0;
    timer.disable(PgrsTimer);// end , stop timer
    timer.setTimer(500L, Completion, 10);  // Pulse msg  times
    timer.setTimer(6000L, Start, 1); // Start, new message
  }

}


/****************** blink msg *********************/
void Completion()
{
  lcd.print(0, 0, (Flag1) ? " completed 100% " : "                ");
  Flag1 = !Flag1;
}

/**************** press Start ***************/
void Start() {
  lcd.clear();
  lcd.print(1, 0, "Press START");
}
4 Likes

Blynktimer LED Panel
this panel help you to see running timers and stage them if error occurs during process.
has you can see, there is no overlap between my void actions

Video_00288

code example :

 /***************** Initialize TIMERS *****************/
  timer.setInterval(100, receiver);//433 Mhz receiver
  timer.setInterval(200L, Blinkbutton);//Blink selected buttons
  timer.setInterval(400L, runled);//runing LED
  timer.setInterval(1000L, WifiSng);//wifi signal RSSI check
  timer.setInterval(1500L, PingIp);//ping local network
  timer.setInterval(1600L, TempUpdate); // Update temp reading DHT11
.
.
.
.

/    small piece of Blynk code  /

void WifiSng() {

/**********LED panel 36 ON ********/

  Blynk.virtualWrite(36, 255);    //<--------------------

/*************************************/

  int Signal = -(WiFi.RSSI());
  if (Signal >= -30) {
    SNG = S5;
  }
  else if (Signal <= -31 && Signal > -67) {
    SNG = S4;
  }
  else if (Signal <= -67 && Signal > -70) {
    SNG = S3;
  }
  else if (Signal <= -70 && Signal > -80) {
    SNG = S2;
  }
  else if (Signal <= -80 && Signal > -90) {
    SNG = S1;
  }
  else {
    SNG = S0;
  }
  Blynk.virtualWrite(V14, SNG );
 
/**********LED panel 36 OFF ********/

  Blynk.virtualWrite(36, 0);   //<------------------------

/**************************************/
}
4 Likes

UNLOCK BUTTON

NO EFFECT
Video_00364

.
.
.
.

PRESS 2 sec to UNLOCK
Video_00365

//V50 and V51 styled button
WidgetLED redLed(52);
WidgetLED greenLed(53);


/**************** LOCK UNLOCK **************/
BLYNK_WRITE(V50) {  // button press 2'' to unlock
  if (param.asInt() and  !LongPress ) {
    ButtonTimer = timer.setTimeout(2000, LongPressDetect);
    ButtonPressed = true;
  } else { // Button released
    ButtonPressed = false;        // Reset the button press flag
       if (!LongPress) {
      timer.deleteTimer(ButtonTimer);  
      // Reset LongPress flag and LED
      LongPress = false;
      greenLed.off();
      redLed.on();
    }
  }
}

void LongPressDetect() {
  // button still depressed
  if (ButtonPressed) {
    LongPress = true;
    greenLed.on();
    redLed.off();
    Blynk.setProperty(V51, "offBackColor", BLYNK_GREEN);
    Blynk.setProperty(V51, "offLabel", "UNLOCK");
    Blynk.setProperty(V51, "onLabel", "LOCK");
  }
}
BLYNK_WRITE(V51) {  // actuator button
  if (param.asInt()) {
    if (LongPress = true) {
      ButtonPressed = false;
      LongPress =  false;
      greenLed.off();
      redLed.on();
      Blynk.setProperty(V51, "offBackColor", BLYNK_RED);
      Blynk.setProperty(V51, "offLabel", "LOCK");
      Blynk.setProperty(V51, "onLabel", "LOCK");
    }
  }
}
3 Likes

Flashing Led twice without blocking blynk

#define LedSys 2 // onboard Pin Led
WidgetLED FlashLed(24); //Led widget

void setup(){
 timer.setInterval(1000, blinkLedWidget);// flash every secondes
//other ....
}

void blinkLedWidget() {
  timer.setTimer(200L, FlashingLed, 2);  // Pulse Led 2 times
}

void FlashingLed() { // Non-blocking timer w/ 100 milis interval
  FlashLed.on();
  digitalWrite(LedSys, LOW);
  timer.setTimeout(100L, []()  {
  FlashLed.off();
  digitalWrite(LedSys, HIGH);
  });  
}
3 Likes

@Blynk_Coeur

Hi,

Below I’m including your code formatted for Micropython. Tried it on ESP32 only. I don’t think it will work on ESP8266 due to its memory limitation. However, can be modified for standard Python.

Thank you for sharing your great ideas!

import BlynkLib # with LCD class
from BlynkTimer import BlynkTimer
import machine, gc
import wifimgr as wm
import esp, uos
#stop esp messages
esp.osdebug(None)

#connect to network
wlan = wm.get_connection()
if wlan is None:
    print('Could not initialize the network connection.')
    while True:
        pass  # you shall not pass :D
    
# Create BlynkTimer Instance
timer = BlynkTimer()
#get token from wifimanager
blynk_token = wm.get_token()
# Initialize Blynk
blynk = BlynkLib.Blynk(blynk_token)

#set lcd widget from modified lib
lcd = BlynkLib.WidgetLCD(blynk, 0)

#*************** Progress bar init ***************
# HORIZONTAL BAR
C = ['\u258F','\u258E','\u258D','\u258C','\u258B','\u258A','\u2589','\u2588']
# VERTICAL BAR
E = ['\u2581','\u2582','\u2583','\u2584','\u2585','\u2586','\u2587','\u2588']

progress = 0
start = False
col=0                #(col from 0 to 15 LCD)
hflag=0
vflag=0

#****************** show msg after a short delay *********************
def Completion():
    if (progress == 0):
        lcd.printlcd(0, 0, ' completed 100% ')
           
#************************* ProgressBar ******************
def ProgressBar():
    global progress, col, hflag, vflag, start
    
    if (progress < 101):
        lcd.printlcd(0, 0, 'Progress {} %'.format(str(progress)))

        hflag += 1

        # HORIZONTAL BAR
        lcd.printlcd(col, 1, C[hflag - 1])
              
        if hflag == 8:
            hflag = 0
            col += 1
            #VERTICAL BAR
            vflag += 1
            if not vflag > 8:
                lcd.printlcd(15, 1, E[vflag - 1])

        if(progress == 100):
            #stop loop
            start = False                    
            #reset variables
            col = 0
            progress = 0
            vflag=0
            #2 seconds pause
            timer.set_timeout(1, Completion) 
        else: progress += 1

#*********************** press start button ************************
@blynk.ON('V1')  
def handler(value):
    global start
    if int(value[0]) == 1:
        start = True
        Init()
    while start == True:
        ProgressBar() # progressbar start

#**************** init LCD @ start ***************
def Init():
    lcd.clear()
    lcd.printlcd(1, 0, 'Press START')
    
if __name__ == '__main__':
    try:
        Init() #one time run
        while True:
            blynk.run()
            timer.run()
            machine.idle()
    except SyntaxError as e:
        print(e)
1 Like

hm
sorry Emilio
I only use c++
I will have to learn python.

Un minuteur serait très utile pour éteindre un relay dans un temps imparti
Comme éteindre un chauffage dans 30 minutes ou une lumière dans 20 minutes

Tu as du te tromper de fil !