Signaling with own hands. Alarm
ESP8266 Board and PIR motion Sensor HC SR501

Link to the sketch and setting up widgets https://yadi.sk/d/CECHM4Jb3S5Bu9
Link to Russian version
Ссылка на Русскую версию https://youtu.be/8kFRyxRLF6M
code
/*****************************************************************************
*
* Author: Obushenkov Alexey Andreevich
* Group in VK https://vk.com/engineer24
* YouTube channel https://www.youtube.com/channel/UCih0Gcl9IEdkR8deDJCiodg
* Inzhenerki Engineering room
*
*****************************************************************************
* A sketch is assembled on site http://docs.blynk.cc/
*****************************************************************************
* Modules in the project
* ESP8266 NodeMCU Lua WIFI V3 (3,75 $) https://goo.gl/GFDYq0
* NodeMCU L293D Motor Shield Board for ESP-12E (1.68 $) https://goo.gl/T0WwT6
* Infrared PIR motion sensor HC - SR501 (0,95 $) https://goo.gl/0mCfOL
* 1-channel relay control the High and Low levels (0,99 $) https://goo.gl/SnFuXY
* Passive Buzzer the Buzzer (0,50 $) https://goo.gl/clKuKb
*
*****************************************************************************
* What is the essence of the sketch
* Simplest alarm
* Triggered by the Infrared motion sensor PIR sensor (HC SR501) is in security mode
* Blink sends notifications to a Mobile device as a PUSH notification and an email
* plus relay to activate anything.
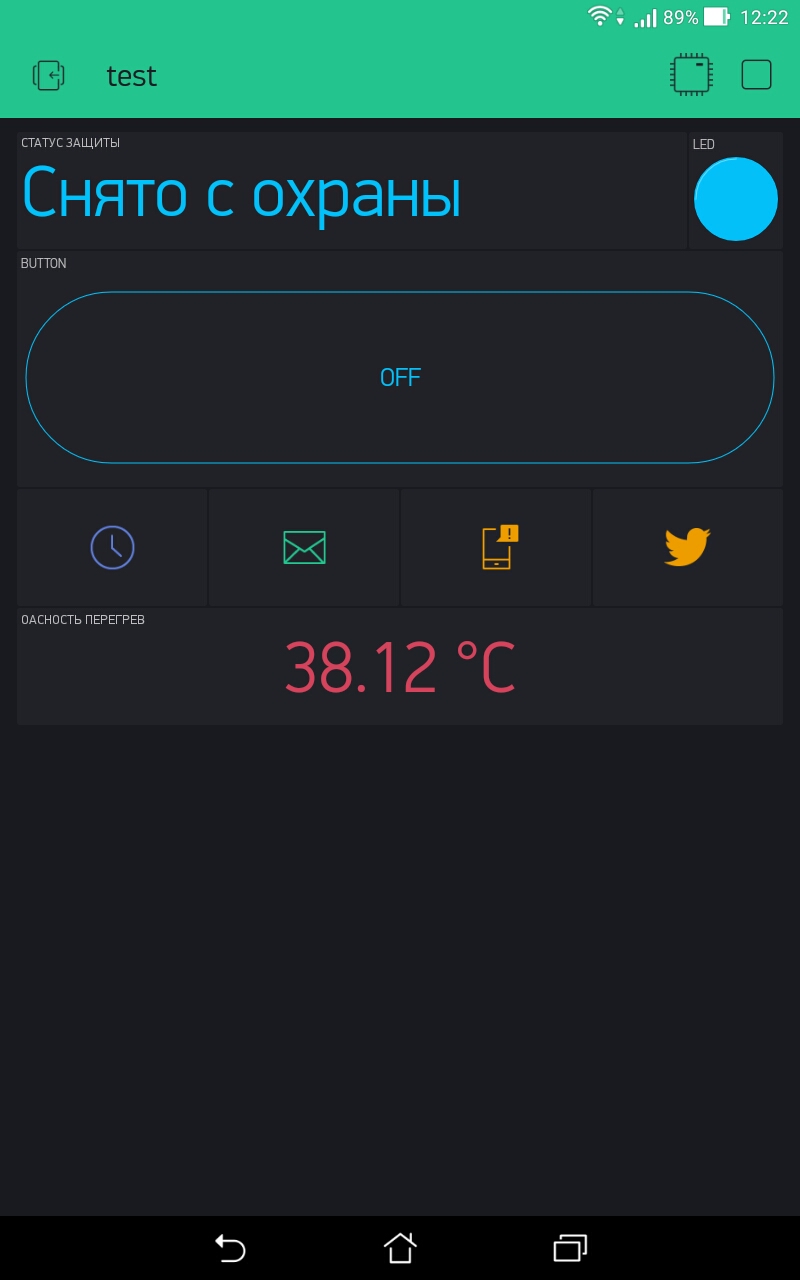
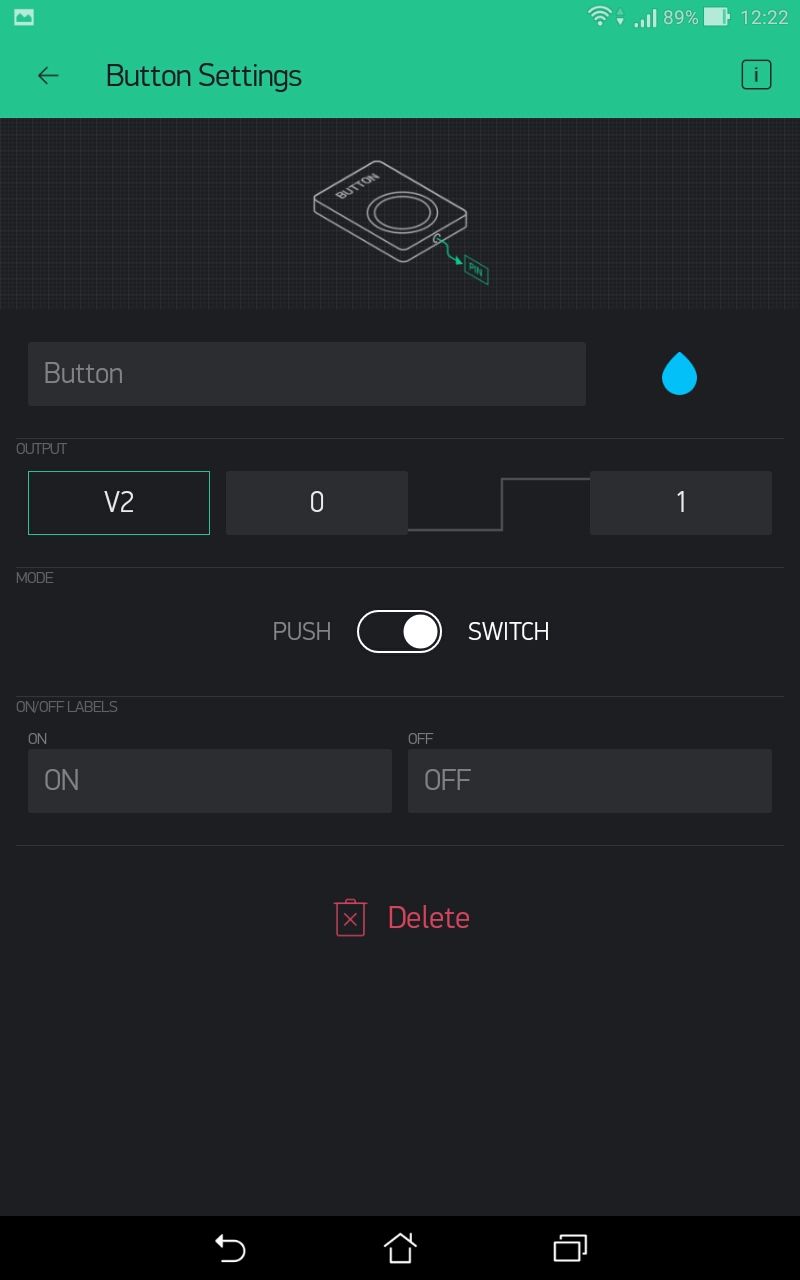
* Takes the protection of just using the widget Button mode SWITCH she is disarmed.
* That we would know under protection or not PIN D4 (sedit LED) under protection will glow,
* Without protection will be off.
* Depending on the condition of the system, changing its appearance
* sent messages, etc.
*
*****************************************************************************
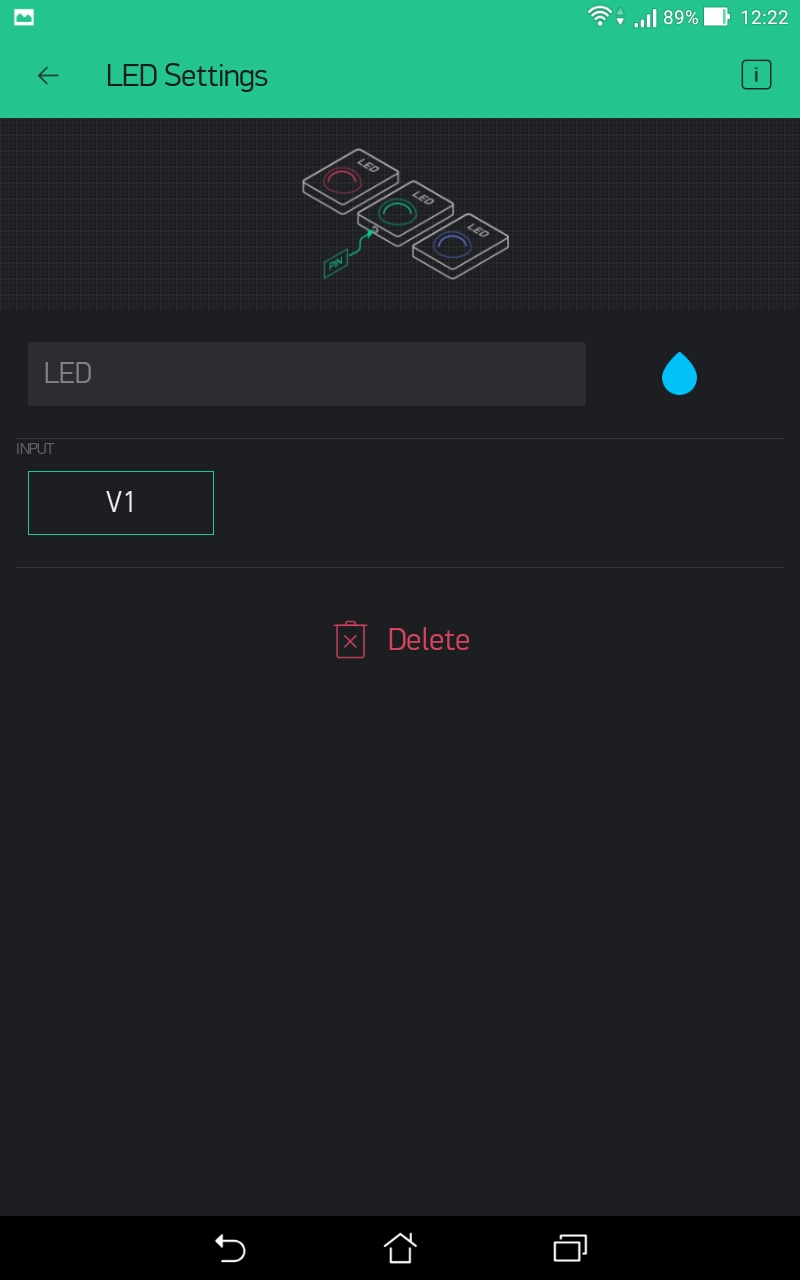
* V1 - Widget LED (Color led) (although in my case, it is not particularly needed)
* V2 - Widget BUTTON (the Button arm and disarm of the alarm)
* V10 - Widget Value Display or Labeled Value (a Reflection of the status of the system)
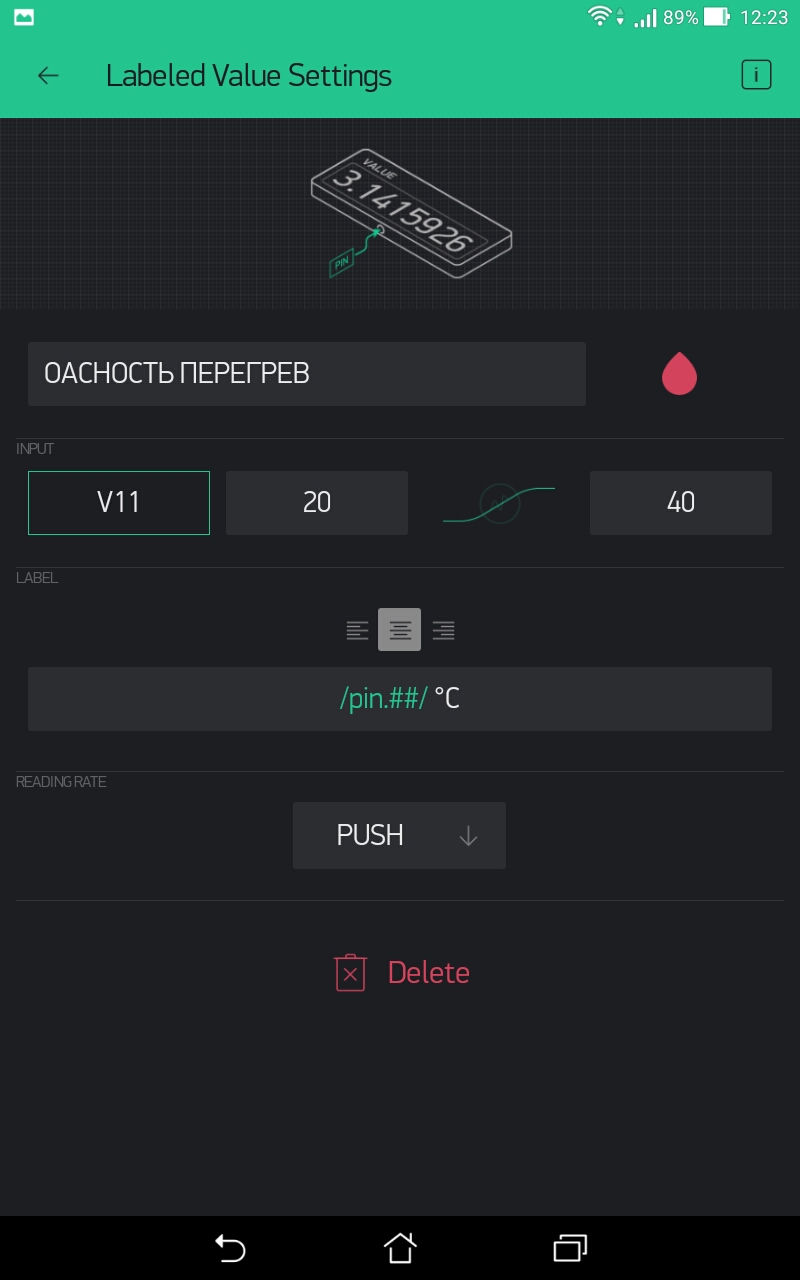
* V11 - Widget Value Display or Labeled Value (the Reflection from the thermometer)
*
* also nugene widgets (they can be unused, but need to remember to disable it in the code
* otherwise, for stability do not meet)
* RTC real time Clock
*
* Notification - notification Pushup
* Mail - E-Mail
* Twitter - Twitter
*****************************************************************************
*
*/
// If sousie line raskomentiruyte performance drops to 10 TIMES!!!
// After debugging the project to zakommentirovat
// #define BLYNK_PRINT Serial
// #define BLYNK_DEBUG
// By default, the Maximum allowed email + subject + message length is 120 characters.
// However, you can increase this limit if needed.
// ESP for example, you can set it to 1200 (don't know how it will affect performance)
// By the way Russian characters guzzle two times more than English
#define BLYNK_MAX_SENDBYTES 600
// Library ESP and Blynk
#include <ESP8266WiFi.h>
#include <BlynkSimpleEsp8266.h>
// Library for firmware ESP by air
#include <ESP8266mDNS.h>
#include <WiFiUdp.h>
#include <ArduinoOTA.h>
// Library for real-time clock
#include <TimeLib.h>
#include <WidgetRTC.h>
// Assignable inputs and outputs
#define PIR D1 // gpio 5 here plug-in infrared sensor
#define LED D4 // gpio 2 here can connect the led, but on the Board he already has (But it's inverted)
// D8 = gpio 15 here we catch relay which is driven by a high level
// if you have a relay with it's low clings through NPN transistor
// for example like this http://amperka.ru/product/bipolar-transistor
#define RELAY D8 // D8 = gpio 15
#define BUZZER D7 // D7 = gpio 13 here we catch the Squeaker
// color for LEDs and the color of the letters
#define BLYNK_GREEN "#23C48E"
#define BLYNK_BLUE "#04C0F8"
#define BLYNK_YELLOW "#ED9D00"
#define BLYNK_RED "#D3435C"
#define BLYNK_DARK_BLUE "#5F7CD8"
#define BLYNK_WHITE "#FFFFFF"
// Area identity ;-P
// You should get the Auth Token in the Blynk App.
// Go to the Project Settings (nut icon).
char auth[] = "XXXXXXXXXXXXXXXXXXXXXXXXXXXXXXXX";
// Your WiFi credentials.
// Set password to "" for open networks.
char ssid[] = "XXXXXXXXX";
char pass[] = "XXXXXXXXX";
char Mail[] = "sib.eng124@gmail.com"; // Your e-mail
String Subject = "Subject: Security ESP "; // subject of email
WidgetRTC rtc; // initialize widget real time clock
BlynkTimer timer; // initialize the timer
int timerSpeak_ID; // initialize a variable to hold the timer ID Tweeters
int timerPIRSensor_ID; // initialize a variable to hold the timer ID of the motion Sensor
WidgetLED led1(V1); // registreren widget LED
bool isFirstConnect = true; // Variable for storing state of the first time whether the established connection
bool pirState = false; // initialize variable to store the status Srabatyvaet alarm motion sensor
// initialize variable to store the Alarm condition
// false / off
// true included
bool flagProtection = false;
bool intruderState = LOW; // Variable that stores the triggering of the alarm
int securityStateX = 0; // number of the alarm condition
float B; // initialize variable to store data plavusa point sensor option 2
//************************************************************************************//
// Here starts the code of the program //
//************************************************************************************//
BLYNK_CONNECTED()// If has installed the first time, sinhroniziruete all widgets
{
if (isFirstConnect) {
Blynk.syncAll(); // syngenesiae all widgets
// Make string with time and date and dobavlaet to the message
String currentTime = String(hour()) + ":" + minute() + ":" + second();
String currentDate = String(day()) + "/" + month() + "/" + year() + " ";
String Notif = "Hardware Running" + currentDate + "" + currentTime;
Blynk.notify(Notif);
//I think the extra sending mail on startup
//Blynk.email(Mail, Subject, Notif); // my sketch to send better this way
//Blynk.email("sib.eng24@gmail.com", "Subject: Security ESP ", "Hardware Running"); // standard sending on soap
isFirstConnect = false;
}
}
void readPIRSensor() // function to read motion sensor
{
static int pir = LOW; // declare variable to store
// information about the state of digital input PIR
/*The static keyword is used to create a variable,
*which is visible to only one function. However, unlike local variables,
*which are created and destroyed with each function call,
*static variables remain after the function call, preserving their values between calls.
*/
if (flagProtection == true && pirState == LOW) // If alarm enabled
{pir = digitalRead(PIR);} // read the value from a digital input
// we are not interested in the state of the sensor while
// protection not included
if (flagProtection == true && pir == HIGH && pirState == LOW) // If alarm is Enabled (ON) and Motion Sensor is triggered
{pirState = HIGH; // This flag can be reset only by disabling the alarm
digitalWrite(LED, !pirState); // turn on the led on the Board
}
if (flagProtection == false && pirState == HIGH) // If alarm is Off (OFF) and Blile drawdown
{pirState = LOW; // Reset the flag
digitalWrite(LED, !pirState); // turn off led
}
// I'm trying to write this function so that it once again nothing happened
} //readPIRSensor
BLYNK_WRITE(V2) // Read the state of the button (Widget Button) and save the value in flagProtection
{
flagProtection = param.asInt(); // Read the button state
if (flagProtection) // if flag is raised
{timer.enable(timerPIRSensor_ID);} // Enable the timer function readPIRSensor
else // otherwise
{timer.disable(timerPIRSensor_ID); // Disable timer function readPIRSensor
timer.setTimeout(50, readPIRSensor);} // Pull the Motion Sensor function
// once with a delay of 50 Millisecond
}
void messeg() // function for sending messages, depending on the status of the Alarm (securityState)
{
String Notif; // Variable for storing messages
// The Respondent RTC and make a string to send
String currentTime = String(hour()) + ":" + minute() + ":" + second();
String currentDate = String(day()) + "/" + month() + "/" + year() + " ";
// depending on the condition of alarm select the desired text
// and add the date and time
switch (securityStateX) {
case 1:
Notif = "a Strange OBJECT" + currentDate + "" + currentTime;
break;
case 2:
Notif = "Protected" + currentDate + "" + currentTime;
break;
case 3:
Notif = "disarmed after obnoruzheniya OFFENDER" + currentDate + "" + currentTime;
break;
case 4:
Notif = "disarmed" + currentDate + "" + currentTime;
break;
//default:
// code to execute
}
static int i = 1; // variable and structure of if else needed for
// serial send delay
// there is a message to be sent
// you can just zakommentirovat
// not the desired method of communication
if (i == 3) {Blynk.notify(Notif); i=1;
}
else if (i == 2) {Blynk.email(Mail, Subject, Notif); i++;
}
else if (i == 1) {Blynk.tweet(Notif); i++;
}
}
// Custom widgets (change colors displaying a message), depending on the status of the Alarm (securityState)
void Setting (String color, String Text)
{
// variable and the design of the if else is needed to
// serial send delay
static int i = 1;
if (i == 4) {led1.setColor(color); i=1;} // Change color LED V1
else if (i == 3) {Blynk.setProperty(V10, "color", color); i++;}// Change the color of the widget V10
else if (i == 2) {Blynk.setProperty(V2, "color", color); i++;}// Change the color of the widget V2
else if (i == 1) {Blynk.virtualWrite(V10, Text); i++;} // Print a message Value Display
}
void sendSetting() // Send settings, depending on the status of the Alarm (securityState)
{
String Notif; // Variable for storing messages
String color; // Variable to store color
// then choose a setting depending on the system state
switch (securityStateX) {
case 1:
Notif = "a Stranger on the OBJECT";
color = BLYNK_RED;
break;
case 2:
Notif = "Protected";
color = BLYNK_GREEN;
break;
case 3:
Notif = "disarmed was the Offender";
color = BLYNK_BLUE;
break;
case 4:
Notif = "disarmed";
color = BLYNK_BLUE;
break;
//default:
// code to execute
}
// call the function Setting and substitute the data
Setting(color, Notif); // Custom widgets (change colors displaying a message)
}
void securityState () // Define the Alarm status and the corresponding actions produce
{
// State 1 // "If the system is armed" and "sensor Tripped" and "Not Able 1"
// Code executed once
if (flagProtection == true && pirState == true && securityStateX != 1)
{
securityStateX=1; // number of the status of the alarm 1
intruderState = HIGH;// the Alarm went off
timer.setTimer(1000, messeg, 3); // call funkciu messeg 3 times, with an interval of 1 second
digitalWrite(RELAY, intruderState); // relay
timer.setTimer(200, sendSetting, 4); // call funkciu sendSetting 4 times, with an interval of 0.2 seconds
timer.enable(timerSpeak_ID); // Enable the timer function Speak Squeaker
} // State 1 //
// State 2 // "If the system is armed" and "Sensor is Tripped" and "Not in Condition 2"
// Code executed once
else if (flagProtection == true && pirState == false && securityStateX != 2)
{
securityStateX=2; // Number of alarm condition 2
timer.setTimer(1000, messeg, 3); // call funkciu messeg 3 times, with an interval of 1 second
timer.setTimer(200, sendSetting, 4); // call funkciu sendSetting 4 times, with an interval of 0.2 seconds
timer.disable(timerSpeak_ID); // Disable timer function Speak Squeaker
} // State 2 //
// Condition 3 // "If security is turned Off" and "Alarm" and "Condition 3"
// Code executed once
else if (flagProtection == false && intruderState == HIGH && securityStateX != 3)
{
securityStateX=3; // number of the status alarm 3
intruderState = LOW; // Reset the flag triggering the Alarm
timer.setTimer(1000, messeg, 3); // call funkciu messeg 3 times, with an interval of 1 second
digitalWrite(RELAY, intruderState); // turn Off relay
timer.setTimer(200, sendSetting, 4); // call funkciu sendSetting 4 times, with an interval of 0.2 seconds
timer.disable(timerSpeak_ID); // Disable timer function Speak Squeaker
} // State 3 //
// State 4 // "If security is Disabled" and "No Alarm" and "Status 4"
// Code executed once
else if (flagProtection == false && intruderState == LOW && securityStateX != 4)
{
if (securityStateX !=3) // if previous state is not equal to 3 then
{securityStateX=4; // Number of alarm condition 4
timer.setTimer(1000, messeg, 3); // call funkciu messeg 3 times, with an interval of 1 second
timer.setTimer(200, sendSetting, 4); // call funkciu sendSetting 4 times, with an interval of 0.2 seconds
timer.disable(timerSpeak_ID); // Disable timer function Speak Squeaker
}
} // State 4 //
} //securityState
void Speak() // Function for Buzzer Buzzer (Chants)
{
// Set frequency and duration for the tweeters
tone(BUZZER, 3500, 50);
} // Speak
//**Start*******************the Send data option 1******************
// Sending data to Blynk. In the Widget settings
// find REDIN RATE and set PUSH. !!!!Only!!!!PUSH!!!!
// otherwise will depart from online
void readSensorB() // function to read sensor B
{
//*********The code for getting random values*******************
//**************************Beginning********************************
static int x = random (100, 200);
static int i = 2000;
if (i > -1) {
i = i + x;
B=(float)i/100;
if (i >= 4000) x = -random (100, 200); // switching control to the maximum
if (i <= 2000) x = random (100, 200); // switching control to the maximum
}
//*********The code for getting random values*******************
//**************************End*********************************
//**************************The send data option 1******************
// Sending data to Blynk in the Widget settings
// find REDIN RATE and set PUSH. !!!!Only!!!!PUSH!!!!
// otherwise will depart from online
Blynk.virtualWrite(V11, B);
//***Depending on the sensor you can change the color and the inscription***
//Serial.println(B); // print values to serial monitor
static int hotState = 0;
if (B > 32 && hotState != 1)
{hotState = 1;
Blynk.setProperty(V11, "label", "OPASNOSTI OVERHEAT");// Change the name of the widget V11 (understands only English)
Blynk.setProperty(V11, "color", BLYNK_RED); // Change the color of the widget V11 red
}
else if (B <= 32 && hotState != 2)
{hotState = 2;
Blynk.setProperty(V11, "label", "Temperature NORMAL"); // Change the name of the widget V11 (understands only English)
Blynk.setProperty(V11, "color", BLYNK_WHITE); // Change the color of the widget V11 on white
}
}
//The bottom line is that in this case we obnavljam data with the frequency which was prescribed
//timer B. This line is
//void setup()
//timer.setInterval(1000L, readSensorB);
//ie update data in the widget manages Our iron (ESP8266)
//**End********************the Send data option 1******************
void reconnectBlynk() // function which checks the connection
{
if (!Blynk.connected()) { //if there is no connection then
if (Blynk.connect()) { // conectica
BLYNK_LOG("Reconnected"); // print in log
} else {
BLYNK_LOG("Not reconnected"); // print in log
}
}
} // reconnectBlynk
void setup()
{
// Debug console
Serial.begin(19200);
Serial.println(" ");
Serial.println("Launch");
// Custom inputs and outputs
pinMode (LED,OUTPUT);
digitalWrite(LED, HIGH);
pinMode (RELAY,OUTPUT);
pinMode (PIR,INPUT);
pinMode (BUZZER,OUTPUT);
delay(1000);
for (int i=0; i <= 3; i++)
{tone(BUZZER, 300, 50);
delay(80);}
// Blynk.begin(auth, ssid, pass);
// Usually, we use the construction from above but from
// ESP8266 for it hangs when trying to install a WiFi connection
Blynk.config(auth); // so configurable connection
Blynk.disconnect(); //terminate the connection
Blynk.connect(); // and then try to have to concretise
//Custom timers
timerPIRSensor_ID = timer.setInterval(1000L, readPIRSensor); // Pull the motion sensor function every six seconds.
timerSpeak_ID = timer.setInterval(500L, Speak); // Pull the function
timer.disable(timerPIRSensor_ID); // disable timer Motion Sensor
timer.disable(timerSpeak_ID); // disable timer Tweeters
timer.setInterval(3000L, securityState); // Pull the function of protection Status once a second
timer.setInterval(30000L, reconnectBlynk); // check every 30 seconds if still connected to the server
timer.setInterval(2000L, readSensorB); // read data from sensor B times a second (Pull function)
rtc.begin(); // run clock widget real-time
//Custom widgets
// Turn on the LED for that would change the color of the Led's were visible
led1.on();
// Change the name of the widget V10 (Value Display)(only understands English)
Blynk.setProperty(V10, "label", "Status"); // Custom title for the Widget
//************************
ArduinoOTA.setHostname("Security01"); //OTA Set the name of the network port
ArduinoOTA.setPassword((const char *)"0000"); //OTA Set access password for remote firmware
ArduinoOTA.begin(); //Initialize OTA OTA
Serial.println("Ready");
Serial.print("IP address: ");
Serial.println(WiFi.localIP());
//***********************
if (Blynk.connected()) { // If has established communication, then twice a Squeaker will Paknam
for (int i=0; i <= 2; i++)
{tone(BUZZER, 200, 50);
delay(100);}
}
else {
for (int i=0; i <= 10; i++) // If not connected then 10 times the Beeper will Paknam
{tone(BUZZER, 100, 50);
delay(80);}
}
} //setup
void loop()
{
ArduinoOTA.handle(); // OTA Always ready to be flashed wirelessly
if (Blynk.connected()) {
Blynk.run(); // Startup blink
}
timer.run(); // start the timer
} // loop