Hi Dave,
I thought I’d post the code here so that others can see/use it if they wish.
#include <PubSubClient.h>     // https://github.com/knolleary/pubsubclient
#include <ESP8266WiFi.h>
#include <SimpleTimer.h>

// Wi-Fi variables...
const char *ssid =                "REDACTED";
const char *pass =                "REDACTED";

// MQTT Server Setting variables...
IPAddress mqtt_server_ip          (192,168,xxx,xxx);                     // IP Address for the MQTT Server...
const int mqtt_port =             1883;                                  // Port for the MQTT Server...
const char* mqtt_username =       "REDACTED";                            // MQTT Server username...
const char* mqtt_password =       "REDACTED";                            // MQTT Server password...
String base_mqtt_topic =          "My_MQTT_Test/NodeMCU_Test_Device";    // Start of the MQTT Topic name used by this device
String mqtt_client_id;                                                   // Will hold unique ID, so use ChipID will be assigned in void setup


// Create instances of the Wi-Fi, MQTT and SimpleTimer objects...
WiFiClient My_WiFi_Client;
PubSubClient MQTTclient(My_WiFi_Client);
SimpleTimer timer;


void connect_to_Wifi()
{
  if (WiFi.status() != WL_CONNECTED)
  {
    Serial.print("Connecting to ");
    Serial.print(ssid);
    Serial.println("...");
    WiFi.begin(ssid, pass);

    if (WiFi.waitForConnectResult() != WL_CONNECTED)
    {
      return;
    }
    Serial.println("WiFi Connected");
  }
  WiFi.mode(WIFI_STA);
  Serial.print("IP Address = ");
  Serial.println(WiFi.localIP());
}

void connect_to_MQTT()
{
  Serial.println("Connecting to MQTT...");
  if(MQTTclient.connect(mqtt_client_id.c_str(), mqtt_username, mqtt_password, (base_mqtt_topic + "/Status").c_str(),0, 1, "Dead"))
  {
    // We get here if the connection was successful...
    Serial.println("MQTT Connected");
    // We can update the /Status topic to "Alive" now...
    MQTTclient.publish((base_mqtt_topic + "/Status").c_str(),"Alive",true);

    // ... and then re/subscribe to the watched topics
    MQTTclient.subscribe((base_mqtt_topic + "/LED").c_str());   // Watch the .../LED topic for incoming MQTT messages
    // Add other watched topics in here...  <--------------------- THIS IS THE BIT THAT YOU'LL FORGET TO DO!!

  }
  else
  {
    // We get here if the connection failed...
    Serial.print(F("MQTT Connection FAILED, Return Code = "));
    Serial.println(MQTTclient.state());
    Serial.println();
    /*
    MQTTclient.state return code meanings...
    -4 : MQTT_CONNECTION_TIMEOUT - the server didn't respond within the keepalive time
    -3 : MQTT_CONNECTION_LOST - the network connection was broken
    -2 : MQTT_CONNECT_FAILED - the network connection failed
    -1 : MQTT_DISCONNECTED - the client is disconnected cleanly
     0 : MQTT_CONNECTED - the client is connected
     1 : MQTT_CONNECT_BAD_PROTOCOL - the server doesn't support the requested version of MQTT
     2 : MQTT_CONNECT_BAD_CLIENT_ID - the server rejected the client identifier
     3 : MQTT_CONNECT_UNAVAILABLE - the server was unable to accept the connection
     4 : MQTT_CONNECT_BAD_CREDENTIALS - the username/password were rejected
     5 : MQTT_CONNECT_UNAUTHORIZED - the client was not authorized to connect *
     */
  }

}

void MQTTcallback(char* topic, byte* payload, unsigned int length)
{
  Serial.print(F("Message arrived ["));
  Serial.print(topic);
  Serial.print(F("] ["));
  for (int i=0;i<length;i++)
  {
    Serial.print((char)payload[i]);
  }
  Serial.println(F("]"));

  String msg_topic = String((char *)topic);
  String msg_payload = String((char *)payload);
  msg_payload.remove(length); // Trim any unwanted characters off the end of the string
  // We now have two string variables, 'msg_topic' and 'msg_payload' that we can use in 'if' statements below...

  if (msg_topic==base_mqtt_topic + "/LED")
  {
    if (msg_payload == "ON")
    {
      digitalWrite (2,LOW);
    }
    else if (msg_payload == "OFF")
    {
      digitalWrite (2,HIGH);
    }
  }

  // Handle messages from other topics in here,
  // DON'T FORGET to subscribe to the topic in void MQTT_Connect()

} // End of void MQTTcallback


void MQTT_Heartbeat()
{
    MQTTclient.publish((base_mqtt_topic + "/RSSI").c_str(),String(WiFi.RSSI()).c_str(),true);         // Publish RSSI
    MQTTclient.publish((base_mqtt_topic + "/Uptime").c_str(),String(millis()/1000).c_str(),true);     // Uptime in seconds
}


void setup()
{
  Serial.begin(74880);
  pinMode(2,OUTPUT); // Internal LED on NodeMCU is connected to GPIO2 - Active LOW
  mqtt_client_id = String(ESP.getChipId());
  MQTTclient.setServer(mqtt_server_ip, mqtt_port);
  MQTTclient.setCallback(MQTTcallback);           // This function is called automatically whenever a message arrives on a subscribed topic
  connect_to_Wifi();
  connect_to_MQTT();
  timer.setInterval(5000, MQTT_Heartbeat);
}

void loop()
{
  if(WiFi.status() != WL_CONNECTED)
  {
  connect_to_Wifi();
  connect_to_MQTT();
  }

  if (!MQTTclient.connected())     // Note that MQTTclient.connected() will still return 'true' until the MQTT keepalive timeout has expired (around 35 seconds for my setup)
  {
  connect_to_MQTT();
  }

  timer.run();
  MQTTclient.loop();
}
I couldn’t find anything I liked from my old code, so I put this together from parts of my ‘bells and whistles’ code.
It does two things:
- Pushes RSSI and Uptime data to out in MQTT messages every 5 seconds
- Toggles the onboard LED on and off when it receives instructions via MQTT messages
This should give you the bare bones that can be used to push things like temperature and humidity data out as MQTT messages, and allow you to send MQTT instructions to the device as you would from any Blynk widget.
The code allows you to define the “base” MQTT topic structure for your device, which I’ve found works very well when you want to have a slightly different structure for each device you are running. It means you don’t have to do a lot of find and replace within the code.
In this example I’ve defined the base topic as “My_MQTT_Test/NodeMCU_Test_Device”. Think of the topics as being like a Windows folder structure and organise you devices in a similar way to how you might structure photos or documents within your folders.
This might be on a room by room basis if you’re doing home automation, but it’s up to you.
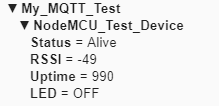
in MQTT explorer, the output looks like this:
The Status message uses something called “Last Will and Testament” and is a way of the device telling the MQTT server what to do when it dies. In this case it changes the “Status” topic to “Dead” and this change will occur about 40 seconds after the device drops off the servers radar.
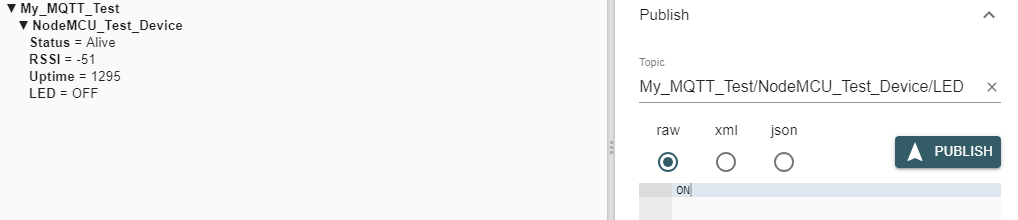
Sending (Publishing) an MQTT message that will make the NodeMCU turn its built in LED on or off can be done from MQTT Explorer like this:
or in Node-Red like this:

The MQTT message body (Payload) has to be “ON” or “OFF” in uppercase - simply because that’s how I’ve coded it. You could easily change to 1 and 0, true and false etc. Going for 1 and 0 makes sense because you can then turn that string into an integer and use it directly in your digitalWrite command (although you have to ! (NOT) it because the LED is active LOW.
Some things to watch out for. If your messages start to get truncated (because you’ve gone OTT with the topic name structure) then you have to manually edit the PubSubClient.h file and increase the MQTT_MAX_PACKET_SIZE value.
If you want to add new topics that the device will watch for commands then it’s a two step process:
- Add the logic to
MQTTcallback - Subscribe to the topic once the MQTT connection is established. This is done in 1connect_to_MQTT` - This is the bit I always forget. Looking at the serial monitor when you’re trying to debug these problems is handy, because iot will tell you when a new message has arrived and what its contents is. If you don’t see the message then either you’re publishing to the wrong topic, or you haven’t subscribed to the topic.
PubSubClient uses character (char) variable types. I hate working with these (mostly because I don’t understand them, but also because most system variables or sensor data is in the form of strings or float/integers). This means you’ll see a lot of things like this: String(WiFi.RSSI()).c_str() where the RSSI value is turned into a String, then a character string.
I also take the char data that comes from the inbound MQTT messages and turn it into strings so that I can work with it more easily, like this:
  String msg_topic = String((char *)topic);
  String msg_payload = String((char *)payload);
I’m sure there are much better ways of doing this, but this old dog probably isn’t going to take them onboard!
The code looks quite bulky and daunting, but it’s a good basis for doing some testing, and it’s very easy to then add-in your own to send sensor data to the server and respond to commands on the topics that you’ve subscribed to.
Give me a shout if you have any problems or when you want to do more challenging stuff.
Pete.