Hi,
could You help my discover, why the state on the btnPin (gpio14 (D5)) does not back to HIGH when I disconnect from GND?
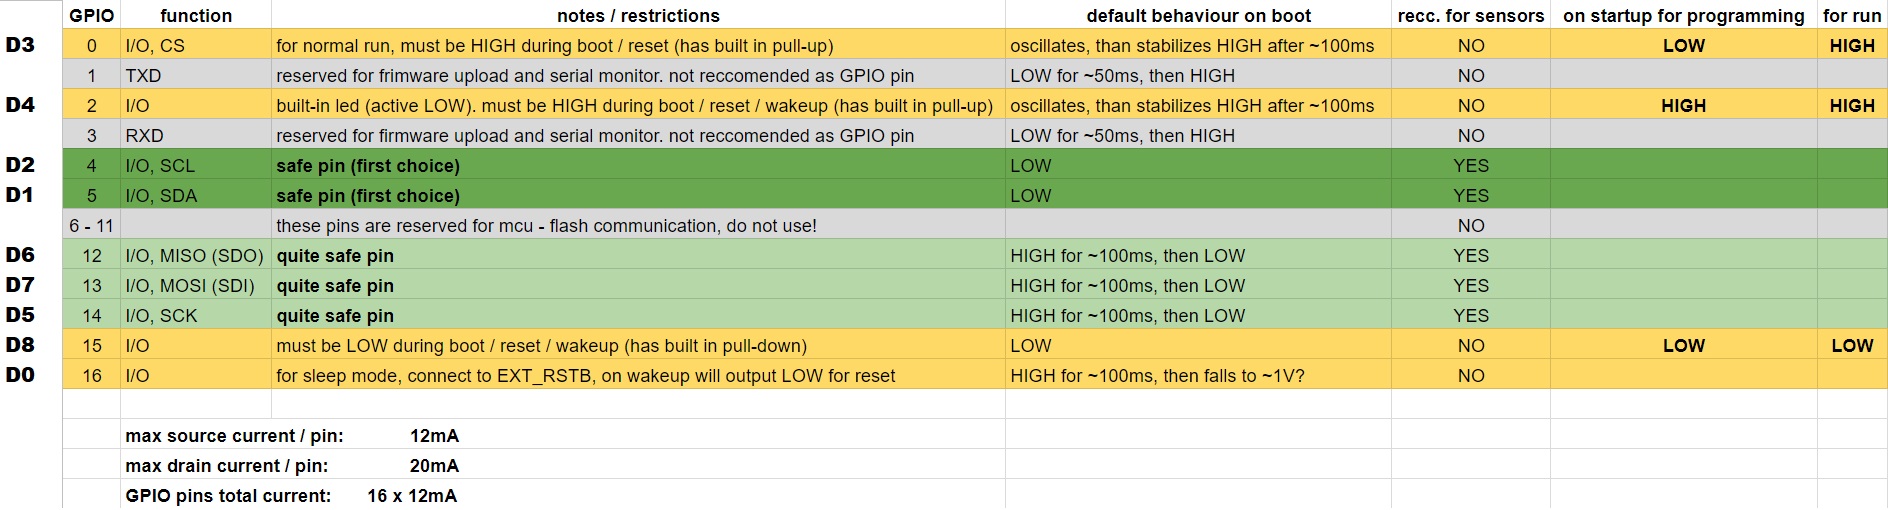
The case is: when this D5 is open (not connect to gnd) I see “1” in blynk in Value Display which is connected to V0, so all is correct. But when I connect this pin to gnd then Value Display shows “0” which is also correct, but when I disconnect then the state is still “0”. Shouldn’t be “1” due to set INPUT_PULLUP which I declared in setup method?
Not really a Blynk issue as it could be due the type of GPIO, weak pullup?.. ESP’s have particulars across various pins. What does your Serial prints say?
@Gunner thanks for the tip. You probably have right that it can be issue with gpio itself. When I connected my board few hours later, the state were changing correctly. I’m only concern that if gpio 14 is not the best choice, so could I use such pin in sonoff basic to connect physical button?
Never said it won’t work… just basically pointing out that some pins have peculiar issues.
As for the Sonoff Basic, no problem using the built-in button on GPIO0.
I have some Blynkified Sonoff code here that I started with, but it does have some issues with “switch bounce”.
I have since then improved with more reliable anti-bounce code that I found in the tubes, for said button… but all mine now work on Virtuino instead of Blynk, so that is the only code I have handy and do not feel up to editing and testing my existing Blynk code right now.
But here is a snippet of the button monitoring with anti-bounce that you can probably merge if desired…
void PhysButton() {
// Monitor and Debounce Physical Button
  if (digitalRead(pysBtn) != pinState) {  // get state of GPIO 0
    dbStart = millis();      // reset db timer
    pinState = !pinState;    // now they are equal, won't enter
  }                          // here again unless pin state changes
  if (millis() - dbStart > dbTime) {  // db timer has elapsed
    btnState = pinState;  // button state is valid
  }
  if (btnState != prevBtnState && btnState == HIGH) { // btnState changed
    // if button pressed and NOT latched
    if (!latch) {
      latch = true;    // prevents entry while latched
      digitalWrite(led, HIGH);  // LED ON
      digitalWrite(rly, LOW);  // Relay OFF
    } else {
      // if button pressed while latched,
      latch = false;
      digitalWrite(led, LOW);  // LED OFF
      digitalWrite(rly, HIGH);  // Relay ON
    }
    if (latch) {
      V_memory[1] = 1;  // Update Virtuino Button Widget ON
    } else {
      V_memory[1] = 0;  // Update Virtuino Button Widget OFF
    }
  }
  prevBtnState = btnState;
}
The Sonoff Basic V1 allowd easy access to GPIO14, but this was changed in V2, and again in the V3 model.
if you’re looking to use the V1 Sonoff then by all means go with GPIO14, but to be honest there are better alternatives for applications like light switching.
The Shelly1 has a built-in switch connector and is a very small form factor. you donet even have to do any soldering, as the programming headers are accessible.
It also has some nice features such as being able to be powered by 12v by moving a jumper, and having relay contacts that are independent of the supply voltage.