Need Help

I was looking at the code but now that it is hard to read I am done. I may come back later and look but perhaps not.

3 Likes

I removed the unformatted code… Please properly format all posted code, as requested a few times now.

But one last hint… all your timers are running concurrently, thus so is their (identical) function tring to run at the same time… I would shut down as well if multiple people started yammering at me all wanting the same thing something done at the exact same time but for each one individually :stuck_out_tongue_winking_eye:

3 Likes

Maybe he has a QuadCore MCU ? :thinking::rofl:

I am not getting what you are trying to explain :slightly_frowning_face:

How hard it is to explain “Read this and follow directions” :thinking:

1 Like

Which bit? how to post code correctly, or how to set-up your timers so that they don’t clash with each other?

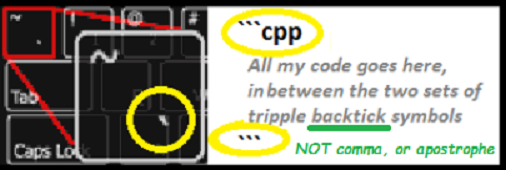
The posting code was already explained, but you didn’t follow the instructions:

Blynk%20-%20FTFC

The timers thing is discussed here:

Pete.

2 Likes

@faisaljagirdar14048 Now you are posting almost entire copies of another topic here… why?

2 Likes

I used this code it works fine to sync 4 physical buttons… But the problem I am getting is my nodeMCU and wemos D1 mini losing its WiFi connection and reconnecting automatically this is happening continuously. The device goes offline and connects automatically again. So I am finding solution for that. I am New here in this Blynk community. I don’t know how to post in proper format etc. You all are master in this there for I asked help. I hope you understand my situation. Thanks :slightly_smiling_face:

#define BLYNK_PRINT Serial


#include <ESP8266WiFi.h>
#include <BlynkSimpleEsp8266.h>

// You should get Auth Token in the Blynk App.
// Go to the Project Settings (nut icon).
char auth[] = "xxxxxxxxxx";

// Your WiFi credentials.
// Set password to "" for open networks.
char ssid[] = "xxxx";
char pass[] = "xxxxxxx";

// Set your LED and physical button pins here
const int ledPin1 = 12;
const int ledPin2 = 13;
const int ledPin3 = 14;
const int ledPin4 = 15;
const int btnPin1 = 5;
const int btnPin2 = 4;
const int btnPin3 = 0;
const int btnPin4 = 1;

BlynkTimer timer;
void checkPhysicalButton();

int led1State = LOW;
int btn1State = HIGH;

int led2State = LOW;
int btn2State = HIGH;

int led3State = LOW;
int btn3State = HIGH;

int led4State = LOW;
int btn4State = HIGH;

// Every time we connect to the cloud...
BLYNK_CONNECTED() {
  // Request the latest state from the server
  Blynk.syncVirtual(V12);
  Blynk.syncVirtual(V13);
  Blynk.syncVirtual(V14);
  Blynk.syncVirtual(V15);

  // Alternatively, you could override server state using:
  //Blynk.virtualWrite(V12, led1State);
  //Blynk.virtualWrite(V13, led2State);
  //Blynk.virtualWrite(V14, led3State);
  //Blynk.virtualWrite(V15, led4State);

}

// When App button is pushed - switch the state
BLYNK_WRITE(V12) {
  led1State = param.asInt();
  digitalWrite(ledPin1, led1State);
}
  
 BLYNK_WRITE(V13) {
  led2State = param.asInt();
  digitalWrite(ledPin2, led2State);
 }
BLYNK_WRITE(V14) {
  led3State = param.asInt();
  digitalWrite(ledPin3, led3State);
}
BLYNK_WRITE(V15) {
  led4State = param.asInt();
  digitalWrite(ledPin4, led4State);
}

void checkPhysicalButton()
{
  if (digitalRead(btnPin1) == LOW) {
    // btn1State is used to avoid sequential toggles
    if (btn1State != LOW) {

      // Toggle LED state
      led1State = !led1State;
      digitalWrite(ledPin1, led1State);

      // Update Button Widget
      Blynk.virtualWrite(V12, led1State);
    }
    btn1State = LOW;
  } else {
    btn1State = HIGH;
  }

  if (digitalRead(btnPin2) == LOW) {
    // btnState is used to avoid sequential toggles
    if (btn2State != LOW) {

      // Toggle LED state
      led2State = !led2State;
      digitalWrite(ledPin2, led2State);

      // Update Button Widget
      Blynk.virtualWrite(V13, led2State);
    }
    btn2State = LOW;
  } else {
    btn2State = HIGH;
  }

  if (digitalRead(btnPin3) == LOW) {
    // btnState is used to avoid sequential toggles
    if (btn3State != LOW) {

      // Toggle LED state
      led3State = !led3State;
      digitalWrite(ledPin3, led3State);

      // Update Button Widget
      Blynk.virtualWrite(V14, led3State);
    }
    btn3State = LOW;
  } else {
    btn3State = HIGH;
  }

  if (digitalRead(btnPin4) == LOW) {
    // btnState is used to avoid sequential toggles
    if (btn4State != LOW) {

      // Toggle LED state
      led4State = !led4State;
      digitalWrite(ledPin4, led4State);

      // Update Button Widget
      Blynk.virtualWrite(V15, led4State);
    }
    btn4State = LOW;
  } else {
    btn4State = HIGH;
  }
}

void setup()
{
  // Debug console
  Serial.begin(9600);

  Blynk.begin(auth, ssid, pass);
  // You can also specify server:
  //Blynk.begin(auth, ssid, pass, "blynk-cloud.com", 8442);
  //Blynk.begin(auth, ssid, pass, IPAddress(192,168,1,100), 8442);

  pinMode(ledPin1, OUTPUT);
  pinMode(btnPin1, INPUT_PULLUP);
  digitalWrite(ledPin1, led1State);
  

  pinMode(ledPin2, OUTPUT);
  pinMode(btnPin2, INPUT_PULLUP);
  digitalWrite(ledPin2, led2State);
  

  pinMode(ledPin3, OUTPUT);
  pinMode(btnPin3, INPUT_PULLUP);
  digitalWrite(ledPin3, led3State);
  

  pinMode(ledPin4, OUTPUT);
  pinMode(btnPin4, INPUT_PULLUP);
  digitalWrite(ledPin4, led4State);

  // Setup a function to be called every 100 ms
  timer.setInterval(500L, checkPhysicalButton);
}

void loop()
{
  Blynk.run();
  timer.run();
}

My first thought would be to ensure that it’s not a networking issue, or a power supply issue.
Run a very simple sketch from Sketch Builder and make sure it functions without disconnections.

If that’s okay then it’s your code.

Your checkPhysicalButton() function does quite a lot processing, and it probably isn’t running as frequently as you’d like it to in order for your physical buttons to feel responsive.
Blynk needs to frequently be fed with processor time, and that isn’t happening while the processor is executing functions. you could try inserting some Blynk.run statements after each section of code in your checkPhysicalButton() function. These would allow Blynk to “come up for air” while the function executes.

The other option (which is what I’d do) is to attach interrupts to each of the physical button pins.
That way, you don’t have to scan them for changes in state. When a button is pressed the corresponding interrupt would fire and then it would call the function associated with that button.
You might need a bit of debounce code in the functions that are called, as physical buttons tend to produce multiple connections/disconnections when they first make or break the circuit, but that’s easy enough to do.

Interrupts and the associated debounce code aren’t a Blynk thing, and there’s plenty of information on the internet about how to use them. Just be aware that Arduinos only allowed interrupts on some pins, but NodeMCUs allow them on all digital pins.

Pete.

2 Likes

When I upload other blynk example codes like “stand alone” to control the led from the widgets it works good. And doesn’t losing the WiFi connection. Therefore there no any problem of network and power supply.
But when I upload the “Sync physical button” code from the blynk sketch builder it works fine for switching the led from both blynk app and physical button. But the problem remains same here also. The Blynk app shows device is offline and it come back to online again automatically. This is the only problem of my nodeMCU and wemos D1 mini. Someone says it is unstable.
I don’t know how to use interrupters. I am not a developer like you all masters.
I am a student and working on this project. So what can I o now.?

@faisaljagirdar14048 , I realize you are a beginner (like me), but just a side note, everything Pete said above is not something a normal pro would take the time to tell a normal beginner. I had an epiphany moment reading what he had written when it came to timers / and the difference between arduinos and nodemcu’s. Thanks Pete!

In a nutshell he gave the best tip he could think of
In your checkPhysicalButton, place a blink.run, maybe between the major IF statements? He was leaving it up to your since its your program.

void checkPhysicalButton()
if  {
do stuff
}

Blynk.run();
if  {
do stuff
}

Blynk.run();
}  // end of void checkPhysicalButton()

and so on, but only on the checkPhysicalButton().

compile/upload that code first … work ok?

If not
He also told us to debounce the button. this can be super important. Read up on this… read up on this twice. check youtube… check other forums… this is super important for your board/button … you have to know how to do this in the future… this is a MUST to learn. Learn why you need it.

Also… learn your board… and what it can do. Blynk rides on top of what you can do with your board. Good luck!

2 Likes

It is most likely your code trying to do to much to fast and causing the background operations to lose connectivity.

We are not developers or masters either. Most of us are just Blynk users and programming beginners.

I spend a lot of time Googling the ideas I read about here, and then experimenting with what I find to learn about it.

Google ESP8266 interrupts, spend some time reading and you will find it is not as complex as it first seems.

3 Likes

It might be, or not, this

const int btnPin4 = 1;

The ESP has some “special” pins that can cause unwanted behavior if not used correctly.

https://tttapa.github.io/ESP8266/Chap04%20-%20Microcontroller.html
https://www.forward.com.au/pfod/ESP8266/GPIOpins/index.html

Try starting with just one button and led, and then add them in one by one and see if there is a point when the connection issues start.

1 Like

@PeteKnight @Gunner @lvennard
Thank you so mupc to all. for your guidance and help.
My problem was solved by just editing the code, by adding Blynk.run();
in void checkPhysicalButton() after every if statement.

Thank you once again to All @PeteKnight @Gunner @lvennard for giving your precious time to reply on my post and for helping me. now my project is working fine :slightly_smiling_face:

here is the code…

#define BLYNK_PRINT Serial


#include <ESP8266WiFi.h>
#include <BlynkSimpleEsp8266.h>

// You should get Auth Token in the Blynk App.
// Go to the Project Settings (nut icon).
char auth[] = "token";

// Your WiFi credentials.
// Set password to "" for open networks.
char ssid[] = "ssid";
char pass[] = "pass";

// Set your LED and physical button pins here
const int ledPin1 = 12;
const int ledPin2 = 13;
const int ledPin3 = 14;
const int ledPin4 = 15;
const int btnPin1 = 5;
const int btnPin2 = 4;
const int btnPin3 = 2;
const int btnPin4 = 0;

BlynkTimer timer;
void checkPhysicalButton();

int led1State = LOW;
int btn1State = HIGH;

int led2State = LOW;
int btn2State = HIGH;

int led3State = LOW;
int btn3State = HIGH;

int led4State = LOW;
int btn4State = HIGH;

// Every time we connect to the cloud...
BLYNK_CONNECTED() {
  // Request the latest state from the server
  Blynk.syncVirtual(V12);
  Blynk.syncVirtual(V13);
  Blynk.syncVirtual(V14);
  Blynk.syncVirtual(V15);

  // Alternatively, you could override server state using:
  //Blynk.virtualWrite(V12, led1State);
  //Blynk.virtualWrite(V13, led2State);
  //Blynk.virtualWrite(V14, led3State);
  //Blynk.virtualWrite(V15, led4State);

}

// When App button is pushed - switch the state
BLYNK_WRITE(V12) {
  led1State = param.asInt();
  digitalWrite(ledPin1, led1State);
}
  
 BLYNK_WRITE(V13) {
  led2State = param.asInt();
  digitalWrite(ledPin2, led2State);
 }
BLYNK_WRITE(V14) {
  led3State = param.asInt();
  digitalWrite(ledPin3, led3State);
}
BLYNK_WRITE(V15) {
  led4State = param.asInt();
  digitalWrite(ledPin4, led4State);
}

void checkPhysicalButton()
{
  if (digitalRead(btnPin1) == LOW) {
    // btn1State is used to avoid sequential toggles
    if (btn1State != LOW) {

      // Toggle LED state
      led1State = !led1State;
      digitalWrite(ledPin1, led1State);

      // Update Button Widget
      Blynk.virtualWrite(V12, led1State);
    }
    btn1State = LOW;
  } else {
    btn1State = HIGH;
  }

  if (digitalRead(btnPin2) == LOW) {
    // btnState is used to avoid sequential toggles
    if (btn2State != LOW) {

      // Toggle LED state
      led2State = !led2State;
      digitalWrite(ledPin2, led2State);

      // Update Button Widget
      Blynk.virtualWrite(V13, led2State);
    }
    btn2State = LOW;
  } else {
    btn2State = HIGH;
  }
  Blynk.run();

  if (digitalRead(btnPin3) == LOW) {
    // btnState is used to avoid sequential toggles
    if (btn3State != LOW) {

      // Toggle LED state
      led3State = !led3State;
      digitalWrite(ledPin3, led3State);

      // Update Button Widget
      Blynk.virtualWrite(V14, led3State);
    }
    btn3State = LOW;
  } else {
    btn3State = HIGH;
  }
Blynk.run();
  if (digitalRead(btnPin4) == LOW) {
    // btnState is used to avoid sequential toggles
    if (btn4State != LOW) {

      // Toggle LED state
      led4State = !led4State;
      digitalWrite(ledPin4, led4State);

      // Update Button Widget
      Blynk.virtualWrite(V15, led4State);
    }
    btn4State = LOW;
  } else {
    btn4State = HIGH;
  }
  Blynk.run();
}

void setup()
{
  // Debug console
  Serial.begin(9600);

  Blynk.begin(auth, ssid, pass);
  // You can also specify server:
  //Blynk.begin(auth, ssid, pass, "blynk-cloud.com", 8442);
  //Blynk.begin(auth, ssid, pass, IPAddress(192,168,1,100), 8442);

 { pinMode(ledPin1, OUTPUT);
  pinMode(btnPin1, INPUT_PULLUP);
  digitalWrite(ledPin1, led1State);
  timer.setInterval(100L, checkPhysicalButton);}

 { pinMode(ledPin2, OUTPUT);
  pinMode(btnPin2, INPUT_PULLUP);
  digitalWrite(ledPin2, led2State);
  timer.setInterval(100L, checkPhysicalButton);}
{
  pinMode(ledPin3, OUTPUT);
  pinMode(btnPin3, INPUT_PULLUP);
  digitalWrite(ledPin3, led3State);
  timer.setInterval(100L, checkPhysicalButton);}

 { pinMode(ledPin4, OUTPUT);
  pinMode(btnPin4, INPUT_PULLUP);
  digitalWrite(ledPin4, led4State);

  // Setup a function to be called every 100 ms
  timer.setInterval(100L, checkPhysicalButton);}
}

void loop()
{
  Blynk.run();
  timer.run();
}
1 Like

:angel: :angel: :angel:

I love it when I’m right!

Pete.

3 Likes

This setup seems a bit off to me. Why the need for all the extra brackets, and multiple timer calls to the same function.

void setup()
{
  // Debug console
  Serial.begin(9600);

  Blynk.begin(auth, ssid, pass);
  // You can also specify server:
  //Blynk.begin(auth, ssid, pass, "blynk-cloud.com", 8442);
  //Blynk.begin(auth, ssid, pass, IPAddress(192,168,1,100), 8442);

 { pinMode(ledPin1, OUTPUT);
  pinMode(btnPin1, INPUT_PULLUP);
  digitalWrite(ledPin1, led1State);
  timer.setInterval(100L, checkPhysicalButton);}

 { pinMode(ledPin2, OUTPUT);
  pinMode(btnPin2, INPUT_PULLUP);
  digitalWrite(ledPin2, led2State);
  timer.setInterval(100L, checkPhysicalButton);}
{
  pinMode(ledPin3, OUTPUT);
  pinMode(btnPin3, INPUT_PULLUP);
  digitalWrite(ledPin3, led3State);
  timer.setInterval(100L, checkPhysicalButton);}

 { pinMode(ledPin4, OUTPUT);
  pinMode(btnPin4, INPUT_PULLUP);
  digitalWrite(ledPin4, led4State);

  // Setup a function to be called every 100 ms
  timer.setInterval(100L, checkPhysicalButton);}
}

I also see you are not using GPIO 1 any more as well. So it seems you need a little more then just add Blynk.run(); to your sketch. To be honest, I do not see why this code would need the extra ```Blynk.run();`` commands in order to function correctly. I could see maybe increasing the timer interval a little, but that may not even be necessary.

I want to add DHT11 sensor into this project.
To monitor room temperature and humidity
Can anybody help me please how can I modify this code.

@Gunner @peteKnight

#define BLYNK_PRINT Serial


#include <ESP8266WiFi.h>
#include <BlynkSimpleEsp8266.h>

// You should get Auth Token in the Blynk App.
// Go to the Project Settings (nut icon).
char auth[] = "token";

// Your WiFi credentials.
// Set password to "" for open networks.
char ssid[] = "ssid";
char pass[] = "pass";

// Set your LED and physical button pins here
const int ledPin1 = 12;
const int ledPin2 = 13;
const int ledPin3 = 14;
const int ledPin4 = 15;
const int btnPin1 = 5;
const int btnPin2 = 4;
const int btnPin3 = 2;
const int btnPin4 = 0;

BlynkTimer timer;
void checkPhysicalButton();

int led1State = LOW;
int btn1State = HIGH;

int led2State = LOW;
int btn2State = HIGH;

int led3State = LOW;
int btn3State = HIGH;

int led4State = LOW;
int btn4State = HIGH;

// Every time we connect to the cloud...
BLYNK_CONNECTED() {
  // Request the latest state from the server
  Blynk.syncVirtual(V12);
  Blynk.syncVirtual(V13);
  Blynk.syncVirtual(V14);
  Blynk.syncVirtual(V15);

  // Alternatively, you could override server state using:
  //Blynk.virtualWrite(V12, led1State);
  //Blynk.virtualWrite(V13, led2State);
  //Blynk.virtualWrite(V14, led3State);
  //Blynk.virtualWrite(V15, led4State);

}

// When App button is pushed - switch the state
BLYNK_WRITE(V12) {
  led1State = param.asInt();
  digitalWrite(ledPin1, led1State);
}
  
 BLYNK_WRITE(V13) {
  led2State = param.asInt();
  digitalWrite(ledPin2, led2State);
 }
BLYNK_WRITE(V14) {
  led3State = param.asInt();
  digitalWrite(ledPin3, led3State);
}
BLYNK_WRITE(V15) {
  led4State = param.asInt();
  digitalWrite(ledPin4, led4State);
}

void checkPhysicalButton()
{
  if (digitalRead(btnPin1) == LOW) {
    // btn1State is used to avoid sequential toggles
    if (btn1State != LOW) {

      // Toggle LED state
      led1State = !led1State;
      digitalWrite(ledPin1, led1State);

      // Update Button Widget
      Blynk.virtualWrite(V12, led1State);
    }
    btn1State = LOW;
  } else {
    btn1State = HIGH;
  }

  if (digitalRead(btnPin2) == LOW) {
    // btnState is used to avoid sequential toggles
    if (btn2State != LOW) {

      // Toggle LED state
      led2State = !led2State;
      digitalWrite(ledPin2, led2State);

      // Update Button Widget
      Blynk.virtualWrite(V13, led2State);
    }
    btn2State = LOW;
  } else {
    btn2State = HIGH;
  }
  Blynk.run();

  if (digitalRead(btnPin3) == LOW) {
    // btnState is used to avoid sequential toggles
    if (btn3State != LOW) {

      // Toggle LED state
      led3State = !led3State;
      digitalWrite(ledPin3, led3State);

      // Update Button Widget
      Blynk.virtualWrite(V14, led3State);
    }
    btn3State = LOW;
  } else {
    btn3State = HIGH;
  }
Blynk.run();
  if (digitalRead(btnPin4) == LOW) {
    // btnState is used to avoid sequential toggles
    if (btn4State != LOW) {

      // Toggle LED state
      led4State = !led4State;
      digitalWrite(ledPin4, led4State);

      // Update Button Widget
      Blynk.virtualWrite(V15, led4State);
    }
    btn4State = LOW;
  } else {
    btn4State = HIGH;
  }
  Blynk.run();
}

void setup()
{
  // Debug console
  Serial.begin(9600);

  Blynk.begin(auth, ssid, pass);
  // You can also specify server:
  //Blynk.begin(auth, ssid, pass, "blynk-cloud.com", 8442);
  //Blynk.begin(auth, ssid, pass, IPAddress(192,168,1,100), 8442);

 { pinMode(ledPin1, OUTPUT);
  pinMode(btnPin1, INPUT_PULLUP);
  digitalWrite(ledPin1, led1State);
  timer.setInterval(100L, checkPhysicalButton);}

 { pinMode(ledPin2, OUTPUT);
  pinMode(btnPin2, INPUT_PULLUP);
  digitalWrite(ledPin2, led2State);
  timer.setInterval(100L, checkPhysicalButton);}
{
  pinMode(ledPin3, OUTPUT);
  pinMode(btnPin3, INPUT_PULLUP);
  digitalWrite(ledPin3, led3State);
  timer.setInterval(100L, checkPhysicalButton);}

 { pinMode(ledPin4, OUTPUT);
  pinMode(btnPin4, INPUT_PULLUP);
  digitalWrite(ledPin4, led4State);

  // Setup a function to be called every 100 ms
  timer.setInterval(100L, checkPhysicalButton);}
}

void loop()
{
  Blynk.run();
  timer.run();
}

I’d use the search to be honest. It’s been covered on here countless times.

https://community.blynk.cc/search?q=DHT11

I didn’t find any solution of my problem in this
@JustBertC