Need Help for Robotic Arm Semester Project

Hi, I need help. This is my first time used Blynk for my project. I’m working on my robotic arm semester project and I want to control a robotic arm with a NodeMCU ESP8266 via Blynk application. I use code like on this website https://iotdesignpro.com/projects/iot-based-robotic-arm-using-esp8266
Because the website uses the Robotic Arm 4 DOF, so I modified it a little bit because I used the Robotic Arm 6 DOF. I have made a code like below. But I think something is wrong, because the code can’t connect NodeMCU with the Blynk app. Can anyone tell me where I went wrong?

I don’t think you will get any help if don’t post the code in the required format,

1 Like

Oh I’m so sorry about that. I’ll post my code. Thank you for your advice.

Sorry that I didn’t put the code correctly in my first post. I would be very grateful if you guys could help me.

#define BLYNK_PRINT Serial
#include <ESP8266WiFi.h>
#include <BlynkSimpleEsp8266.h>
#include <Servo.h>

char auth[] = "ijEJ20fIeb0DkA8w4dmiWKnym4nWqumU";

char ssid[] = "harra";
char pass[] = "12345678";

Servo servo;
Servo servo1;
Servo servo2;
Servo servo3;
Servo servo4;
Servo servo5;

BLYNK_WRITE(V3)
{
  servo.write(param.asInt());
}

BLYNK_WRITE(V0)
{
  servo1.write(param.asInt());
}

BLYNK_WRITE(V1)
{
  servo2.write(param.asInt());
}

BLYNK_WRITE(V2)
{
  servo3.write(param.asInt());

BLYNK_WRITE(V4)
{
  servo4.write(param.asInt());

BLYNK_WRITE(V5)
{
  servo5.write(param.asInt());
}

void setup()
{
  // Debug console
  Serial.begin(38400);

  Blynk.begin(auth, ssid, pass);

  servo.attach(D0);
  servo1.attach(D1);
  servo2.attach(D2);
  servo3.attach(D3);
  servo4.attach(D4);
  servo5.attach(D5);
}

void loop()
{
  Blynk.run();
}

What does your serial monitor show?

Pete.

Excuse me, is this what you mean? The serial monitor did not show any results :frowning:

When you reset the device, the serial monitor should show information about how the device is attempting to connect to Blynk.
I’d suggest changing the baud rate in the sketch to 74880 and setting the serial monitor to the the same rate, as this is the native baud rate for the NodeMCU and will allow you to see the boot messages from your device as well as the debug messages from your sketch.

I assume that the code uploaded without any errors?

Pete.

I’m sorry, the code above contains a slight error. I fixed it and also changed the baud rate to 74880. But, I still don’t get it.


#define BLYNK_PRINT Serial
#include <ESP8266WiFi.h>
#include <BlynkSimpleEsp8266.h>
#include <Servo.h>

char auth[] = "ijEJ20fIeb0DkA8w4dmiWKnym4nWqumU";

char ssid[] = "harra";
char pass[] = "12345678";

Servo servo;
Servo servo1;
Servo servo2;
Servo servo3;
Servo servo4;
Servo servo5;

BLYNK_WRITE(V3)
{
  servo.write(param.asInt());
}

BLYNK_WRITE(V0)
{
  servo1.write(param.asInt());
}

BLYNK_WRITE(V1)
{
  servo2.write(param.asInt());
}

BLYNK_WRITE(V2)
{
  servo3.write(param.asInt());
}

BLYNK_WRITE(V4)
{
  servo4.write(param.asInt());
}

BLYNK_WRITE(V5)
{
  servo5.write(param.asInt());
}

void setup()
{
  // Debug console
  Serial.begin(74880);

  Blynk.begin(auth, ssid, pass);

  servo.attach(D0);
  servo1.attach(D1);
  servo2.attach(D2);
  servo3.attach(D3);
  servo4.attach(D4);
  servo5.attach(D5);
}

void loop()
{
  Blynk.run();
}

I’m still not getting any results from the serial monitor, sir.

I wanted to ask, will I get something from the serial monitor if my code is successfully connected with the Blynk app?

This line of code tells the Blynk library to output some connection data to the serial monitor…

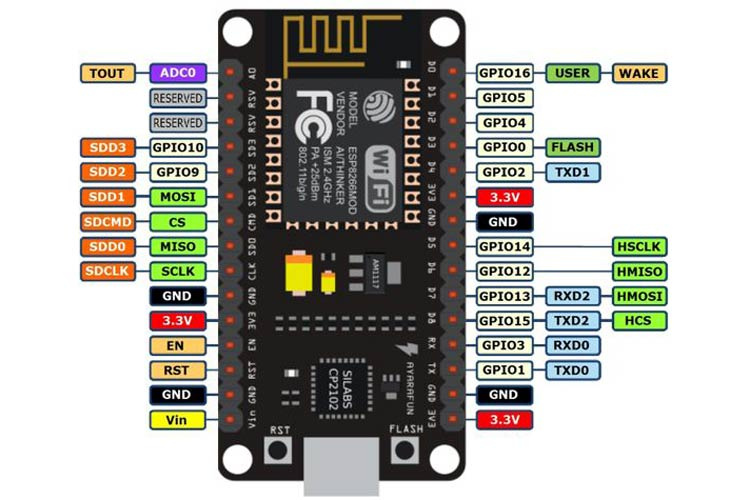
My guess is that your connection to D3 (GPIO0) is pulling that pin LOW all the time, and causing the NodeMCU to boot into Flash mode rather than Run mode.

Try disconnecting the wires from that pin and trying again.

If that solves the problem then read this:

alongside this:

Pete.

Thank you for the advice, sir. I will try it.