I was using a massive 84x48 pixel display… so yours will be a tight squeeze, but workable ![]()
I think if you comment out or remove these lines, then everything will work “normal” with a larger display.
1 Like
Thanks. Not sure when, but certainly will comment here my results.
I am too lazy to make a proper YouTube video  … but here is a GIF of my current alliteration… I realise now that you can’t really see the data scrolling by in the top half of the LCD…

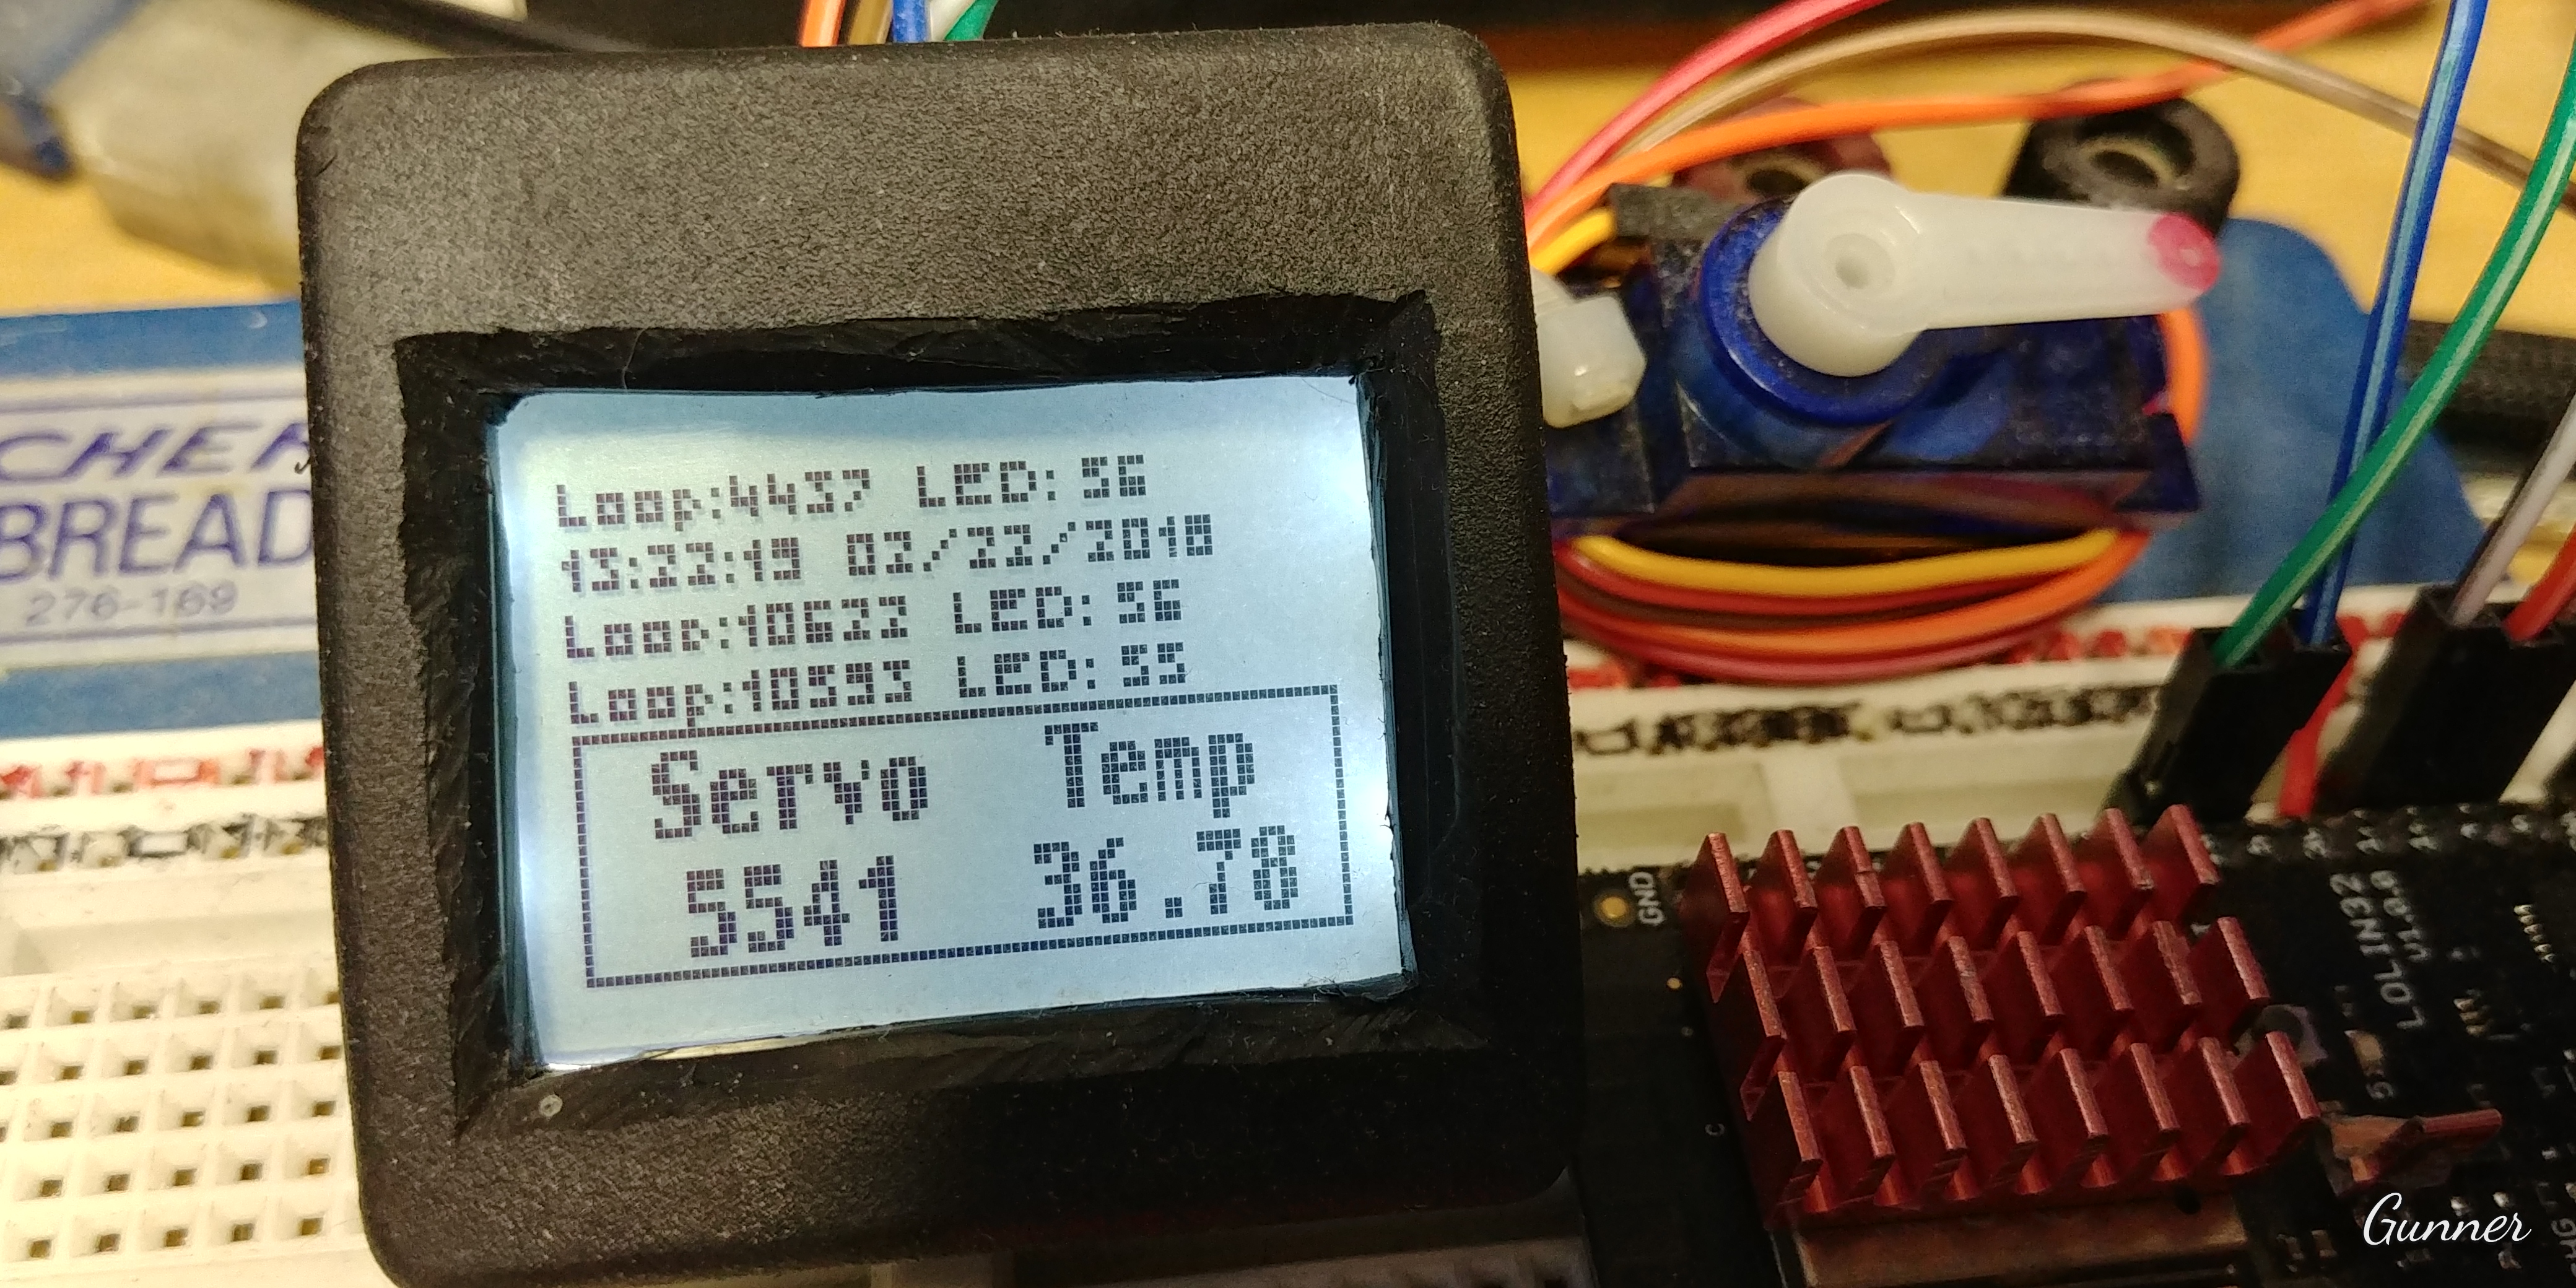

I merged in my above redirection code and a Virtual LED matrix code (not showing, but running in another tab) and now also containing random servo moves and CPU temp checks - Basically a programming test bench for my ESP32.
The top half of the screen is a scrolling account of any Blynk prints, logs & errors, plus any timer based “serial” prints I make, actually myConsole.println(), such as RSSI and time/date stamps.
While the bottom half is a direct screen print of real-time data like Servo position and CPU temp.
One benefit I have already noticed is that occasionally my ESP seemed to loose Blynk connection… but even while originally using Blynk.begin() and without any coded checks or Blynk.run() bypasses, somehow keep on running everything else in the code?? maybe an automatic dual core ESP32 thing??
Anyhow… so I never really knew it was disconnected until I checked the App. But now I can see the "connecting to… " message in the screen 
I have since added in Blynk.config() and re-connection routines 
2 Likes
Well, I am not sure where my fascination with displays and LEDs comes from… probably the whole visual understanding thing… but I can’t leave this one alone 
So I finally managed to get my little SSD1331, a 96x64 Full Colour OLED display (that I had previously wired as a Wemos shield) and added in this Blynk print redirection… so far so good.
The best library I found for this OLED for speed is an older one. https://github.com/sumotoy/SSD_13XX But very fast and relatively easy to program for… just lousy / non-existent directions for all the commands… have to spend lots of time dissecting and testing from the library files.
It allows simpler Blynk Print setup and word wrapping… which makes it much nicer to just dump test to
It even has a small collection of external fonts. Unfortunately, the font that looks the best for the Blynk Logo (Terminal_9) is a bit too big… so only half a logo for me 

But the display (or libraries) built-in font is fairly OK, and shows more text.
And a sketch for the ESP8266 and the ssd1331 OLED
//#define BLYNK_DEBUG
#define BLYNK_NO_BUILTIN  // Disable Blynk's built-in analog & digital pin operations

#include <SPI.h>
#include <SSD_13XX.h>
#include "_fonts/Terminal_9.c"
#define __CS_TFT 16  // pin D0
#define __DC_TFT 15  // pin D8
SSD_13XX tft = SSD_13XX(__CS_TFT, __DC_TFT);

class CustomConsole
  : public Print // This automatically adds functions like .println()
{
  public:
    CustomConsole() {}
    virtual size_t write(uint8_t ch) {  // Grabs character from print
      tft.setTextWrap(false);  // Enable/disable word wrapping
      tft.setFontInterline(1);  // Add single pixel in-between lines
      tft.print(char(ch));  // print character to OLED
      Serial.print(char(ch));  // Repeat all character output to Serial monitor
      if (ch == '\n') {  // End of line check
        line ++;
        if (line >= 7 ) {  // Last line on screen check
          line = 0;  // Reset line counter
          if (firstScreen == 0) {
            firstScreen = 1;
            delay(5000);  // One-time delay to view Logo :)
          }
          tft.print(char(ch));  // print character to OLED
          delay(500);  // Small delay to allow viewing of last line befor screen clear
          tft.clearScreen();
        }  // End screen wrap
      }  // End line count
      return 1; // Processed 1 character
    }  // End character print
  private:
    int line = 0;
    int firstScreen = 0;
};

CustomConsole myConsole;

#define BLYNK_PRINT myConsole
#include <ESP8266WiFi.h>
#include <BlynkSimpleEsp8266.h>
BlynkTimer timer;

char auth[] = "xxxxxxxxxx";  // Local Server
char ssid[] = "xxxxxxxxxx";
char pass[] = "xxxxxxxxxx";
char server[] = "xxx.xxx.xxx.xxx";
int port = 8080;


void setup() {
  Serial.begin(115200);
  tft.begin();
  WiFi.begin(ssid, pass);
  Blynk.config(auth, server, port);
  Blynk.connect();

  // Timed Lambda Function - UpTime counter
  timer.setInterval(1000L, []() {  // Run every second
    Blynk.virtualWrite(V0, millis() / 1000);  // Display the UpTime in Minutes to App
    myConsole.println(millis() / 1000);  // Display the UpTime in Minutes to OLED and Serial
  });  // END Timer Function
}


void loop() {
  Blynk.run();
  timer.run();
}
3 Likes
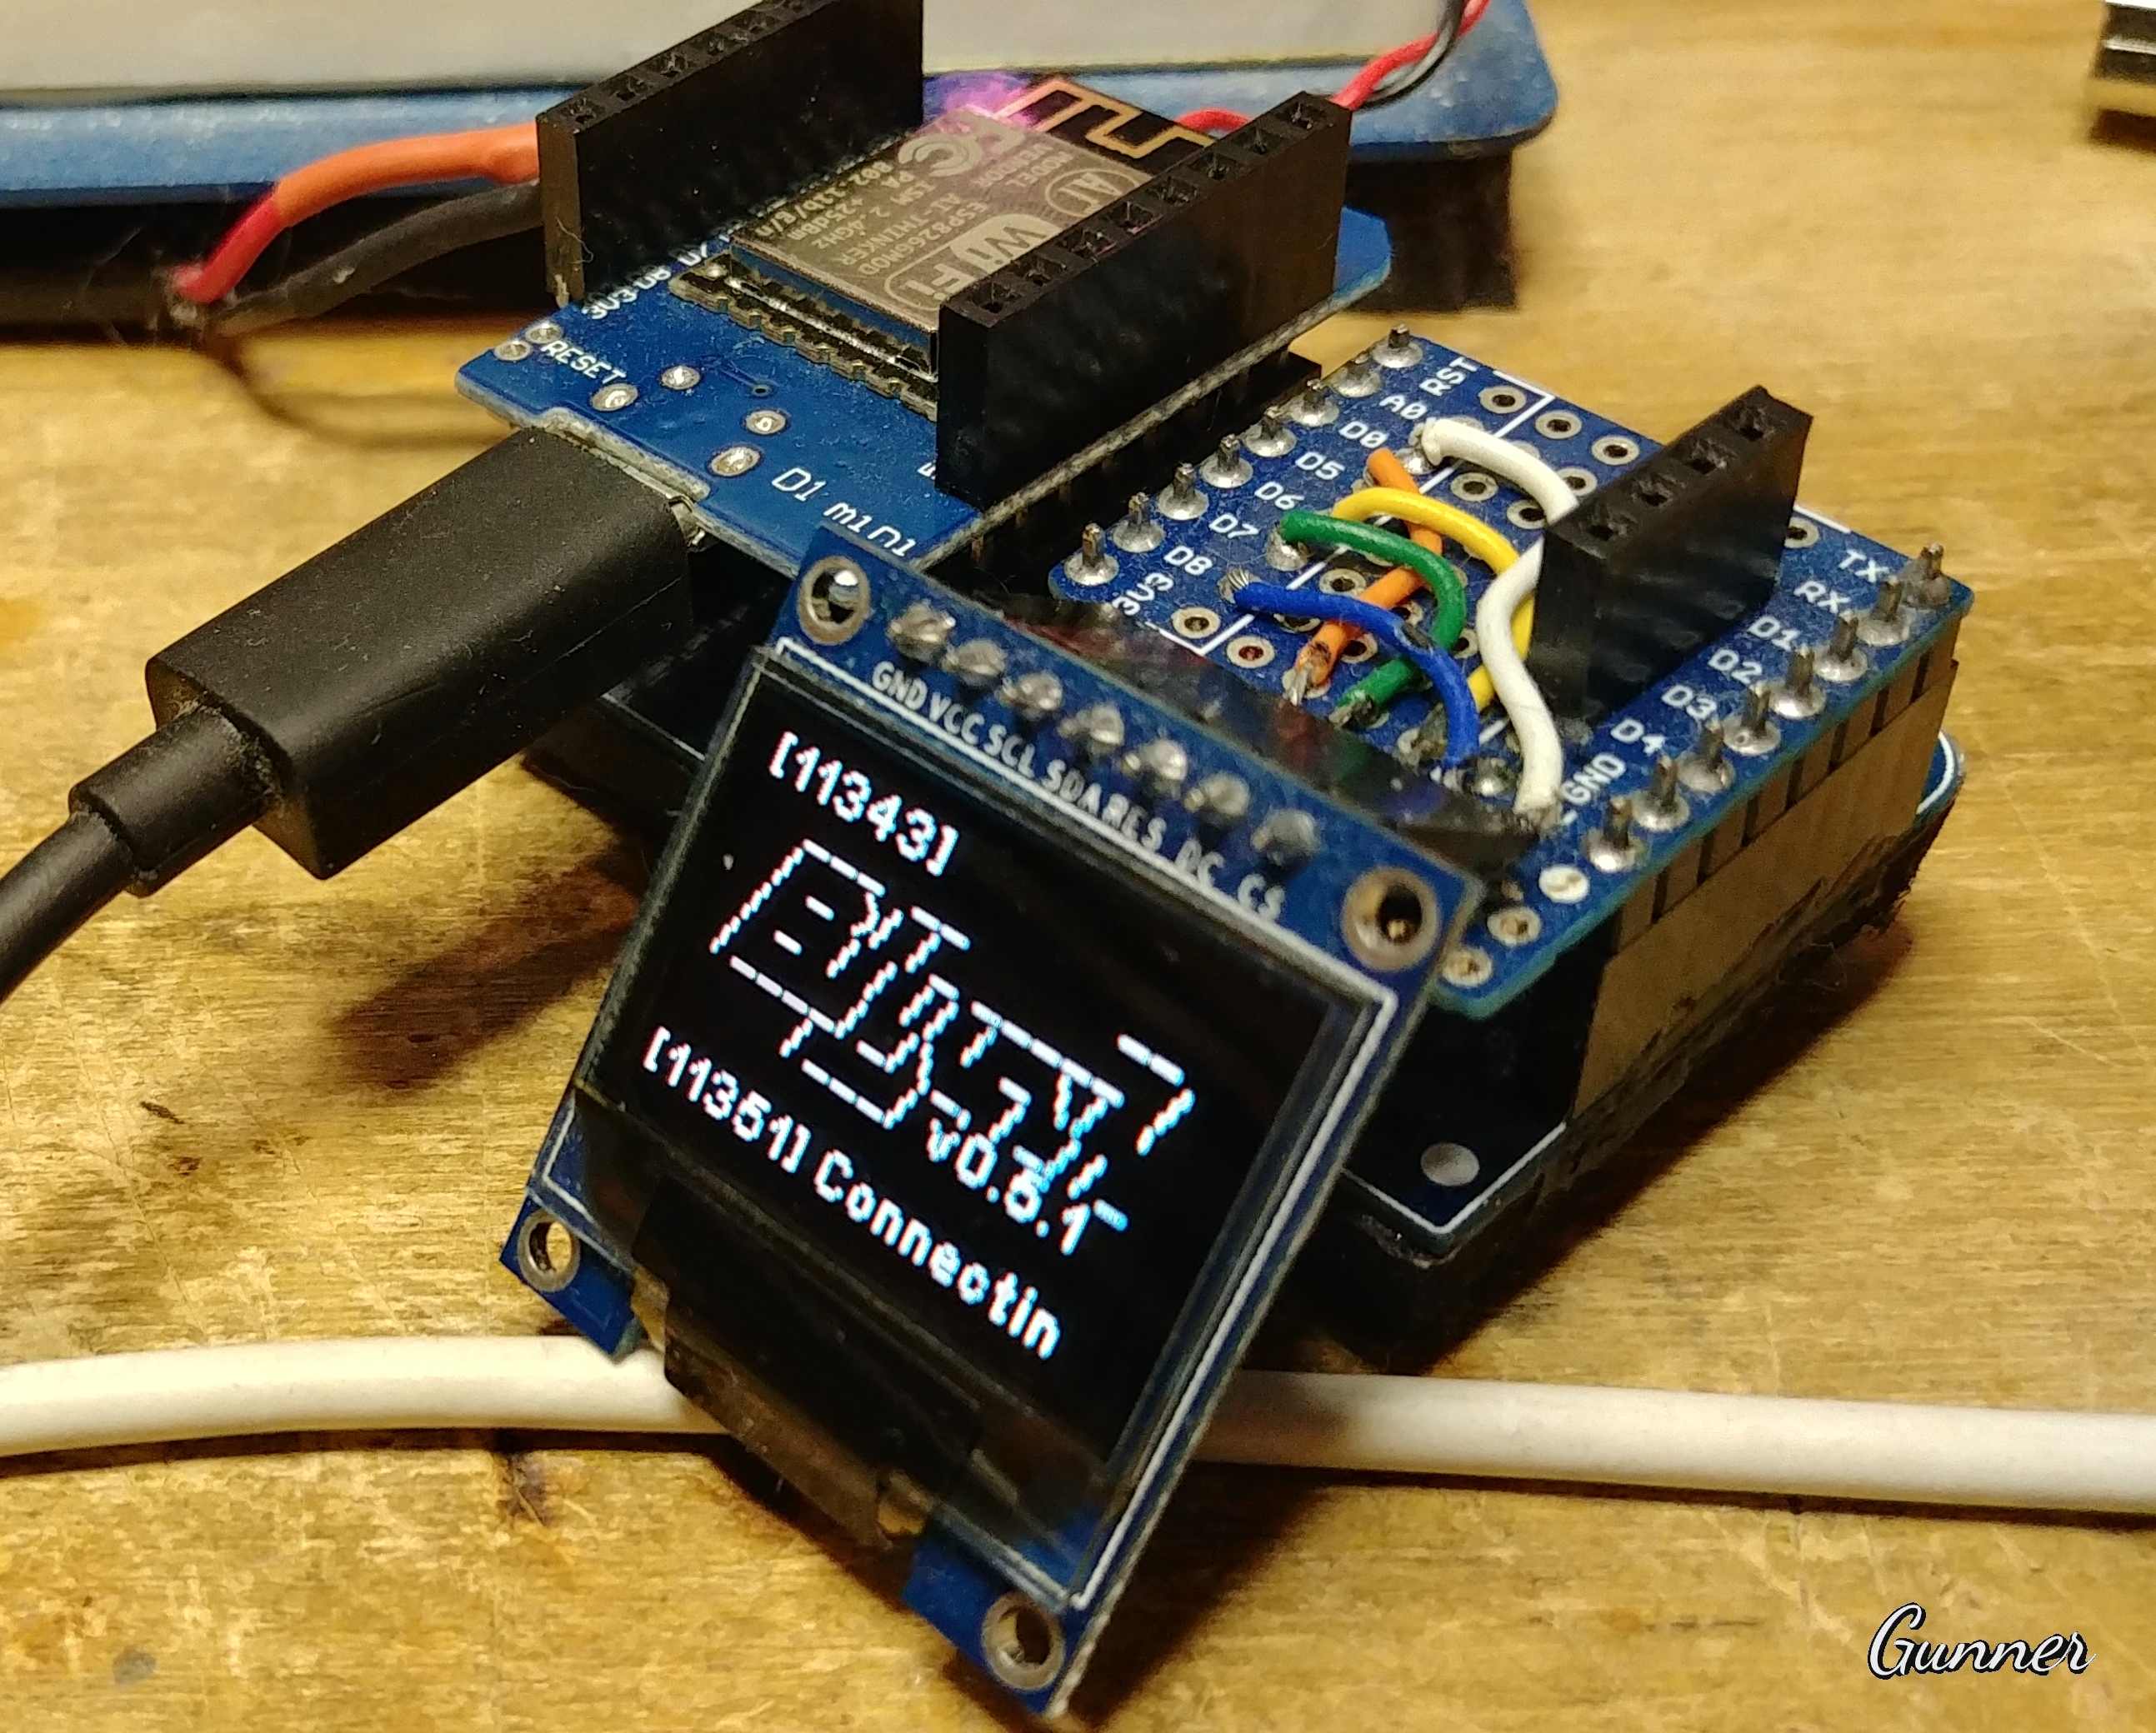
And my latest addition to this Blynk Serial Display phase I am on…
The TTG ESP32 with OLED & 18650
Tiny screen, but good resolution (128x64)… hard to focus up close 

//#define BLYNK_DEBUG
#define BLYNK_MAX_READBYTES 1024
#define BLYNK_MSG_LIMIT 0
#define BLYNK_HEARTBEAT 60
#define BLYNK_NO_BUILTIN // Disable Blynk's built-in analog & digital pin operations
#include <U8g2lib.h> // For OLED
U8G2_SSD1306_128X64_NONAME_F_HW_I2C u8g2(U8G2_R0,/* reset=*/ U8X8_PIN_NONE,/* clock=*/ 4, /* data=*/ 5); // The all important setup for the TTGO's build in OLED
// Define a custom console for OLED debug output
class CustomConsole
: public Print // This automatically adds functions like .println()
{
public:
CustomConsole() {}
virtual size_t write(uint8_t ch) { // Grabs character from print
u8g2.print(char(ch)); // Add character to OLED buffer
Serial.print(char(ch)); // Repeat all character output to Serial monitor
if (ch == '\n') { // End of line check
u8g2.sendBuffer(); // Dump buffer to OLED
line += height; // Increment next line down
if (line >= 72) {
line = height; // Reset line counter
}
u8g2.sendBuffer(); // Dump buffer to OLED
u8g2.setCursor(0, line); // Set curser to next line down
}
return 1; // Processed 1 character
}
private:
// define variables used in myConsole
int line = 8; // line counter
int height = 8; // Line pixel height
};
// initiate myConsole
CustomConsole myConsole;
#define BLYNK_PRINT myConsole
#include <WiFi.h>
#include <WiFiClient.h>
#include <BlynkSimpleEsp32.h>
#include <ESPmDNS.h> // For OTA
#include <WiFiUdp.h> // For OTA
#include <ArduinoOTA.h> // For OTA
#include <TimeLib.h>
#include <WidgetRTC.h>
char auth[] = "xxxxxxxxxx";
char ssid[] = "xxxxxxxxxx";
char pass[] = "xxxxxxxxxx";
char server[] = "10.10.3.13";
int port = 8080;
char currentTime[9];
char currentDate[11];
BlynkTimer timer;
WidgetRTC rtc;
void setup() {
pinMode(16, OUTPUT);
u8g2.setFont(u8g2_font_micro_mr); // choose a suitable font for Logo
Serial.begin(115200);
u8g2.begin();
timer.setInterval(1010L, TimeDatecheck);
timer.setInterval(2030L, RSSIcheck);
timer.setInterval(3045L, FlashLED);
WiFi.begin(ssid, pass);
Blynk.config(auth, server, port);
Blynk.connect();
ArduinoOTA.setHostname("TTGO - OLED & 18650"); // For OTA
ArduinoOTA.begin(); // For OTA
}
BLYNK_CONNECTED() {
rtc.begin();
setSyncInterval(360); // Time Sync
}
void loop() {
ArduinoOTA.handle(); // For OTA
timer.run();
Blynk.run();
}
//--------------------------------------------------//
void TimeDatecheck() {
sprintf(currentTime, "%02d:%02d:%02d", hour(), minute(), second());
sprintf(currentDate, "%02d/%02d/%04d", month(), day(), year());
myConsole.print(currentTime);
myConsole.print(" ");
myConsole.print(currentDate);
myConsole.println(" ");
}
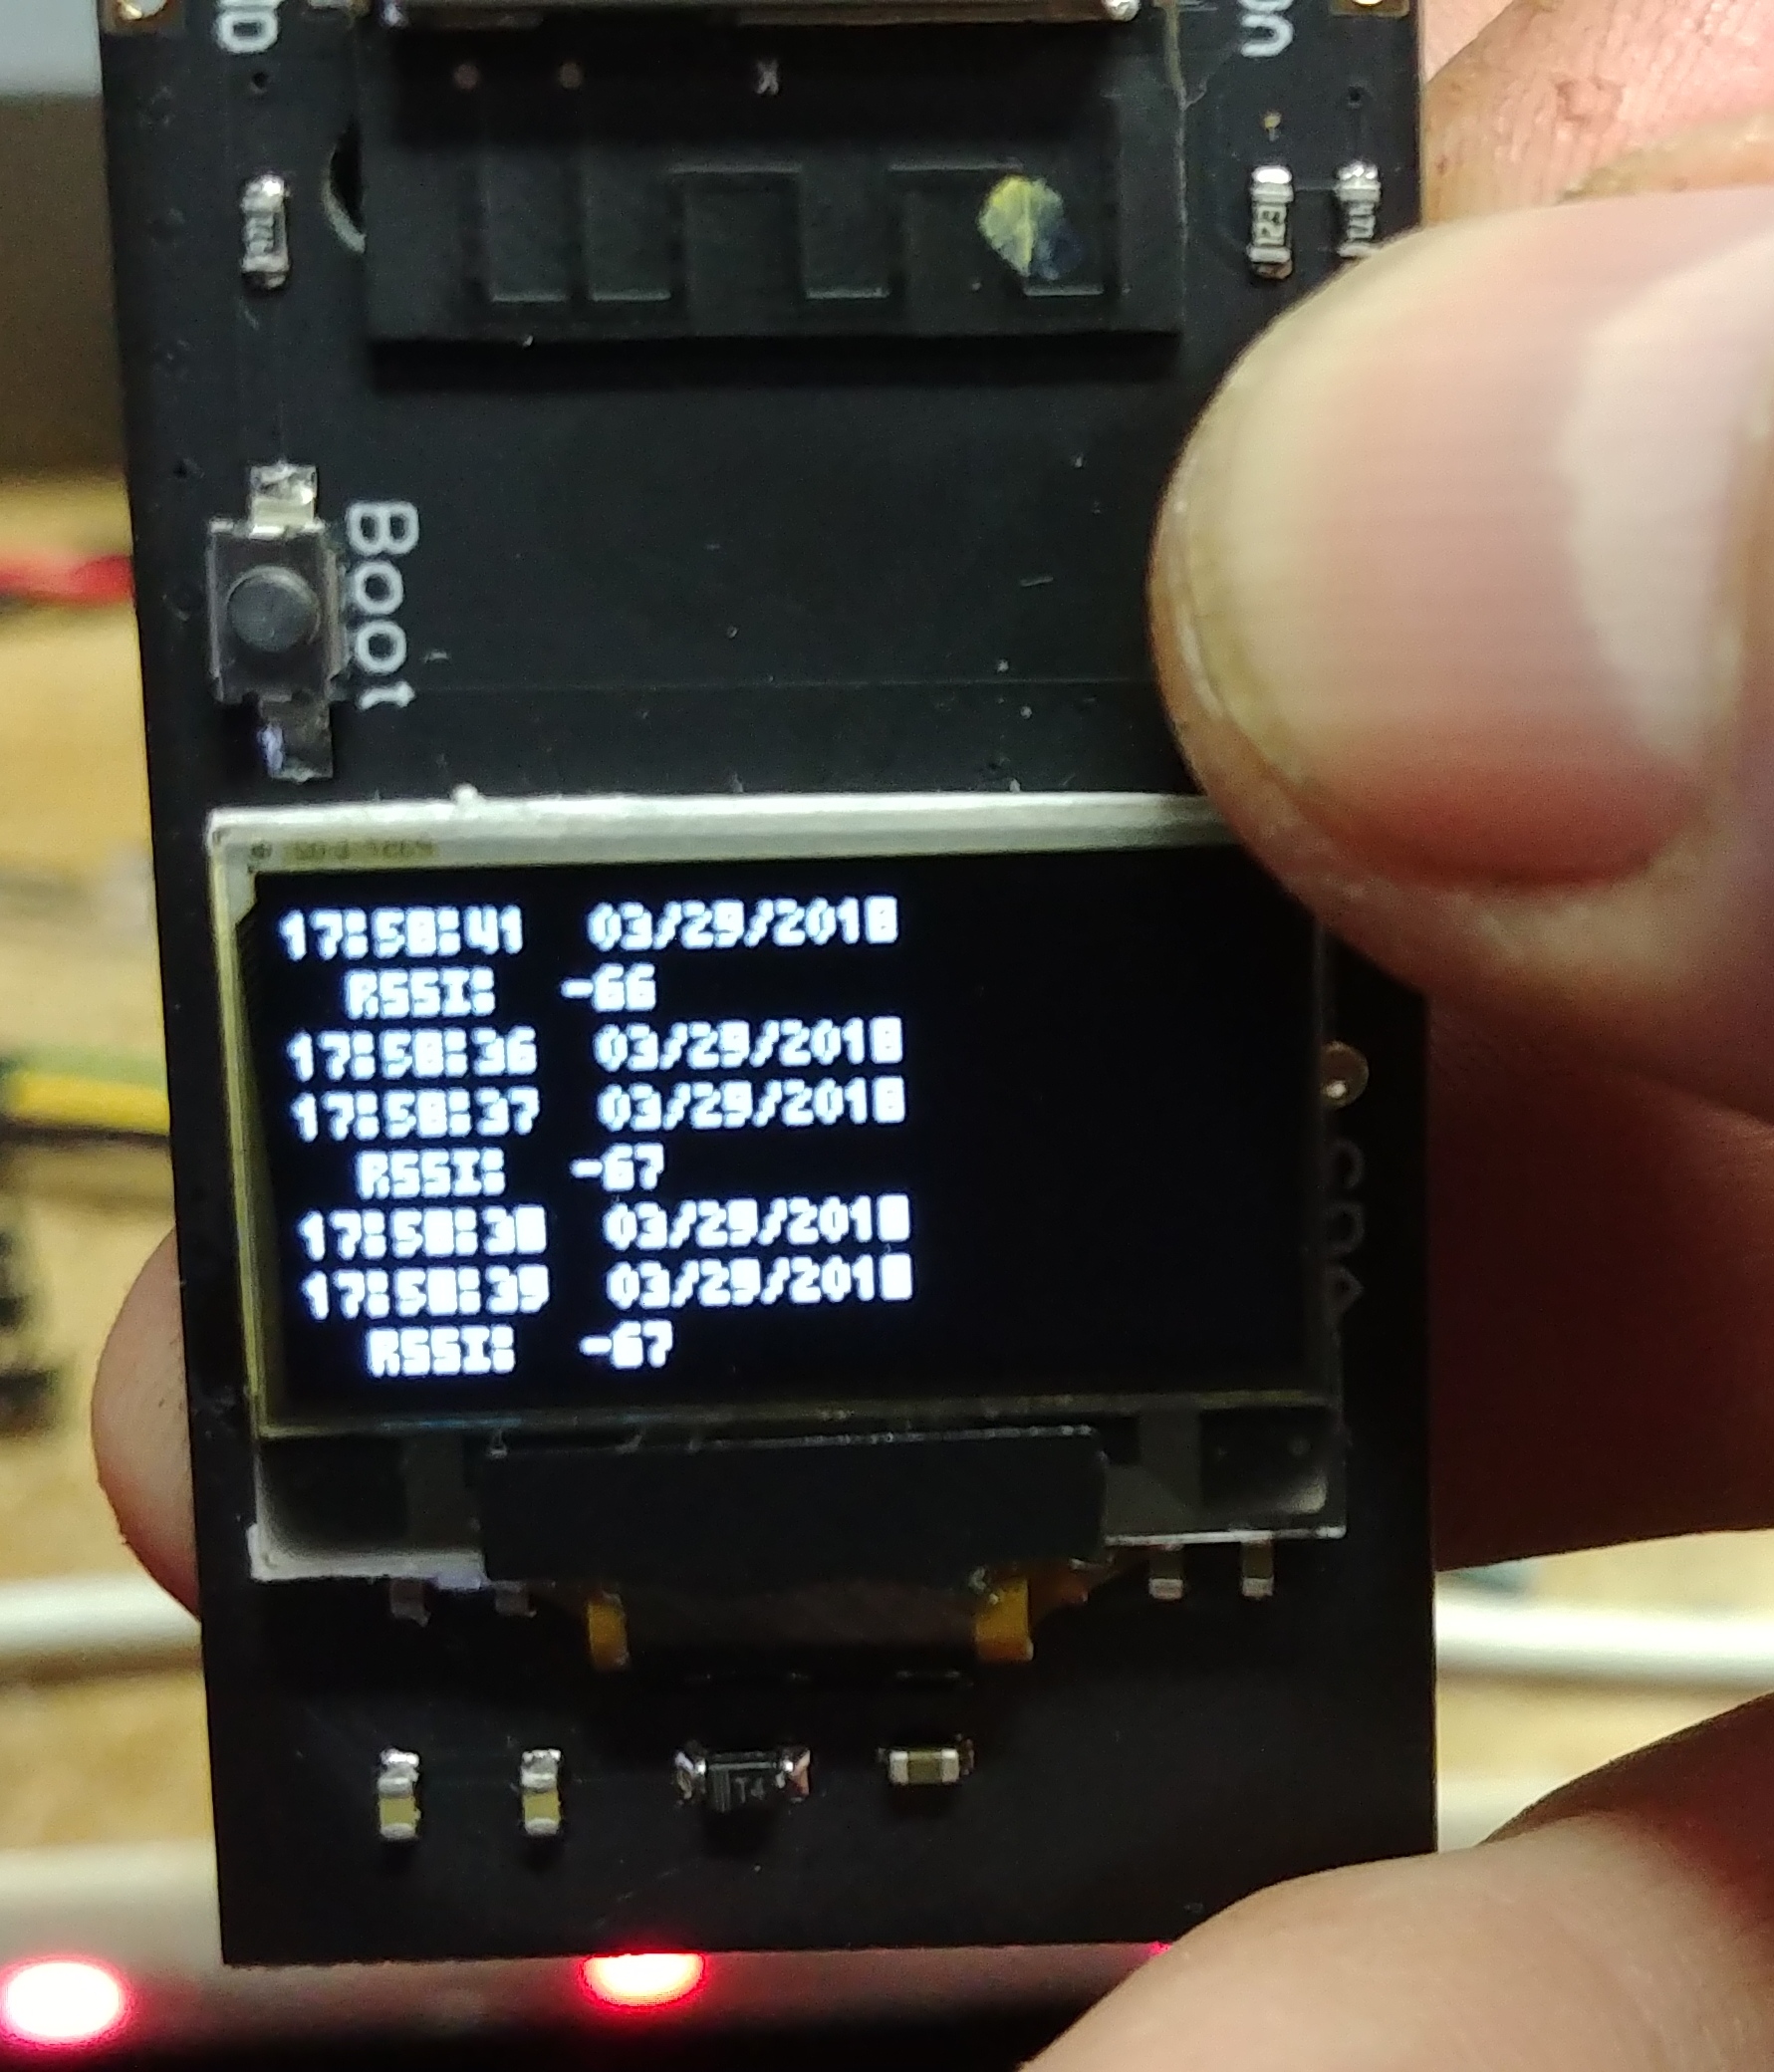
void RSSIcheck() {
Blynk.virtualWrite(V67, WiFi.RSSI()); // RSSI
//myConsole.print("Board #1 - RSSI ");
myConsole.print("Board #2 - RSSI ");
myConsole.print(WiFi.RSSI());
myConsole.println(" ");
}
void FlashLED() {
digitalWrite(16, LOW); // Turn ON
delay(100);
digitalWrite(16, HIGH); // Turn OFF
}
3 Likes
@Gunner can you please provide the full pin details for the OLED you are using. I have 4 or 5 OLED’s that I haven’t used for a year or more. Some have 4 pins but with pins switched around between different models and some have 7 like yours. Might be my lack of soldering skills that’s a problem but I couldn’t get any of them to work. They were working when I last used them but I might have destroyed one of them.
In the old days you had to tweak the libraries to your particular OLED but it looks like most of that is now done in the sketch.
see also:
1 Like
Some of these similar looking OLEDS apparently can be set for SPI or i2c via soldered jumpers. Or at least the address used for i2c can be assigned in some.
But despite the extra SCL SDA pins, the color SSD1331 I have appears to be only a 4 pin SPI (VCC, GND, DC, CS - RST seems optional depending on the library) I successfully used these pins with my Wemos with that referenced library…
So VCC, GND, D0 and D8?
For VCC are you using 3.3V or 5V?
I have a feeling none of mine are color OLED’s.
I used 5v
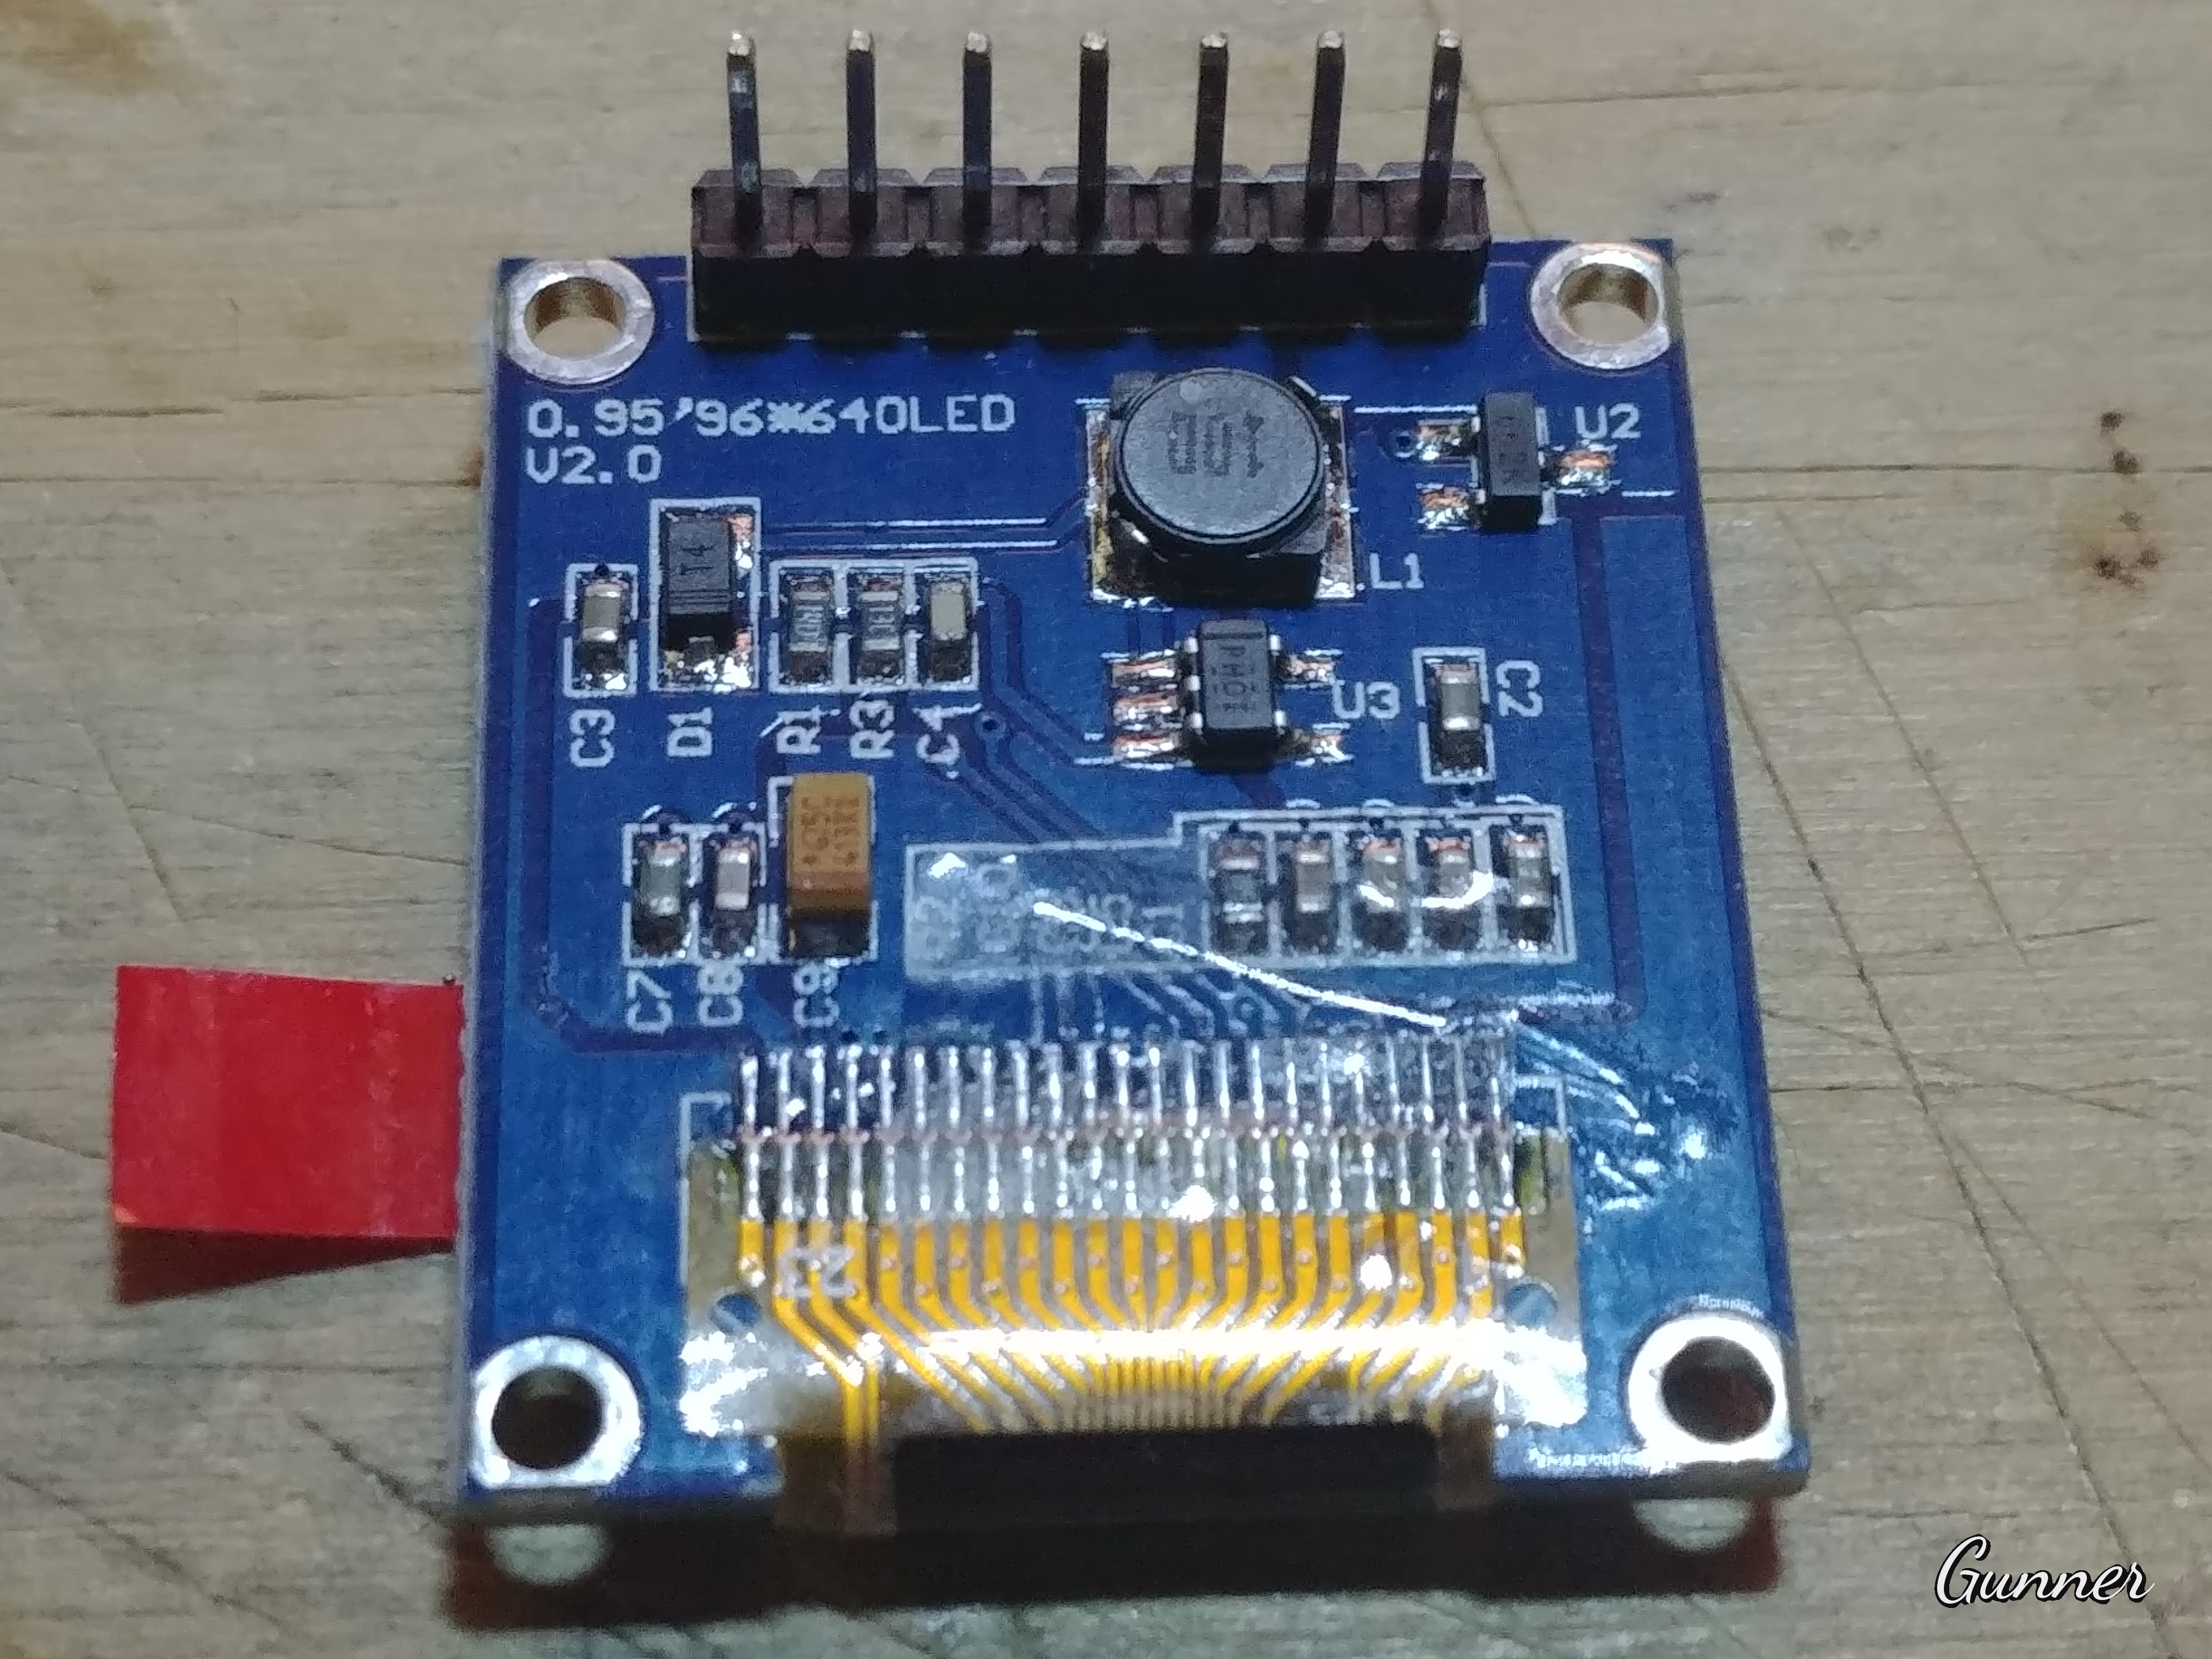
Here is a snippet from another random example I used with the adafruit library… It wanted all the pins for Option 1, but I used the Option 2 Hardware SPI mode D0 and D8
#include <Adafruit_GFX.h>
#include <Adafruit_SSD1331.h>

// You can use any (4 or) 5 pins - Wemos D1 Mini used here
#define sclk D5 //--- connect this to the display module SCL pin (Serial Clock)
#define mosi D7 //--- connect this to the display module SDA pin (Serial Data)
#define rst  D6 //--- connect this to the display module RES pin (Reset)
#define dc   D8 //--- connect this to the display module DC  pin (Data or Command)
#define cs   D0 //--- connect this to the display module CS  pin (Chip Select)

// Option 1: use any pins but a little slower
// Adafruit_SSD1331 display = Adafruit_SSD1331(cs, dc, mosi, sclk, rst);

// Option 2: must use the hardware SPI pins
// (for UNO thats sclk = 13 and sid = 11) and pin 10 must be
// an output. This is much faster - also required if you want
// to use the microSD card (see the image drawing example)
Adafruit_SSD1331 display = Adafruit_SSD1331(cs, dc, rst);
1 Like
OK I managed to get one of my 4 pin OLED’s working. 3,3V, GND, GPIO 5 SCL (WeMos D1) and GPIO 4 SDA (WeMos D2). This Adafruit sketch displays falling snowflakes on the screen.
/**************************************************************************
 SSD1306.ino
 This is an example for our Monochrome OLEDs based on SSD1306 drivers

 Pick one up today in the adafruit shop!
 ------> http://www.adafruit.com/category/63_98

 This example is for a 128x32 pixel display using I2C to communicate
 3 pins are required to interface (two I2C and one reset).

 Adafruit invests time and resources providing this open
 source code, please support Adafruit and open-source
 hardware by purchasing products from Adafruit!

 Written by Limor Fried/Ladyada for Adafruit Industries,
 with contributions from the open source community.
 BSD license, check license.txt for more information
 All text above, and the splash screen below must be
 included in any redistribution.
 **************************************************************************/

#include <SPI.h>
#include <Wire.h>
#include <Adafruit_GFX.h>
#include <Adafruit_SSD1306.h>

#define SCREEN_WIDTH 128 // OLED display width, in pixels
#define SCREEN_HEIGHT 64 // OLED display height, in pixels

// Declaration for an SSD1306 display connected to I2C (SDA, SCL pins)
#define OLED_RESET LED_BUILTIN  //4    -1  // 4 // Reset pin # (or -1 if sharing Arduino reset pin)
Adafruit_SSD1306 display(SCREEN_WIDTH, SCREEN_HEIGHT, &Wire, OLED_RESET);

#define NUMFLAKES     10 // Number of snowflakes in the animation example

#define LOGO_HEIGHT   16
#define LOGO_WIDTH    16
static const unsigned char PROGMEM logo_bmp[] =
{ B00000000, B11000000,
  B00000001, B11000000,
  B00000001, B11000000,
  B00000011, B11100000,
  B11110011, B11100000,
  B11111110, B11111000,
  B01111110, B11111111,
  B00110011, B10011111,
  B00011111, B11111100,
  B00001101, B01110000,
  B00011011, B10100000,
  B00111111, B11100000,
  B00111111, B11110000,
  B01111100, B11110000,
  B01110000, B01110000,
  B00000000, B00110000 };

void setup() {
  Serial.begin(115200);
  Serial.println(F("SSD1306 test"));
  // SSD1306_SWITCHCAPVCC = generate display voltage from 3.3V internally
  if(!display.begin(SSD1306_SWITCHCAPVCC, 0x3C)) { // Address 0x3D for 128x64
    Serial.println(F("SSD1306 allocation failed"));
    for(;;); // Don't proceed, loop forever
  }
  Serial.println(F("OK"));
  // Show initial display buffer contents on the screen --
  // the library initializes this with an Adafruit splash screen.
  display.display();
  delay(2000); // Pause for 2 seconds

  // Clear the buffer
  display.clearDisplay();

  // Draw a single pixel in white
  display.drawPixel(10, 10, WHITE);

  // Show the display buffer on the screen. You MUST call display() after
  // drawing commands to make them visible on screen!
  display.display();
  delay(2000);
  // display.display() is NOT necessary after every single drawing command,
  // unless that's what you want...rather, you can batch up a bunch of
  // drawing operations and then update the screen all at once by calling
  // display.display(). These examples demonstrate both approaches...

  testdrawline();      // Draw many lines

  testdrawrect();      // Draw rectangles (outlines)

  testfillrect();      // Draw rectangles (filled)

  testdrawcircle();    // Draw circles (outlines)

  testfillcircle();    // Draw circles (filled)

  testdrawroundrect(); // Draw rounded rectangles (outlines)

  testfillroundrect(); // Draw rounded rectangles (filled)

  testdrawtriangle();  // Draw triangles (outlines)

  testfilltriangle();  // Draw triangles (filled)

  testdrawchar();      // Draw characters of the default font

  testdrawstyles();    // Draw 'stylized' characters

  testscrolltext();    // Draw scrolling text

  testdrawbitmap();    // Draw a small bitmap image

  // Invert and restore display, pausing in-between
  display.invertDisplay(true);
  delay(1000);
  display.invertDisplay(false);
  delay(1000);

  testanimate(logo_bmp, LOGO_WIDTH, LOGO_HEIGHT); // Animate bitmaps
}

void loop() {
}

void testdrawline() {
  int16_t i;

  display.clearDisplay(); // Clear display buffer

  for(i=0; i<display.width(); i+=4) {
    display.drawLine(0, 0, i, display.height()-1, WHITE);
    display.display(); // Update screen with each newly-drawn line
    delay(1);
  }
  for(i=0; i<display.height(); i+=4) {
    display.drawLine(0, 0, display.width()-1, i, WHITE);
    display.display();
    delay(1);
  }
  delay(250);

  display.clearDisplay();

  for(i=0; i<display.width(); i+=4) {
    display.drawLine(0, display.height()-1, i, 0, WHITE);
    display.display();
    delay(1);
  }
  for(i=display.height()-1; i>=0; i-=4) {
    display.drawLine(0, display.height()-1, display.width()-1, i, WHITE);
    display.display();
    delay(1);
  }
  delay(250);

  display.clearDisplay();

  for(i=display.width()-1; i>=0; i-=4) {
    display.drawLine(display.width()-1, display.height()-1, i, 0, WHITE);
    display.display();
    delay(1);
  }
  for(i=display.height()-1; i>=0; i-=4) {
    display.drawLine(display.width()-1, display.height()-1, 0, i, WHITE);
    display.display();
    delay(1);
  }
  delay(250);

  display.clearDisplay();

  for(i=0; i<display.height(); i+=4) {
    display.drawLine(display.width()-1, 0, 0, i, WHITE);
    display.display();
    delay(1);
  }
  for(i=0; i<display.width(); i+=4) {
    display.drawLine(display.width()-1, 0, i, display.height()-1, WHITE);
    display.display();
    delay(1);
  }

  delay(2000); // Pause for 2 seconds
}

void testdrawrect(void) {
  display.clearDisplay();

  for(int16_t i=0; i<display.height()/2; i+=2) {
    display.drawRect(i, i, display.width()-2*i, display.height()-2*i, WHITE);
    display.display(); // Update screen with each newly-drawn rectangle
    delay(1);
  }

  delay(2000);
}

void testfillrect(void) {
  display.clearDisplay();

  for(int16_t i=0; i<display.height()/2; i+=3) {
    // The INVERSE color is used so rectangles alternate white/black
    display.fillRect(i, i, display.width()-i*2, display.height()-i*2, INVERSE);
    display.display(); // Update screen with each newly-drawn rectangle
    delay(1);
  }

  delay(2000);
}

void testdrawcircle(void) {
  display.clearDisplay();

  for(int16_t i=0; i<max(display.width(),display.height())/2; i+=2) {
    display.drawCircle(display.width()/2, display.height()/2, i, WHITE);
    display.display();
    delay(1);
  }

  delay(2000);
}

void testfillcircle(void) {
  display.clearDisplay();

  for(int16_t i=max(display.width(),display.height())/2; i>0; i-=3) {
    // The INVERSE color is used so circles alternate white/black
    display.fillCircle(display.width() / 2, display.height() / 2, i, INVERSE);
    display.display(); // Update screen with each newly-drawn circle
    delay(1);
  }

  delay(2000);
}

void testdrawroundrect(void) {
  display.clearDisplay();

  for(int16_t i=0; i<display.height()/2-2; i+=2) {
    display.drawRoundRect(i, i, display.width()-2*i, display.height()-2*i,
      display.height()/4, WHITE);
    display.display();
    delay(1);
  }

  delay(2000);
}

void testfillroundrect(void) {
  display.clearDisplay();

  for(int16_t i=0; i<display.height()/2-2; i+=2) {
    // The INVERSE color is used so round-rects alternate white/black
    display.fillRoundRect(i, i, display.width()-2*i, display.height()-2*i,
      display.height()/4, INVERSE);
    display.display();
    delay(1);
  }

  delay(2000);
}

void testdrawtriangle(void) {
  display.clearDisplay();

  for(int16_t i=0; i<max(display.width(),display.height())/2; i+=5) {
    display.drawTriangle(
      display.width()/2  , display.height()/2-i,
      display.width()/2-i, display.height()/2+i,
      display.width()/2+i, display.height()/2+i, WHITE);
    display.display();
    delay(1);
  }

  delay(2000);
}

void testfilltriangle(void) {
  display.clearDisplay();

  for(int16_t i=max(display.width(),display.height())/2; i>0; i-=5) {
    // The INVERSE color is used so triangles alternate white/black
    display.fillTriangle(
      display.width()/2  , display.height()/2-i,
      display.width()/2-i, display.height()/2+i,
      display.width()/2+i, display.height()/2+i, INVERSE);
    display.display();
    delay(1);
  }

  delay(2000);
}

void testdrawchar(void) {
  display.clearDisplay();

  display.setTextSize(1);      // Normal 1:1 pixel scale
  display.setTextColor(WHITE); // Draw white text
  display.setCursor(0, 0);     // Start at top-left corner
  display.cp437(true);         // Use full 256 char 'Code Page 437' font

  // Not all the characters will fit on the display. This is normal.
  // Library will draw what it can and the rest will be clipped.
  for(int16_t i=0; i<256; i++) {
    if(i == '\n') display.write(' ');
    else          display.write(i);
  }

  display.display();
  delay(2000);
}

void testdrawstyles(void) {
  display.clearDisplay();

  display.setTextSize(1);             // Normal 1:1 pixel scale
  display.setTextColor(WHITE);        // Draw white text
  display.setCursor(0,0);             // Start at top-left corner
  display.println(F("Hello, world!"));

  display.setTextColor(BLACK, WHITE); // Draw 'inverse' text
  display.println(3.141592);

  display.setTextSize(2);             // Draw 2X-scale text
  display.setTextColor(WHITE);
  display.print(F("0x")); display.println(0xDEADBEEF, HEX);

  display.display();
  delay(2000);
}

void testscrolltext(void) {
  display.clearDisplay();

  display.setTextSize(2); // Draw 2X-scale text
  display.setTextColor(WHITE);
  display.setCursor(10, 0);
  display.println(F("scroll"));
  display.display();      // Show initial text
  delay(100);

  // Scroll in various directions, pausing in-between:
  display.startscrollright(0x00, 0x0F);
  delay(2000);
  display.stopscroll();
  delay(1000);
  display.startscrollleft(0x00, 0x0F);
  delay(2000);
  display.stopscroll();
  delay(1000);
  display.startscrolldiagright(0x00, 0x07);
  delay(2000);
  display.startscrolldiagleft(0x00, 0x07);
  delay(2000);
  display.stopscroll();
  delay(1000);
}

void testdrawbitmap(void) {
  display.clearDisplay();

  display.drawBitmap(
    (display.width()  - LOGO_WIDTH ) / 2,
    (display.height() - LOGO_HEIGHT) / 2,
    logo_bmp, LOGO_WIDTH, LOGO_HEIGHT, 1);
  display.display();
  delay(1000);
}

#define XPOS   0 // Indexes into the 'icons' array in function below
#define YPOS   1
#define DELTAY 2

void testanimate(const uint8_t *bitmap, uint8_t w, uint8_t h) {
  int8_t f, icons[NUMFLAKES][3];

  // Initialize 'snowflake' positions
  for(f=0; f< NUMFLAKES; f++) {
    icons[f][XPOS]   = random(1 - LOGO_WIDTH, display.width());
    icons[f][YPOS]   = -LOGO_HEIGHT;
    icons[f][DELTAY] = random(1, 6);
    Serial.print(F("x: "));
    Serial.print(icons[f][XPOS], DEC);
    Serial.print(F(" y: "));
    Serial.print(icons[f][YPOS], DEC);
    Serial.print(F(" dy: "));
    Serial.println(icons[f][DELTAY], DEC);
  }

  for(;;) { // Loop forever...
    display.clearDisplay(); // Clear the display buffer

    // Draw each snowflake:
    for(f=0; f< NUMFLAKES; f++) {
      display.drawBitmap(icons[f][XPOS], icons[f][YPOS], bitmap, w, h, WHITE);
    }

    display.display(); // Show the display buffer on the screen
    delay(200);        // Pause for 1/10 second

    // Then update coordinates of each flake...
    for(f=0; f< NUMFLAKES; f++) {
      icons[f][YPOS] += icons[f][DELTAY];
      // If snowflake is off the bottom of the screen...
      if (icons[f][YPOS] >= display.height()) {
        // Reinitialize to a random position, just off the top
        icons[f][XPOS]   = random(1 - LOGO_WIDTH, display.width());
        icons[f][YPOS]   = -LOGO_HEIGHT;
        icons[f][DELTAY] = random(1, 6);
      }
    }
  }
}
That’ll be your 7 day weather forecast then! ![]()
Up in the Troodos mountains, perhaps.
Yes it turns out that the 2 OLED’s I have with 7 pins can be configured differently if I get out the iron, which I’m reluctant to do. There is a default setting that should work but I haven’t got them running yet.
Of the 3 OLED’s I have with 4 pins one appears to be dead. One displays white text and the resolution is very poor. I have to set a fontsize of 2 for it to be clear enough to read but then it is too big to get very much text on the display.
The third one is quite nice and displays blue text with fontsize 1 being crystal clear if you have 20:20 vision, which I don’t.
I tweaked your code to display a line of text at a time rather than a single character. With the single character format it was like watching an IBM terminal from the 1970’s ![]() Also after displaying the Blynk logo I enable text wrapping to the display.
Also after displaying the Blynk logo I enable text wrapping to the display.
I have two versions of your code:
First version
Allows BLYNK_DEBUG to be sent to the OLED and has a separate class for CustomTerminal. As Terminal only works once the connection has been made you don’t get to see the logo in the Terminal so I have:
BLYNK_CONNECTED()
{
  myTerminal.println(F("Connected to Blynk"));
  myTerminal.print(F("Local IP: "));
  myTerminal.println(WiFi.localIP());
}
Second version
Just one print class to send text to Serial Monitor or Terminal, without an OLED. Useful when your project doesn’t have access to a Serial Monitor. By using myConsole.println() you don’t have to edit a long sketch which might be littered with Serial.println() and Blynk.virtualWrite(Vx, “text to terminal”) commands.
/*************************************************************
 SM2Terminal.ino Send Serial Monitor data to Blynk Terminal
 Terminal widget on V0
 *************************************************************/

#include <ESP8266WiFi.h>
#include <BlynkSimpleEsp8266.h>
#define serialavailable   // comment out when Serial Monitor is not available

class CustomConsole
  : public Print
{
  public:
    CustomConsole() {}
    virtual size_t write(uint8_t ch) // Grabs character from print
    {
      fulltext = fulltext + String(char(ch));
      if (ch == '\n')       // print a line at a time rather than a character at a time
      {
        Blynk.virtualWrite(V0, fulltext);
        #ifdef serialavailable
          Serial.print(fulltext);
        #endif
        fulltext = "";
      }
      return 1; // Sent a line of text to Serial Monitor and Terminal
    }
  private:
    String fulltext = "";
};

CustomConsole myConsole;

#define BLYNK_PRINT myConsole

char auth[] = "xxx";
char ssid[] = "xxx";
char pass[] = "xxx";
char serv[] = "blynk-cloud.com";

BlynkTimer timer;

BLYNK_CONNECTED()
{
  myConsole.println(F("Connected to Blynk"));
  myConsole.print(F("Local IP: "));
  myConsole.println(WiFi.localIP());
}

void myTimerEvent()
{
  myConsole.println("Uptime: " + String(millis() / 1000));
}

void setup()
{
  #ifdef serialavailable
    Serial.begin(74880); // ESP8266 native baud rate
  #endif
  Blynk.begin(auth, ssid, pass, serv);
  timer.setInterval(1000L, myTimerEvent);
}

void loop()
{
  Blynk.run();
  timer.run();
}
OK, this time I am using a bit larger screen then the past ones like a 20" VGA monitor that is  ( UXGA actually)
I spent way more hours then I think I really had in me, today… but I used Bitlune’s wonderfull ESP32 VGA library (in beta)…
And wired up a ESP32 Dev board. I an just using the simple method right now, I will build up the resistor ladder later for higher resolution and color depth.
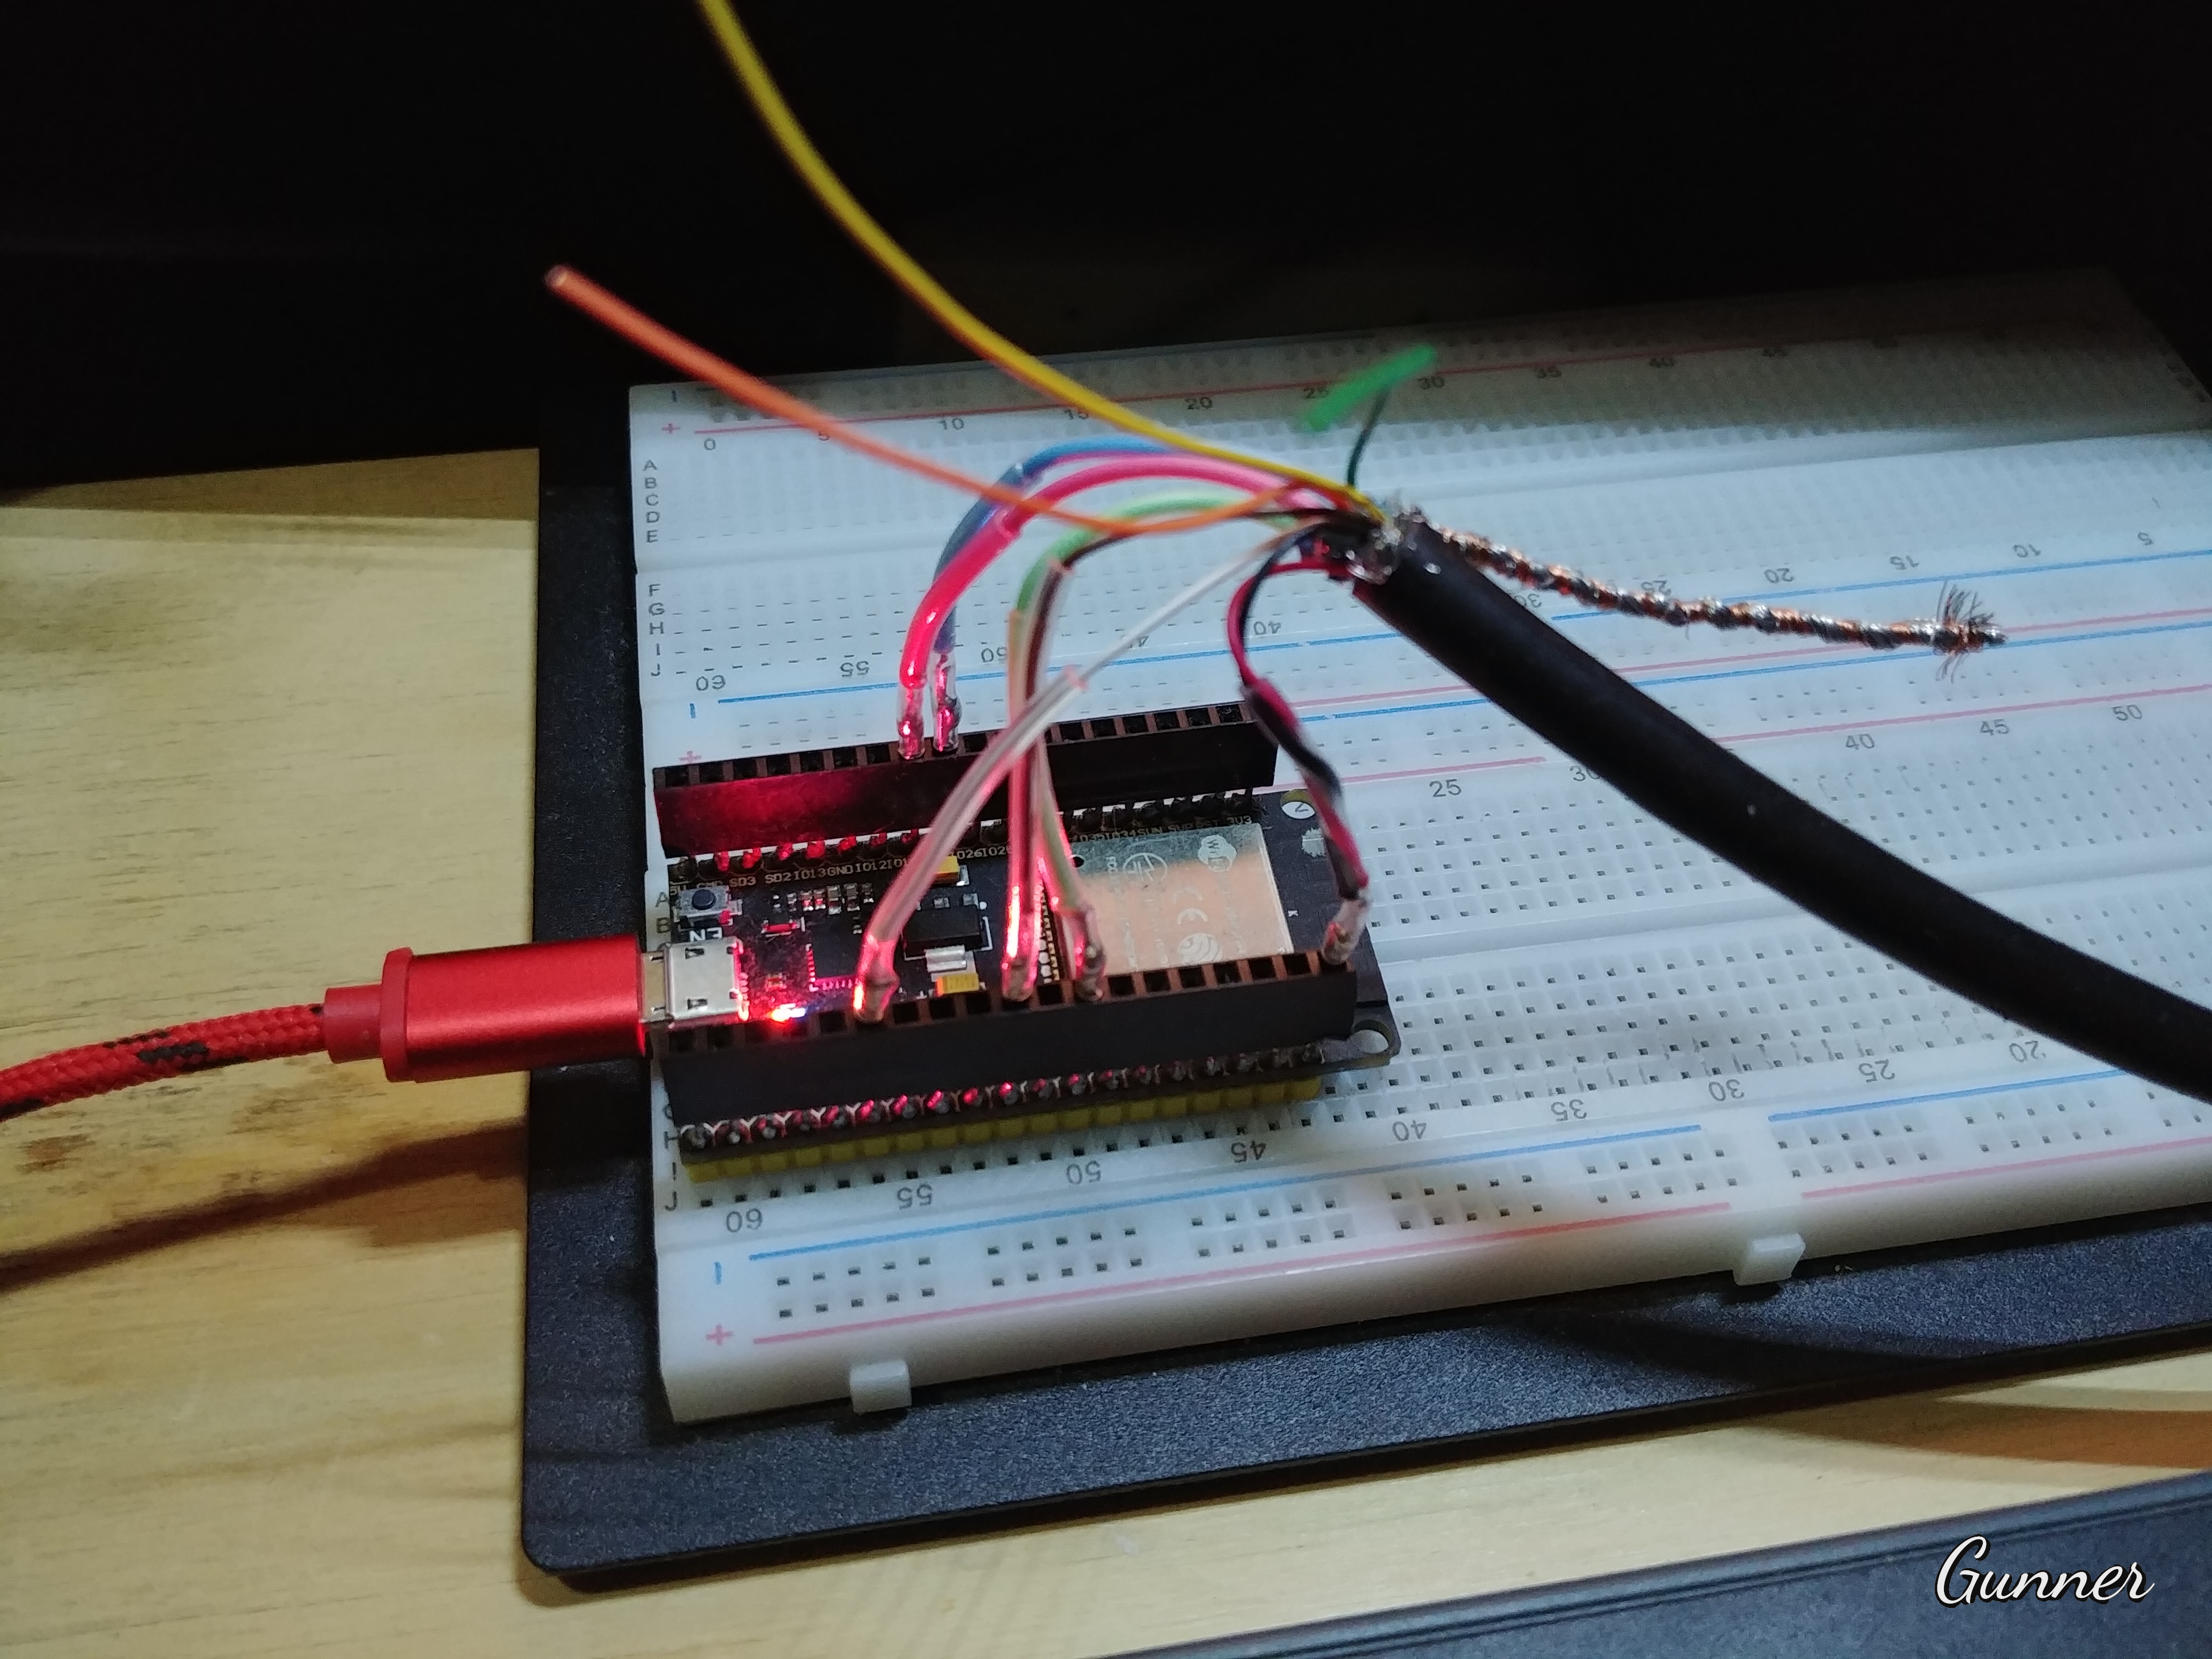
And sent the display to my workstations secondary monitor’s VGA input.
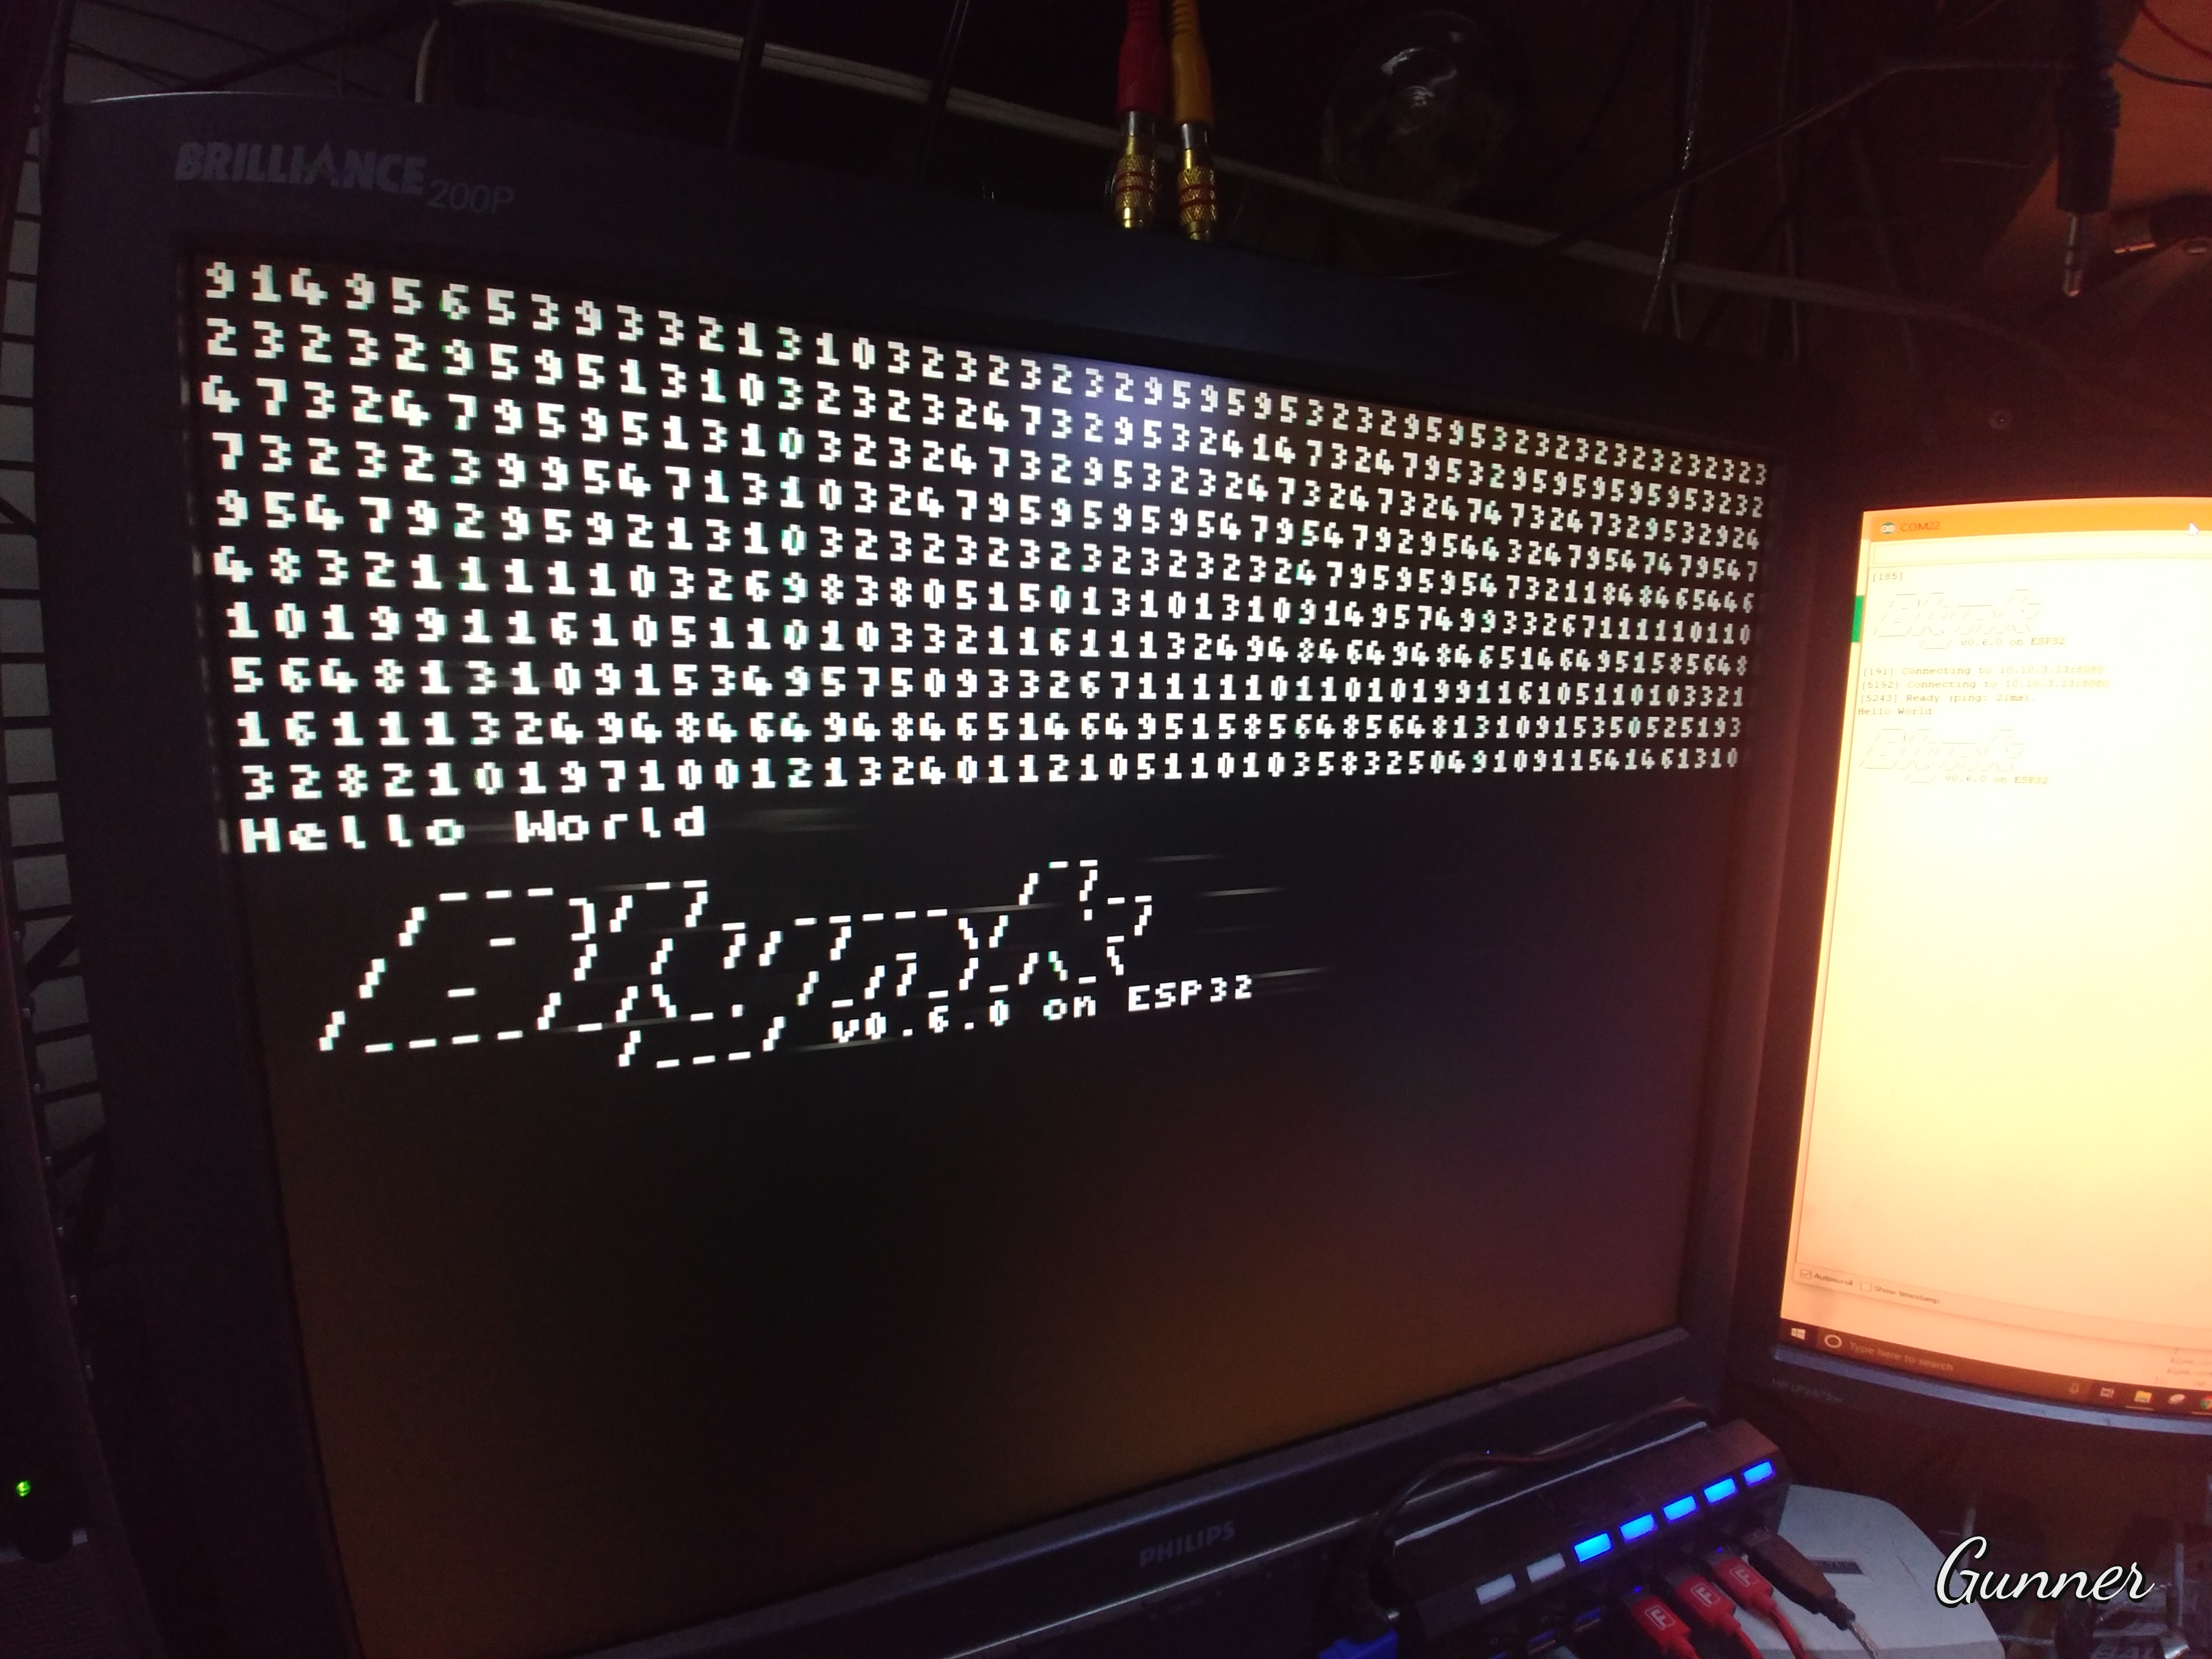
It is NOT really working properly… as all those numbers at the top are actually the ASCII decimal numbers being printed literally instead of the wanted characters… The characters only show up instead of a uptime counter due to some bug in the library that seems to be flushing a buffer?? If I had let the timer keep going it would repeat the logo minus a top leftmost character each time… and so on until it is just showing gibberish.
And this is mimicked on the Serial monitor. Hard to see, but it is on the right hand monitor and looks like this…
But, hey… I got to display the Blynk logo on VGA and sometimes that is all that is needed to amuse me 
#include <ESP32Lib.h>
#include <Ressources/Font6x8.h>
VGA3Bit vga;

// Define a custom console for OLED debug output
class CustomConsole
  : public Print // This automatically adds functions like .println()
{
  public:
    CustomConsole() {}
    virtual size_t write(uint8_t ch) {  // Grabs character from print
      Serial.print(char(ch));  // Repeat all character output to Serial monitor
      vga.print(char(ch));  // Should print a character to VGA, but just shows the decimal value of it
    }
  private:
};

// initiate myConsole
CustomConsole myConsole;

#define BLYNK_PRINT myConsole  // Unfortunatly simply using '#define BLYNK_PRINT vga' didn't work at all
//#define BLYNK_DEBUG  // Optional, this enables more detailed prints
#include <BlynkSimpleEsp32.h>
#include <WiFi.h>
#include <WiFiClient.h>


// VGA pin configuration
const int redPin = 14;
const int greenPin = 19;
const int bluePin = 27;
const int hsyncPin = 0;
const int vsyncPin = 5;

char auth[] = "xxxxxxxxxx";
char ssid[] = "xxxxxxxxxx";
char pass[] = "xxxxxxxxxx";
char server[] = "xxx.xxx.xxx.xxx";  // IP for your Local Server
int port = 8080;

BlynkTimer timer;


void setup() {
  Serial.begin(74880);  // BLYNK_PRINT data

  //initializing vga at the specified pins
  vga.init(vga.MODE320x240, redPin, greenPin, bluePin, hsyncPin, vsyncPin);

  //selecting the font
  vga.setFont(Font6x8);

  //clearing with Green background
  //vga.clear(vga.RGB(0x009900));  // BBGGRR

  //black text color no background color
  //vga.setTextColor(vga.RGB(1));

  // Timed Lambda Function - UpTime counter
  timer.setInterval(1000L, []() {  // Run every second
    int uptime = millis() / 1000;
    Blynk.virtualWrite(V1, uptime);  // Display the UpTime in Seconds
    Serial.print(uptime + ", ");
    vga.print(uptime + ", ");  // This adding of the comma seems to cause some buffer issue that while actually displaying the proper characters since boot... never properly displays the uptime for a while.
  });  // END Timer Function

  WiFi.begin(ssid, pass);
  Blynk.config(auth, server, port);
  Blynk.connect();

  Serial.println("Hello World");
  vga.println("Hello World");
}


void loop() {
  Blynk.run();
  timer.run();
}
2 Likes
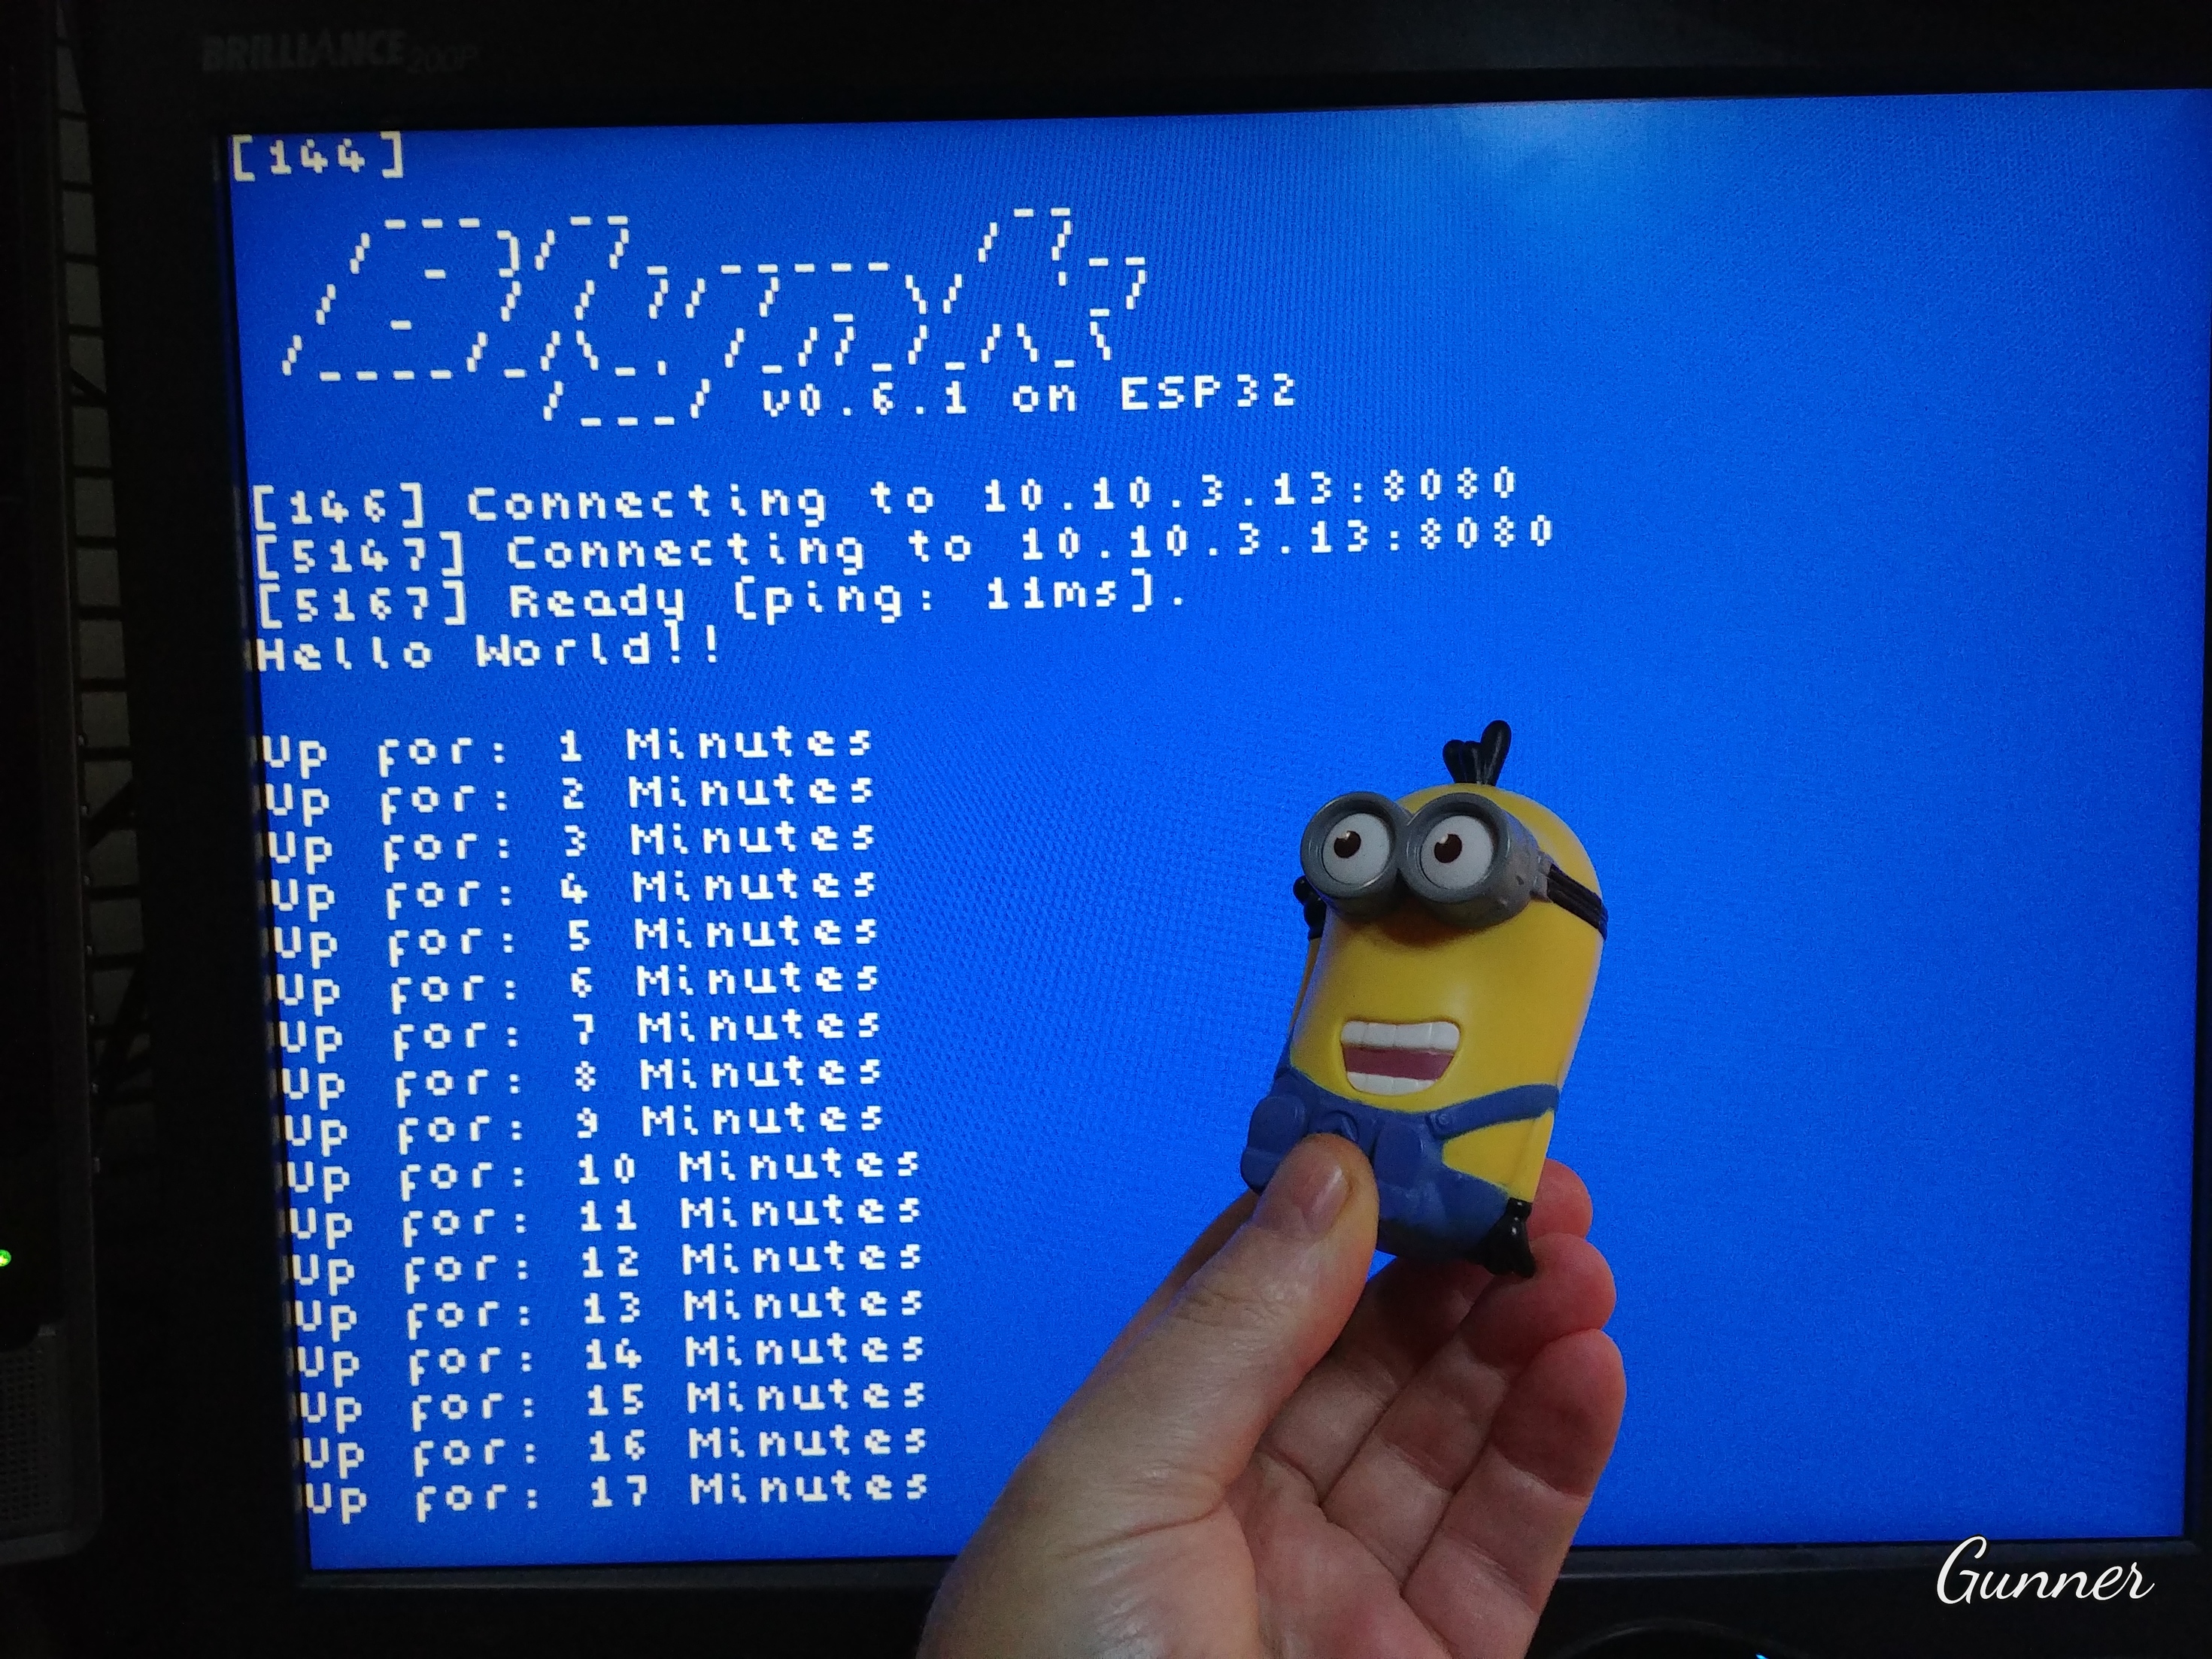
OK, I think I have it beat… using a refreshing character array of a whopping 2 bytes (if I am using the terminology correct). It will display any and all Blynk log, DEBUG and vga.println() commands as needed.
Now we can have a totally independent ESP32/ Blynk setup complete with diagnostics/screen display.
Although it might help to have a much smaller VGA capable display if you wish to make it portableish 

#include <ESP32Lib.h>
#include <Ressources/Font6x8.h>

VGA3Bit vga;

char text[2] = {};
int i = 0;

class CustomConsole
  : public Print {  // This automatically adds functions like .println()
  public:
    CustomConsole() {}
    virtual size_t write(uint8_t ch) {  // Grabs character from print
      Serial.print(char(ch));  // Repeat all character output to Serial monitor
      text[i] += char(ch);
      i++;
      if (i == 2) {
        vga.print(text);
        for (int j = 0; j < i; j++) {
          text[j] = '\0';
        }
        i = 0;
      }
    }
  private:
};


// initiate myConsole
CustomConsole myConsole;

#define BLYNK_PRINT myConsole
#define BLYNK_DEBUG  // Optional, this enables more detailed prints
#include <BlynkSimpleEsp32.h>
#include <WiFi.h>
#include <WiFiClient.h>


//pin configuration
const int redPin = 14;
const int greenPin = 19;
const int bluePin = 27;
const int hsyncPin = 0;
const int vsyncPin = 5;
int RPM;
int maxRPM;

char auth[] = "xxxxxxxxxx";
char ssid[] = "xxxxxxxxxx";
char pass[] = "xxxxxxxxxx";
char server[] = "xxx.xxx.xxx.xxx";  // IP for your Local Server
int port = 8080;

BlynkTimer timer;


void setup() {
  Serial.begin(115200);  // BLYNK_PRINT data
  //initializing vga at the specified pins
  vga.init(vga.MODE320x240, redPin, greenPin, bluePin, hsyncPin, vsyncPin);
  //selecting the font
  vga.setFont(Font6x8);
  //clearing with coloured background
  vga.clear(vga.RGB(0xff0000));  // BBGGRR
  //black text color no background color
  //vga.setTextColor(vga.RGB(1));

  // Timed Lambda Function - UpTime counter
  timer.setInterval(60000L, []() {  // Run every second
    int uptime = millis() / 60000;
    Serial.print("Up for: ");
    Serial.print(uptime);
    Serial.println(" Minutes");
    vga.print("Up for: ");
    vga.print(uptime);
    vga.println(" Minutes");
  });  // END Timer Function

  WiFi.begin(ssid, pass);
  Blynk.config(auth, server, port);
  Blynk.connect();

  Serial.println("Hello World!!\n");
  vga.println("Hello World!!\n");
}


void loop() {
  Blynk.run();
  timer.run();
}
4 Likes
@Gunner, see where bitluni saw your post?
Its briefly on the screen at about 10 seconds in or so. Pretty cool!
3 Likes