hi guys, and for a week I’m spitting the whole forum looking for a topic that talks about that topic. I’m Italian and apologize in advance if my English writing is awful but I’m helping Google translator. I explain a little about my project, I made an irrigation automation plant with various water pumps, with the led widget I wanted to see when these are running and when I’m Stop. I bought an AC / DC photocoupler when I have 220v voltage on the other side coming out 3.3v now i want to send the 3.3v on raspberry but i dont know how to run the led widget without having a detailed guide. I have Blynk cloud server I do not even know how to extract a sketch from the cloud … can you help me? thank you so much to all of you
Hello. We actually have a good tutorial with all required info - https://www.youtube.com/watch?v=LJ3ic8C8CcA
thanks for the answer I already saw this video but it does not fit my work, I explain in summary what I want to do, I have gpio 5 in input mode when a signal comes to gpio 5 you have to turn on the led widget on Blynk app, i do not have to turn on a physical led but the virtual blynk led
@Jack1 you need just to refer to the Sketch builder here on the top right of the forum page
and this sketch which you should start use it to get your task done
/*************************************************************
  Download latest Blynk library here:
    https://github.com/blynkkk/blynk-library/releases/latest

  Blynk is a platform with iOS and Android apps to control
  Arduino, Raspberry Pi and the likes over the Internet.
  You can easily build graphic interfaces for all your
  projects by simply dragging and dropping widgets.

    Downloads, docs, tutorials: http://www.blynk.cc
    Sketch generator:           http://examples.blynk.cc
    Blynk community:            http://community.blynk.cc
    Follow us:                  http://www.fb.com/blynkapp
                                http://twitter.com/blynk_app

  Blynk library is licensed under MIT license
  This example code is in public domain.

 *************************************************************

  This example shows how value can be pushed from Arduino to
  the Blynk App.

  NOTE:
  BlynkTimer provides SimpleTimer functionality:
    http://playground.arduino.cc/Code/SimpleTimer

  App project setup:
    Value Display widget attached to Virtual Pin V5
 *************************************************************/

/* Comment this out to disable prints and save space */
#define BLYNK_PRINT stdout

#ifdef RASPBERRY
 #include <BlynkApiWiringPi.h>
#else
 #include <BlynkApiLinux.h>
#endif
#include <BlynkSocket.h>
#include <BlynkOptionsParser.h>

static BlynkTransportSocket _blynkTransport;
BlynkSocket Blynk(_blynkTransport);
#include <BlynkWidgets.h>

BlynkTimer timer;

// This function sends Arduino's up time every second to Virtual Pin (5).
// In the app, Widget's reading frequency should be set to PUSH. This means
// that you define how often to send data to Blynk App.
void myTimerEvent()
{
  // You can send any value at any time.
  // Please don't send more that 10 values per second.
  Blynk.virtualWrite(V5, millis() / 1000);
}

void setup()
{
  // Setup a function to be called every second
  timer.setInterval(1000L, myTimerEvent);
}

void loop()
{
  Blynk.run();
  timer.run(); // Initiates BlynkTimer
}

int main(int argc, char* argv[])
{
  const char *auth, *serv;
  uint16_t port;
  parse_options(argc, argv, auth, serv, port);

  Blynk.begin(auth, serv, port);

  setup();
  while(true) {
    loop();
  }

  return 0;
}
EDIT : ignore this post
thanks for the answer, I’m trying to interpret your message, as I said in the previous post I also need to know how to extrapolate my sketch from the cloud, save it to modify it and then reload it on the cloud. I looked at your sketch and I read that it’s arduino. there is no gpio link linked to virtual pin, if gpio 5 is high the widget led with v1 must be turned on when gpio 5 is low the widget widget associated with pin V1 must be off. I do not know if I explained to you, I apologize for my inexperience. If it is possible in the answer that you will only write the command lines to run through the Linux terminal, thank you
sorry i misunderstood your objective here is how to use Raspberry by a board not a server you can find it on Blynk Docs here
but i can’t help farther than this as i never used RPI GPIO to control thing i use it only as local server
Here is my Node.js test sketch for my RPi. There is a section at the bottom where it toggles two virtual LED’s from a physical switch, so you can dig into this code and learn how to write your own.
var Gpio = require('onoff').Gpio;  // links variable 'Gpio' to the all important onoff GPIO control library
var Blynk = require('blynk-library');  // Links variable 'Blynk' to the Blynk Library
var AUTH = 'cda957435xxxxxxx283c95018f';  // My top secret auth code... useless to anyone on the cloud ;P
var blynk = new Blynk.Blynk(AUTH, options = { connector : new Blynk.TcpClient( options = { addr:"10.10.3.13", port:8442 } ) });
var process = require('child_process'); // Allows this script to run CLI commands?  Used in the "run the command ifconfig" function

var v1 = new blynk.VirtualPin(1);  		// Setup Button Widget on V1 with variable 'v1'
var v5 = new blynk.VirtualPin(5);  		// Setup Button Widget on V5 with variable 'v5'
var v9 = new blynk.VirtualPin(9);  		// Setup Display Widget on V9 with variable 'v9'
var v10 = new blynk.VirtualPin(10);  	// Setup LED Widget on V10 with variable 'v10'

v1.on('write', function(param) {  		// Watches for V1 Button
  console.log('V1:', param[0]);  		// prints value to CLI
		if (param == 0) {
        		blynk.virtualWrite(10, 0);  // V10 Widget (ORANGE) LED OFF
    			} else if (param == 1) {
                	blynk.virtualWrite(10, 1023);  // V10 Widget (ORANGE) LED ON
        		}
		});

// "run the command ifconfig"
v5.on('write', function(param) {  		// Watches for V5 Button

	console.log('V5:', param[0]);  		// prints value to CLI
		if (param == 1) {				// Runs the CLI command ifconfig if the button on V5 is pressed
			process.exec('ifconfig',function (err,stdout,stderr) {
    				if (err) {
        			console.log("\n"+stderr);
    				} else {
        			console.log(stdout);
    				}
			})
		}
});

v9.on('read', function() {   			// I don't understand this?
	v9.write(new Date().getSeconds());  	// but this sends the seconds 0-59 to the Display Widget
});

	led = new Gpio(18, 'out'),  			// Sets up the BCM pin 18 as an output for the LED and assigns it to variable "led"
	button = new Gpio(25, 'in', 'both');  // Sets up the BCM pin 25 as an input registering both rising and falling for the variable "button"

button.watch(function (err, value) {  // Watches for button press and assigns 0/1 to value
	if (err) {
		throw err;  // Some form of error handling
	}
led.writeSync(value);  // Sends value (0/1) to Physical LED
	if (value  == 0) {
        blynk.virtualWrite(2, 0);  // V2 Widget (BLUE) LED off
		blynk.virtualWrite(3, 1023);  // V3 Widget (RED) LED on
		} 	else if (value == 1) {
            blynk.virtualWrite(2, 1023);  // V2 (BLUE) Widget LED on
			blynk.virtualWrite(3, 0);  // V3 (RED) Widget LED off
			}
});
I just looked at your sketch now and is giving me great help in creating my sketch! I want to ask you something after I write my sketch then can I add widget apps to my project?
Of course… that is how you control and/or get feedback from the sketch.
Sorry my example is rather chaotic… I am still barely learning JavaScript.
thanks always gunner! I have to ask for another favor, which command string should i use on Linux terminal to extract a sketch from the Blynk cloud?
You don’t really do it that way, as far as I know, therefore you can’t simply wget anything… And since there is no current examples in the Sketch Builder, you basicly have to write your own, or copy/paste from the other few examples that others have posted here.
Here is a little sketch which shows how to setup some form of timer in NodeJS and write to the terminal widget (mind you, it connects to my local server). It also shows how to do a GET request with NodeJS because the GET I do is too big for WebHook and I haven’t figured out how to change the BLYNK_MAX_READBYTES in NodeJS.
#!/usr/bin/env node

var https = require('https');
var Blynk = require('blynk-library');
var AUTH = 'token-here';

var blynk = new Blynk.Blynk(AUTH, options = { connector : new Blynk.TcpClient( options = { addr:"192.168.0.24", port:8442 } ) });
var v0 = new blynk.VirtualPin(0);

var options = {
    host: 'br-gpsgadget-new.azurewebsites.net',
    port: 443,
    path: '/data/raintext?lat=51&lon=3',
    method: 'GET',
    headers: {
        'Content-Type': 'text/plain'
    }
};

callback = function(response) {
	var str = '';

	response.on('data', function (chunk) {
		str += chunk;
	});

	response.on('end', function () {
		var result = str.split('\r\n');
		var test = result[0].toString();
		var test1 = test.split('|');

		//console.log('MM: ', test1[0]);
		//console.log('Tijd: ', test1[1]);

		var mm = parseInt(test1[0]);

		if(mm > 0) {
			blynk.notify('Nattigheid!');
		}

		v0.write(mm);

		terminal.write('mm: ');
		terminal.write(mm);
		terminal.write('\r\n');
		terminal.write('tijd: ');
		terminal.write(test1[1]);
		terminal.write('\r\n');
	});
}

var terminal = new blynk.WidgetTerminal(4);

var testomg = setInterval(
function() {
	https.request(options, callback).end();
}, 30000);

blynk.on('connect', function() { console.log("Blynk ready."); });
blynk.on('disconnect', function() { console.log("DISCONNECT"); });
1 Like
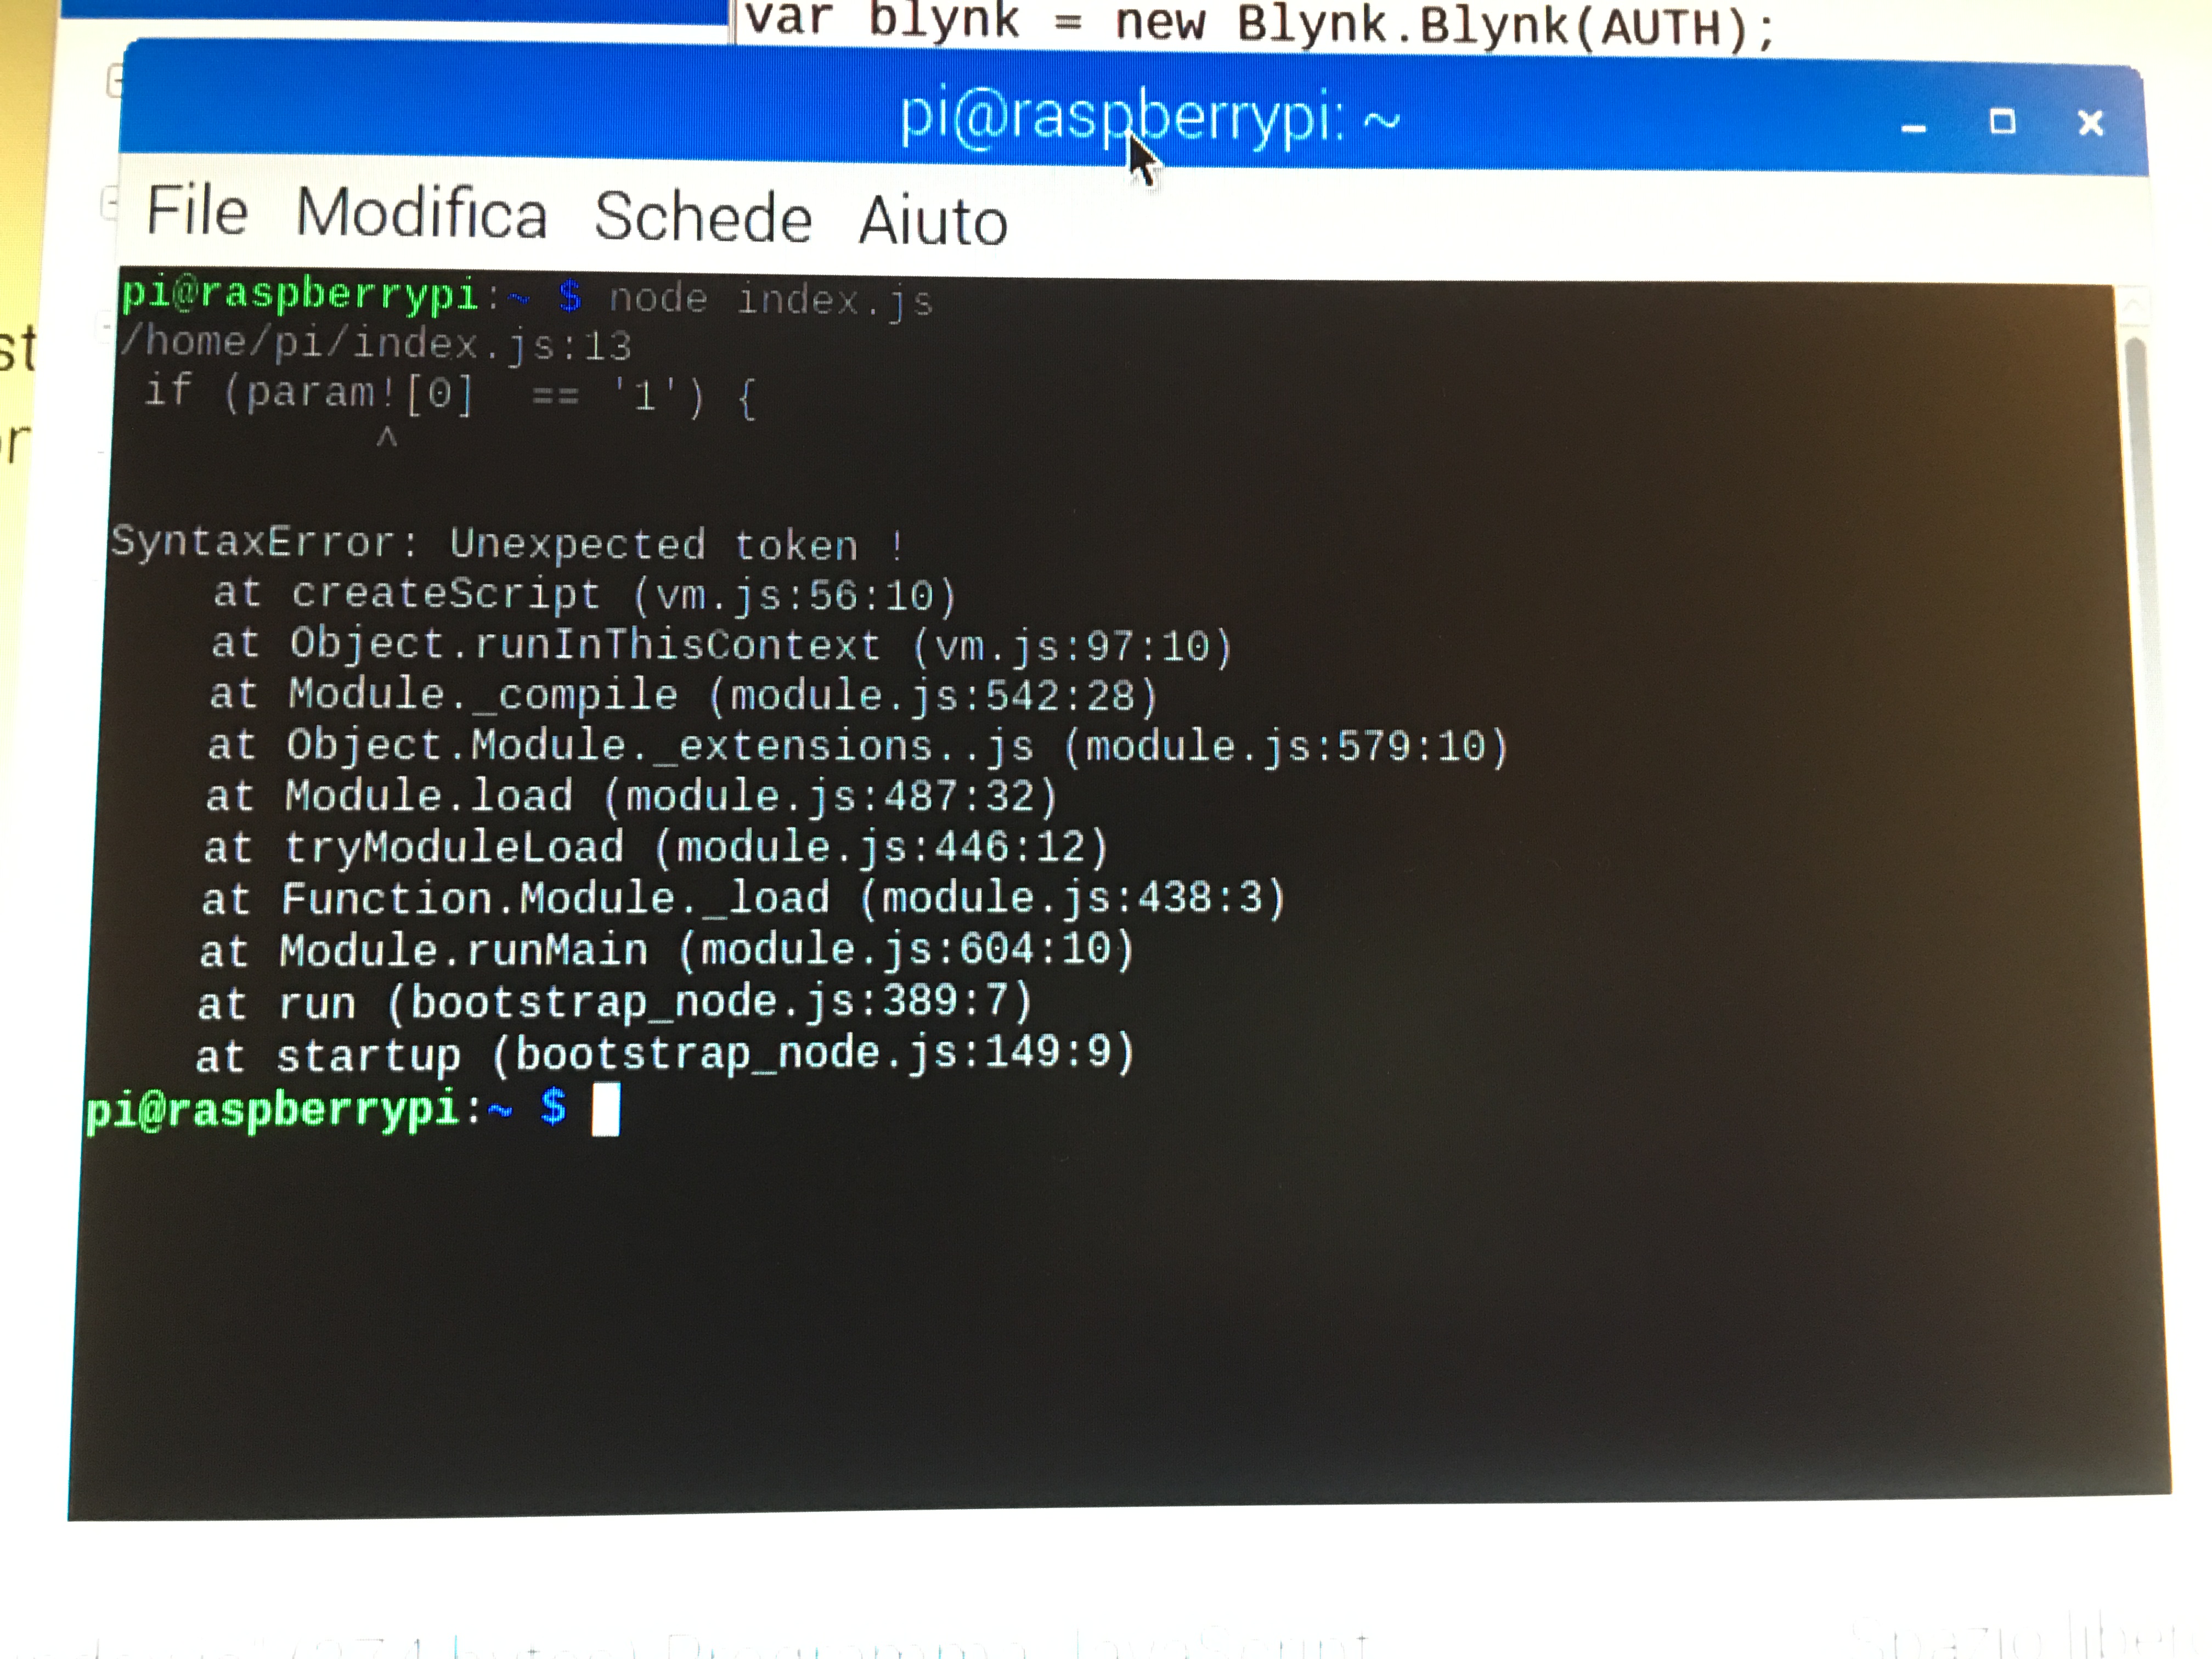
@Jack1 the error message starts with:
if (param![0] == '1') { in /home/pi/index.js
Specifically the ! before the array. Remove the ! and maybe you wanted:
if (param[0] != '1') {
Thank you, you’re a genius! my sketch works !! 
certainly just complete it publicize my sketch. now as my sketch is too ridiculous I managed to run just one button on virtual pin V0 at gpio 24, I’m starting to learn so much as soon as i can put my sketch on the first post …
var Blynk = require('blynk-library');
var Gpio = require('onoff').Gpio;
var led = new Gpio(26, 'in');
var AUTH = 'xxxxxxxxxxxxxxxxxx';

var blynk = new Blynk.Blynk(AUTH);

var v9 = new blynk.VirtualPin(9);

v9.on('read', function() {
	v9.write(new Date().getSeconds());
});

	led = new Gpio(18, 'out'),  			// Sets up the BCM pin 18 as an output for the LED and assigns it to variable "led"
	button = new Gpio(26, 'in', 'both');  // Sets up the BCM pin 26 as an input registering both rising and falling for the variable "button"

button.watch(function (err, value) {  // Watches for button press and assigns 0/1 to value
	if (err) {
		throw err;  // Some form of error handling
	}
led.writeSync(value);  // Sends value (0/1) to Physical LED
	if (value  == 0) {
        blynk.virtualWrite(2, 1023);  // V2 Widget (GREEN) LED off

		} 	else if (value == 1) {
            blynk.virtualWrite(2, 0);  // V2 (GREEN) Widget LED on

			}
});
here is my sketch, I copied from @Gunner, the virtual led works. just what I have to do is not suitable, I want to sync the button = new Gpio button (25, ‘in’, ‘both’); directly to the virtual pin led
@Jack1 I think the virtualWrite’s are wrong not 1023 for off but 0 and 255 for on not 0.
Not sure I understand this. Can you provide more details.