How I can add a phsical switch in blynk app?
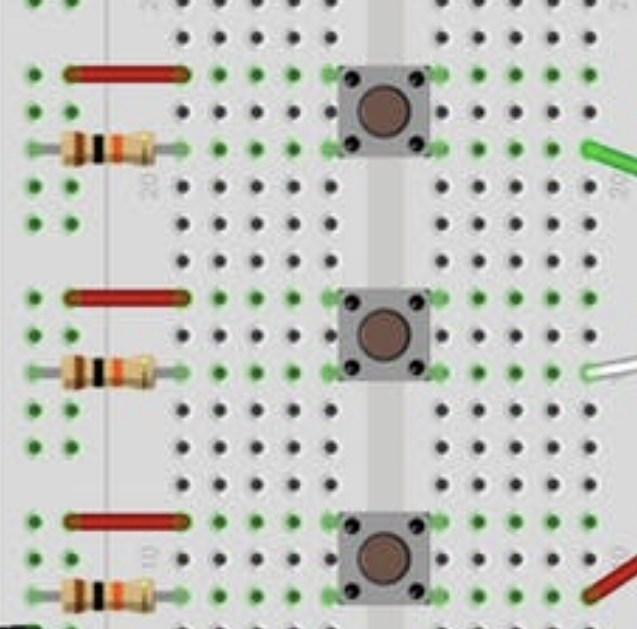
I do like this it is correct??
Please Hi dears
I have project
How to set Data and Time ? using Arduino uno , esp8266, LCD and RTC
Manually I can used by switch push button but I can’t by Blynk app
I used this code I don’t now where the mistake?
#define BLYNK_PRINT Serial
#include <ESP8266_Lib.h>
#include <BlynkSimpleShieldEsp8266.h>
//........................
#include <Wire.h>
#include <RTClib.h>
#include <LiquidCrystal_I2C.h>
//************************************//
LiquidCrystal_I2C lcd(0x3F,20,4);
RTC_DS1307 RTC;
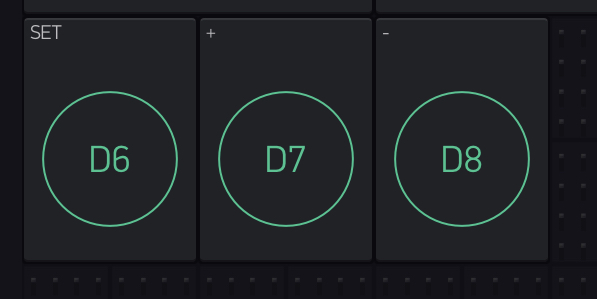
//************Button*****************//
int P1=6; // Button SET MENU'
int P2=7; // Button +
int P3=8; // Button -
//int P1,P2,P3;
//************Variables**************//
int hourupg;
int minupg;
int yearupg;
int monthupg;
int dayupg;
int menu =0;
//.............................
char auth[] = "********************************************";
char ssid[] = "*********************";
char pass[] = "**************";
#include <SoftwareSerial.h>
SoftwareSerial EspSerial(2, 3); // TX, RX
// Your ESP8266 baud rate:
#define ESP8266_BAUD 9600
ESP8266 wifi(&EspSerial);
void setup()
{
Serial.begin(9600);
// Set ESP8266 baud rate
EspSerial.begin(ESP8266_BAUD);
delay(10);
Blynk.begin(auth, wifi, ssid, pass);
//..............................................
lcd.init();
lcd.backlight();
lcd.clear();
pinMode(P1,INPUT);
pinMode(P2,INPUT);
pinMode(P3,INPUT);
Serial.begin(9600);
Wire.begin();
RTC.begin();
if (! RTC.isrunning()) {
Serial.println("RTC is NOT running!");
// Set the date and time at compile time
RTC.adjust(DateTime(__DATE__, __TIME__));
}
int menu=0;
}
//....................................................
void loop()
{
//.......................................
// check if you press the SET button and increase the menu index
int SET = digitalRead(P1);
if (SET == LOW)
// if(digitalRead(P1))
{
menu=menu+1;
}
if (menu==0)
{
DisplayDateTime(); // void DisplayDateTime
}
if (menu==1)
{
DisplaySetHour();
}
if (menu==2)
{
DisplaySetMinute();
}
if (menu==3)
{
DisplaySetYear();
}
if (menu==4)
{
DisplaySetMonth();
}
if (menu==5)
{
DisplaySetDay();
}
if (menu==6)
{
StoreAgg();
delay(500);
menu=0;
}
delay(100);
}
void DisplayDateTime ()
{
// We show the current date and time
DateTime now = RTC.now();
lcd.setCursor(2, 1);
lcd.print("Hour: ");
if (now.hour()<=9)
{
lcd.print("0");
}
lcd.print(now.hour(), DEC);
hourupg=now.hour();
lcd.print(":");
if (now.minute()<=9)
{
lcd.print("0");
}
lcd.print(now.minute(), DEC);
minupg=now.minute();
lcd.print(":");
if (now.second()<=9)
{
lcd.print("0");
}
lcd.print(now.second(), DEC);
lcd.setCursor(2, 2);
lcd.print("Date: ");
if (now.day()<=9)
{
lcd.print("0");
}
lcd.print(now.day(), DEC);
dayupg=now.day();
lcd.print("/");
if (now.month()<=9)
{
lcd.print("0");
}
lcd.print(now.month(), DEC);
monthupg=now.month();
lcd.print("/");
lcd.print(now.year(), DEC);
yearupg=now.year();
}
void DisplaySetHour()
{
// time setting
lcd.clear();
DateTime now = RTC.now();
if(digitalRead(P2)==LOW)
{
if(hourupg==23)
{
hourupg=0;
}
else
{
hourupg=hourupg+1;
}
}
if(digitalRead(P3)==LOW)
{
if(hourupg==0)
{
hourupg=23;
}
else
{
hourupg=hourupg-1;
}
}
lcd.setCursor(0,0);
lcd.print("Set time:");
lcd.setCursor(0,1);
lcd.print(hourupg,DEC);
delay(200);
}
void DisplaySetMinute()
{
// Setting the minutes
lcd.clear();
if(digitalRead(P2)==LOW)
{
if (minupg==59)
{
minupg=0;
}
else
{
minupg=minupg+1;
}
}
if(digitalRead(P3)==LOW)
{
if (minupg==0)
{
minupg=59;
}
else
{
minupg=minupg-1;
}
}
lcd.setCursor(0,0);
lcd.print("Set Minutes:");
lcd.setCursor(0,1);
lcd.print(minupg,DEC);
delay(200);
}
void DisplaySetYear()
{
// setting the year
lcd.clear();
if(digitalRead(P2)==LOW)
{
yearupg=yearupg+1;
}
if(digitalRead(P3)==LOW)
{
yearupg=yearupg-1;
}
lcd.setCursor(0,0);
lcd.print("Set Year:");
lcd.setCursor(0,1);
lcd.print(yearupg,DEC);
delay(200);
}
void DisplaySetMonth()
{
// Setting the month
lcd.clear();
if(digitalRead(P2)==LOW)
{
if (monthupg==12)
{
monthupg=1;
}
else
{
monthupg=monthupg+1;
}
}
if(digitalRead(P3)==LOW)
{
if (monthupg==1)
{
monthupg=12;
}
else
{
monthupg=monthupg-1;
}
}
lcd.setCursor(0,0);
lcd.print("Set Month:");
lcd.setCursor(0,1);
lcd.print(monthupg,DEC);
delay(200);
}
void DisplaySetDay()
{
// Setting the day
lcd.clear();
if(digitalRead(P2)==LOW)
{
if (dayupg==31)
{
dayupg=1;
}
else
{
dayupg=dayupg+1;
}
}
if(digitalRead(P3)==LOW)
{
if (dayupg==1)
{
dayupg=31;
}
else
{
dayupg=dayupg-1;
}
}
lcd.setCursor(0,0);
lcd.print("Set Day:");
lcd.setCursor(0,1);
lcd.print(dayupg,DEC);
delay(200);
}
void StoreAgg()
{
// Variable saving
lcd.clear();
lcd.setCursor(4,1);
lcd.print("SAVING IN");
lcd.setCursor(4,2);
lcd.print("PROGRESS");
RTC.adjust(DateTime(yearupg,monthupg,dayupg,hourupg,minupg,0));
delay(200);
//...............................
Blynk.run();
}
Nasty void loop()
Before you go any further down this concluded code path full of delay() and other Blynk issues… I recommend you clean up the loop and use proper Blynk timer methods, switch() case and possibly even Blynk’s Menu Widget for your “Time adjustment” options.
Possibly even the Segmented Switch Widget might be of use… no Documents yet, but fairly striaght forward - Segmented Switch how it works
PS, please keep same issue in existing topic… no need to create multiple ones.
Thanks dear but not clear
How I can make void loop clear
Try reading the documentation I linked above… the one with the big words “Keep your void loop() clean” 
#define BLYNK_PRINT Serial
#include <ESP8266_Lib.h>
#include <BlynkSimpleShieldEsp8266.h>
//........................
#include <Wire.h>
#include <RTClib.h>
#include <LiquidCrystal_I2C.h>
//************************************//
LiquidCrystal_I2C lcd(0x3F,20,4);
RTC_DS1307 RTC;
//************Button*****************//
int P1=6; // Button SET MENU'
int P2=7; // Button +
int P3=8; // Button -
//int P1,P2,P3;
//************Variables**************//
int hourupg;
int minupg;
int yearupg;
int monthupg;
int dayupg;
int menu =0;
//.............................
char auth[] = "***************************";
char ssid[] = "**************";
char pass[] = "*************";
#include <SoftwareSerial.h>
SoftwareSerial EspSerial(2, 3); // TX, RX

// Your ESP8266 baud rate:
#define ESP8266_BAUD 9600

ESP8266 wifi(&EspSerial);

BlynkTimer timer;

void Clock()
{
  //.......................................
// check if you press the SET button and increase the menu index
 int SET = digitalRead(P1);
   if (SET == LOW)

 // if(digitalRead(P1))
  {
   menu=menu+1;
  }
  if (menu==0)
    {
     DisplayDateTime(); // void DisplayDateTime

    }
  if (menu==1)
    {
    DisplaySetHour();
    }
  if (menu==2)
    {
    DisplaySetMinute();
    }
  if (menu==3)
    {
    DisplaySetYear();
    }
  if (menu==4)
    {
    DisplaySetMonth();
    }
  if (menu==5)
    {
    DisplaySetDay();
    }
  if (menu==6)
    {
    StoreAgg();
    delay(500);
    menu=0;
    }
    delay(100);
}

void DisplayDateTime ()
{
// We show the current date and time
  DateTime now = RTC.now();

  lcd.setCursor(2, 1);
  lcd.print("Hour: ");
  if (now.hour()<=9)
  {
    lcd.print("0");
  }
  lcd.print(now.hour(), DEC);
  hourupg=now.hour();
  lcd.print(":");
  if (now.minute()<=9)
  {
    lcd.print("0");
  }
  lcd.print(now.minute(), DEC);
  minupg=now.minute();
  lcd.print(":");
  if (now.second()<=9)
  {
    lcd.print("0");
  }
  lcd.print(now.second(), DEC);

  lcd.setCursor(2, 2);
  lcd.print("Date: ");
  if (now.day()<=9)
  {
    lcd.print("0");
  }
  lcd.print(now.day(), DEC);
  dayupg=now.day();
  lcd.print("/");
  if (now.month()<=9)
  {
    lcd.print("0");
  }
  lcd.print(now.month(), DEC);
  monthupg=now.month();
  lcd.print("/");
  lcd.print(now.year(), DEC);
  yearupg=now.year();
}

void DisplaySetHour()
{
// time setting
  lcd.clear();
  DateTime now = RTC.now();
  if(digitalRead(P2)==LOW)
  {
    if(hourupg==23)
    {
      hourupg=0;
    }
    else
    {
      hourupg=hourupg+1;
    }
  }
   if(digitalRead(P3)==LOW)
  {
    if(hourupg==0)
    {
      hourupg=23;
    }
    else
    {
      hourupg=hourupg-1;
    }
  }
  lcd.setCursor(0,0);
  lcd.print("Set time:");
  lcd.setCursor(0,1);
  lcd.print(hourupg,DEC);
  delay(200);
}

void DisplaySetMinute()
{
// Setting the minutes
  lcd.clear();
  if(digitalRead(P2)==LOW)
  {
    if (minupg==59)
    {
      minupg=0;
    }
    else
    {
      minupg=minupg+1;
    }
  }
   if(digitalRead(P3)==LOW)
  {
    if (minupg==0)
    {
      minupg=59;
    }
    else
    {
      minupg=minupg-1;
    }
  }
  lcd.setCursor(0,0);
  lcd.print("Set Minutes:");
  lcd.setCursor(0,1);
  lcd.print(minupg,DEC);
  delay(200);
}

void DisplaySetYear()
{
// setting the year
  lcd.clear();
  if(digitalRead(P2)==LOW)
  {
    yearupg=yearupg+1;
  }
   if(digitalRead(P3)==LOW)
  {
    yearupg=yearupg-1;
  }
  lcd.setCursor(0,0);
  lcd.print("Set Year:");
  lcd.setCursor(0,1);
  lcd.print(yearupg,DEC);
  delay(200);
}

void DisplaySetMonth()
{
// Setting the month
  lcd.clear();
  if(digitalRead(P2)==LOW)
  {
    if (monthupg==12)
    {
      monthupg=1;
    }
    else
    {
      monthupg=monthupg+1;
    }
  }
   if(digitalRead(P3)==LOW)
  {
    if (monthupg==1)
    {
      monthupg=12;
    }
    else
    {
      monthupg=monthupg-1;
    }
  }
  lcd.setCursor(0,0);
  lcd.print("Set Month:");
  lcd.setCursor(0,1);
  lcd.print(monthupg,DEC);
  delay(200);
}

void DisplaySetDay()
{
// Setting the day
  lcd.clear();
  if(digitalRead(P2)==LOW)
  {
    if (dayupg==31)
    {
      dayupg=1;
    }
    else
    {
      dayupg=dayupg+1;
    }
  }
   if(digitalRead(P3)==LOW)
  {
    if (dayupg==1)
    {
      dayupg=31;
    }
    else
    {
      dayupg=dayupg-1;
    }
  }
  lcd.setCursor(0,0);
  lcd.print("Set Day:");
  lcd.setCursor(0,1);
  lcd.print(dayupg,DEC);
  delay(200);
}
void StoreAgg()
{
// Variable saving
  lcd.clear();
  lcd.setCursor(4,1);
  lcd.print("SAVING IN");
  lcd.setCursor(4,2);
  lcd.print("PROGRESS");
  RTC.adjust(DateTime(yearupg,monthupg,dayupg,hourupg,minupg,0));
  delay(300);
}
void setup()
{

  Serial.begin(9600);
  EspSerial.begin(ESP8266_BAUD);
  delay(10);

  Blynk.begin(auth, wifi, ssid, pass);
//..............................................
 lcd.init();
  lcd.backlight();
  lcd.clear();

 pinMode(P1,INPUT_PULLUP);
  pinMode(P2,INPUT_PULLUP);
pinMode(P3,INPUT_PULLUP);

  Serial.begin(9600);
  Wire.begin();
  RTC.begin();

  if (! RTC.isrunning()) {
    Serial.println("RTC is NOT running!");
    // Set the date and time at compile time
    RTC.adjust(DateTime(__DATE__, __TIME__));
  }

  int menu=0;
    timer.setInterval(1000L, Clock);
}

void loop()
{
  Blynk.run();
    timer.run();
}
still same problem
I’m sorry just starting coding I’m biggener programming.
I realise that you’re struggling with the programming side of things.
In the “olden days” (my era), programming would start with a sheet of paper and you’d draw a block diagram to show what you wanted to achieve and the steps you should follow.
You’d then write your code on paper and do paper testing, noting the value of each variable and hope it changed. You’d also write a test plan of how to check if the program gave the correct results.
Once you wore happy with the result you’d join the queue to use the computer terminal and key-in your code, save it and compile. If it compiled correctly you’d then run through your test plan.
Today’s approach is to google some code examples and copy/paste them together with no concept of how each piece of code works, the ask on a online forum for help.
You haven’t done the first stage of outlining the concept for your project and how it will work in practice from a user and code structure point of view. Until you do that, tweaking your code is a waste of time, because it’s trying to do things that aren’t necessary, and is also missing things that are necessary.
So, I think you need to re-think your approach to this project and ask yourself a number of key questions before you go any further…
Q - What is the primary purpose of the project?
A - To display the time on the clock. If it will be updated once every second then call the routine that does this once every second. Forget checking to see if the set time buttons are pressed, this is a secondary function (and probably unnecessary anyway).
Q - If I don’t check the state of the set time buttons every second, how will I know that they are pressed?
A - You attach an interrupt to each button. When it’s pressed, a specified routine will be called.
Q - How do I know that a button widget has been pressed in the Blynk App?
A - The Blynk magic will do this for you! If you have a button attached to virtual pin V1, a function called BLYNK_WRITE(V1) will be triggered when the button is pressed or released. In effect, the same as a CHANGE interrupt on a physical button.
Q - Why am I manually setting the time, using physical/Blynk buttons when the Blynk RTC widget knows the time of the mobile device I’m using, and this could be automatically passed across to the clock?
A - Because you haven’t thought-out the concept of your project correctly.
Q - As the clock is connected to the internet, why aren’t I automatically synchronising the time with a Network Time Protocol (NTP) service every so often?
A - Because you haven’t thought-out the concept of your project correctly.
Q - If I synchronised the clock with Blynk or an NTP service, would I need the physical buttons?
A - No, unless the clock couldn’t connect to the internet and the physical RTC module was showing the wrong time.
Q - If I use an NTP service, would the clock show the correct time for my time zone?
A - Yes. If you use a suitable time library which includes time zone features it will show the correct time for your region (including half hour offsets if necessary), and automatically correct for changes in daylight saving time.
So, it’s back to the drawing board in my opinion.
Pete.
![]()
![]()
![]() Too True!!
Too True!!
Fixing the void loop() wan’t intended as a solution to your actual question… but a big recommendation toward proper Blynk programming process. It is good to see that you mastered that fairly quickly. ![]()
![]()
As for the rest, I agree with @PeteKnight There is absolutely no sense in anyone trying to assist adding in Blynk controls with your current code. Work through his recommendations and by the time you map out some new methods, you might even realize some of the ways to make physical and virtual buttons to do the same thing.