Getting Mini MP3 Player to work with a ESP8266 and Blynk

Using Code provided by [federicobusero(Profile - federicobusero - Blynk Community)
• Hardware model + communication type.NODEMCU (ESP 32-12F dev kit V3) WWW.DOIT.COM
WIFI
• Smartphone OS Android 10
• Blynk server
• Blynk Library version 0.61
• Add your sketch code. :point_up:Code should be formatted as example below.

I Hope I have the code formatted properly.
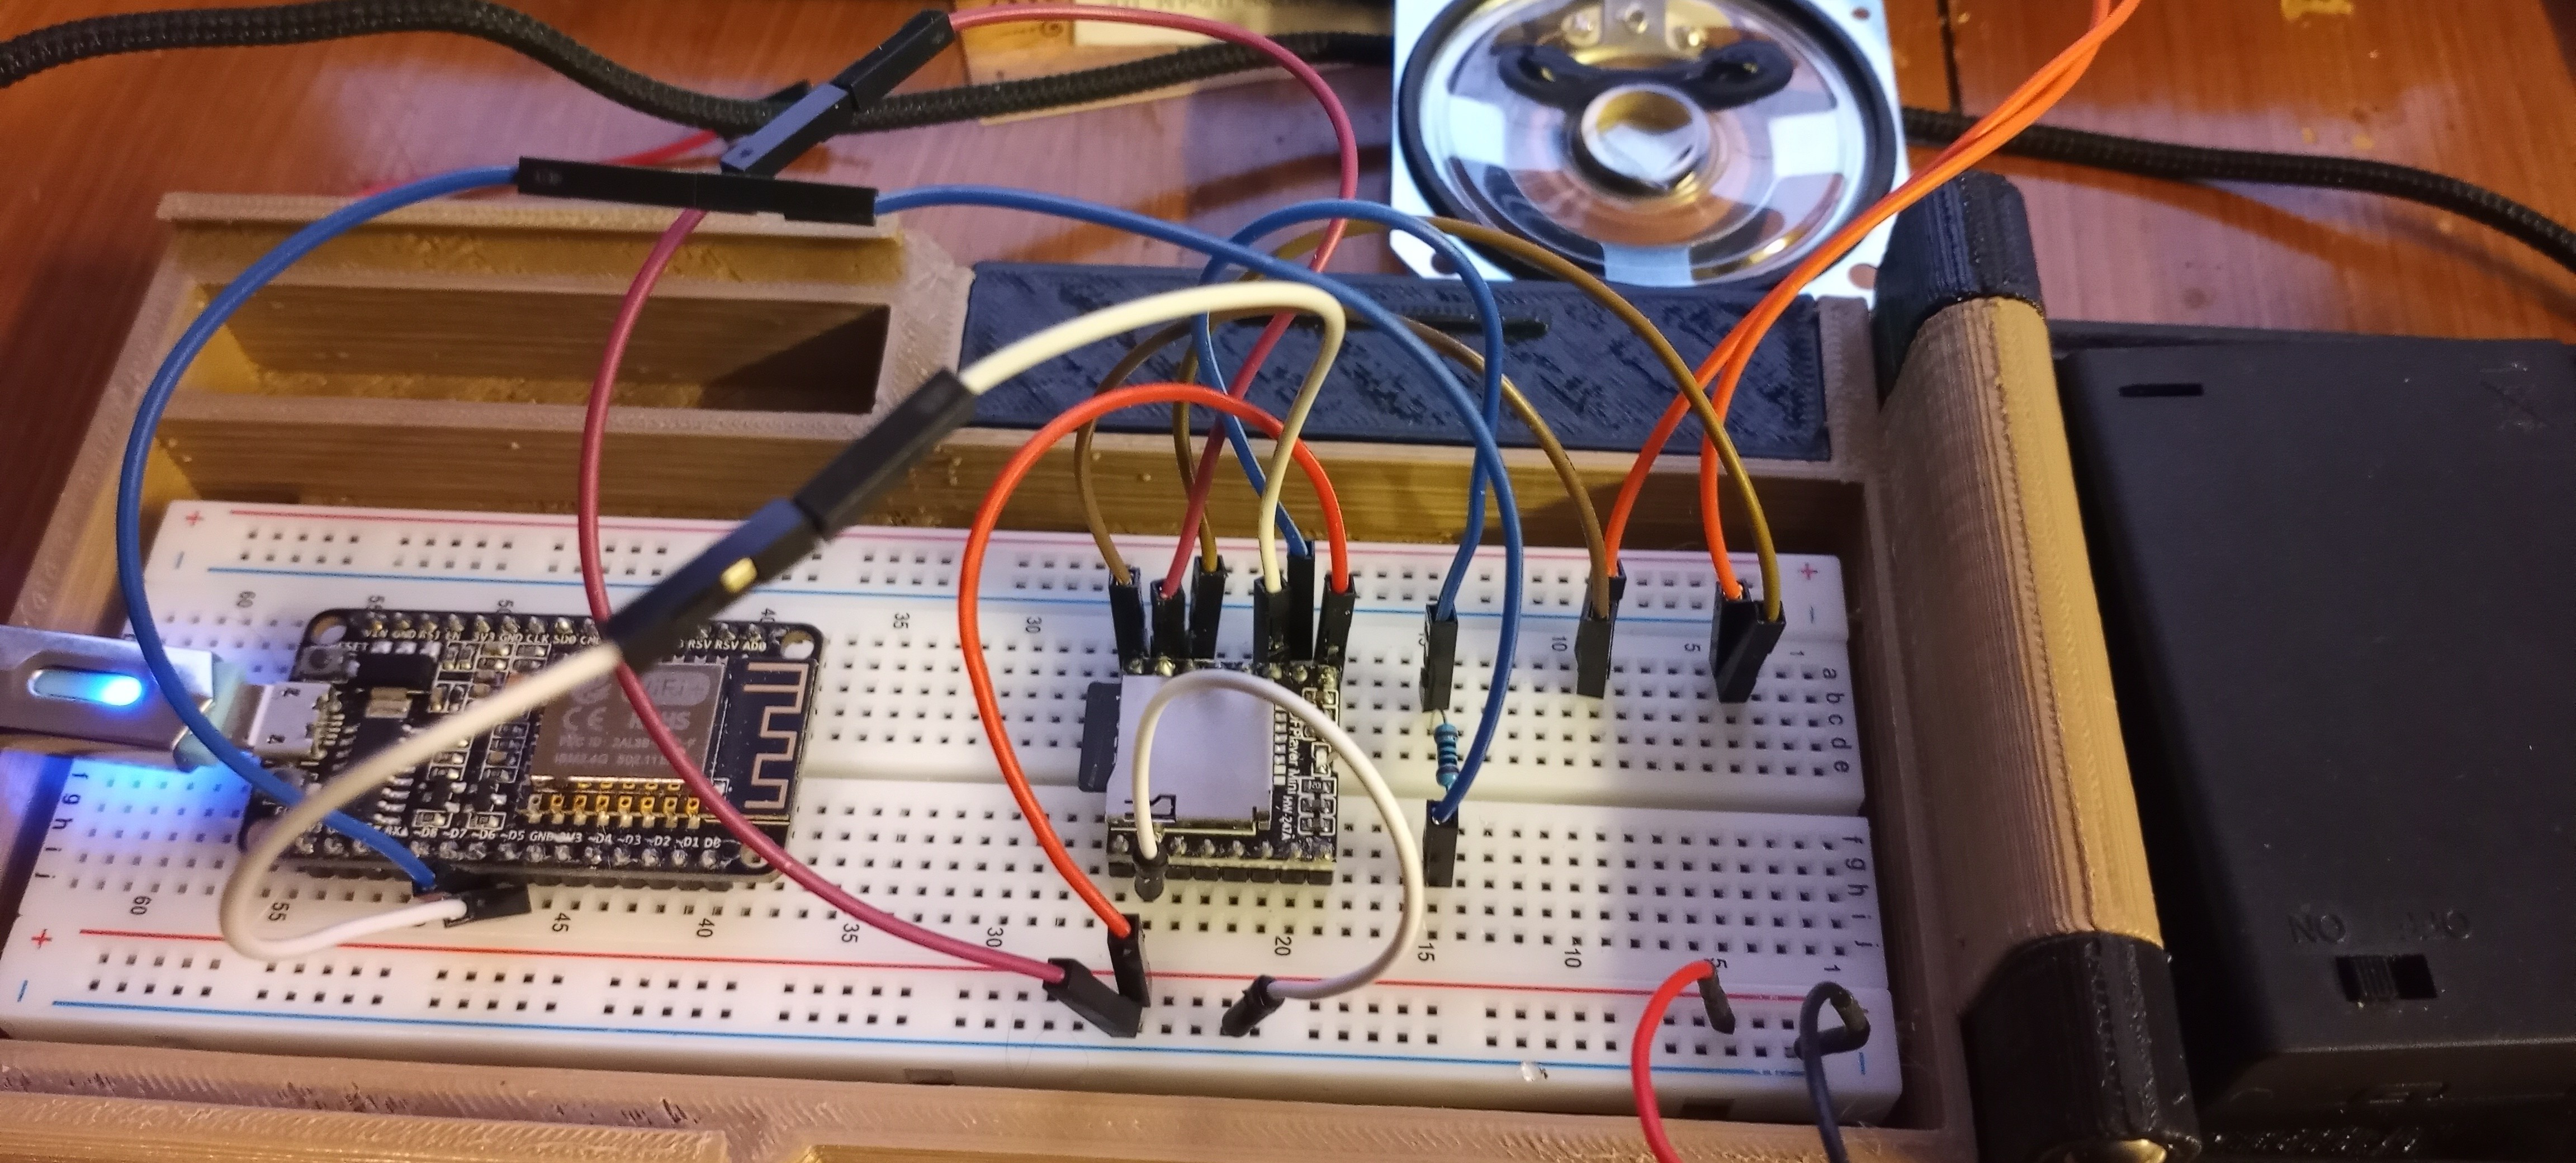
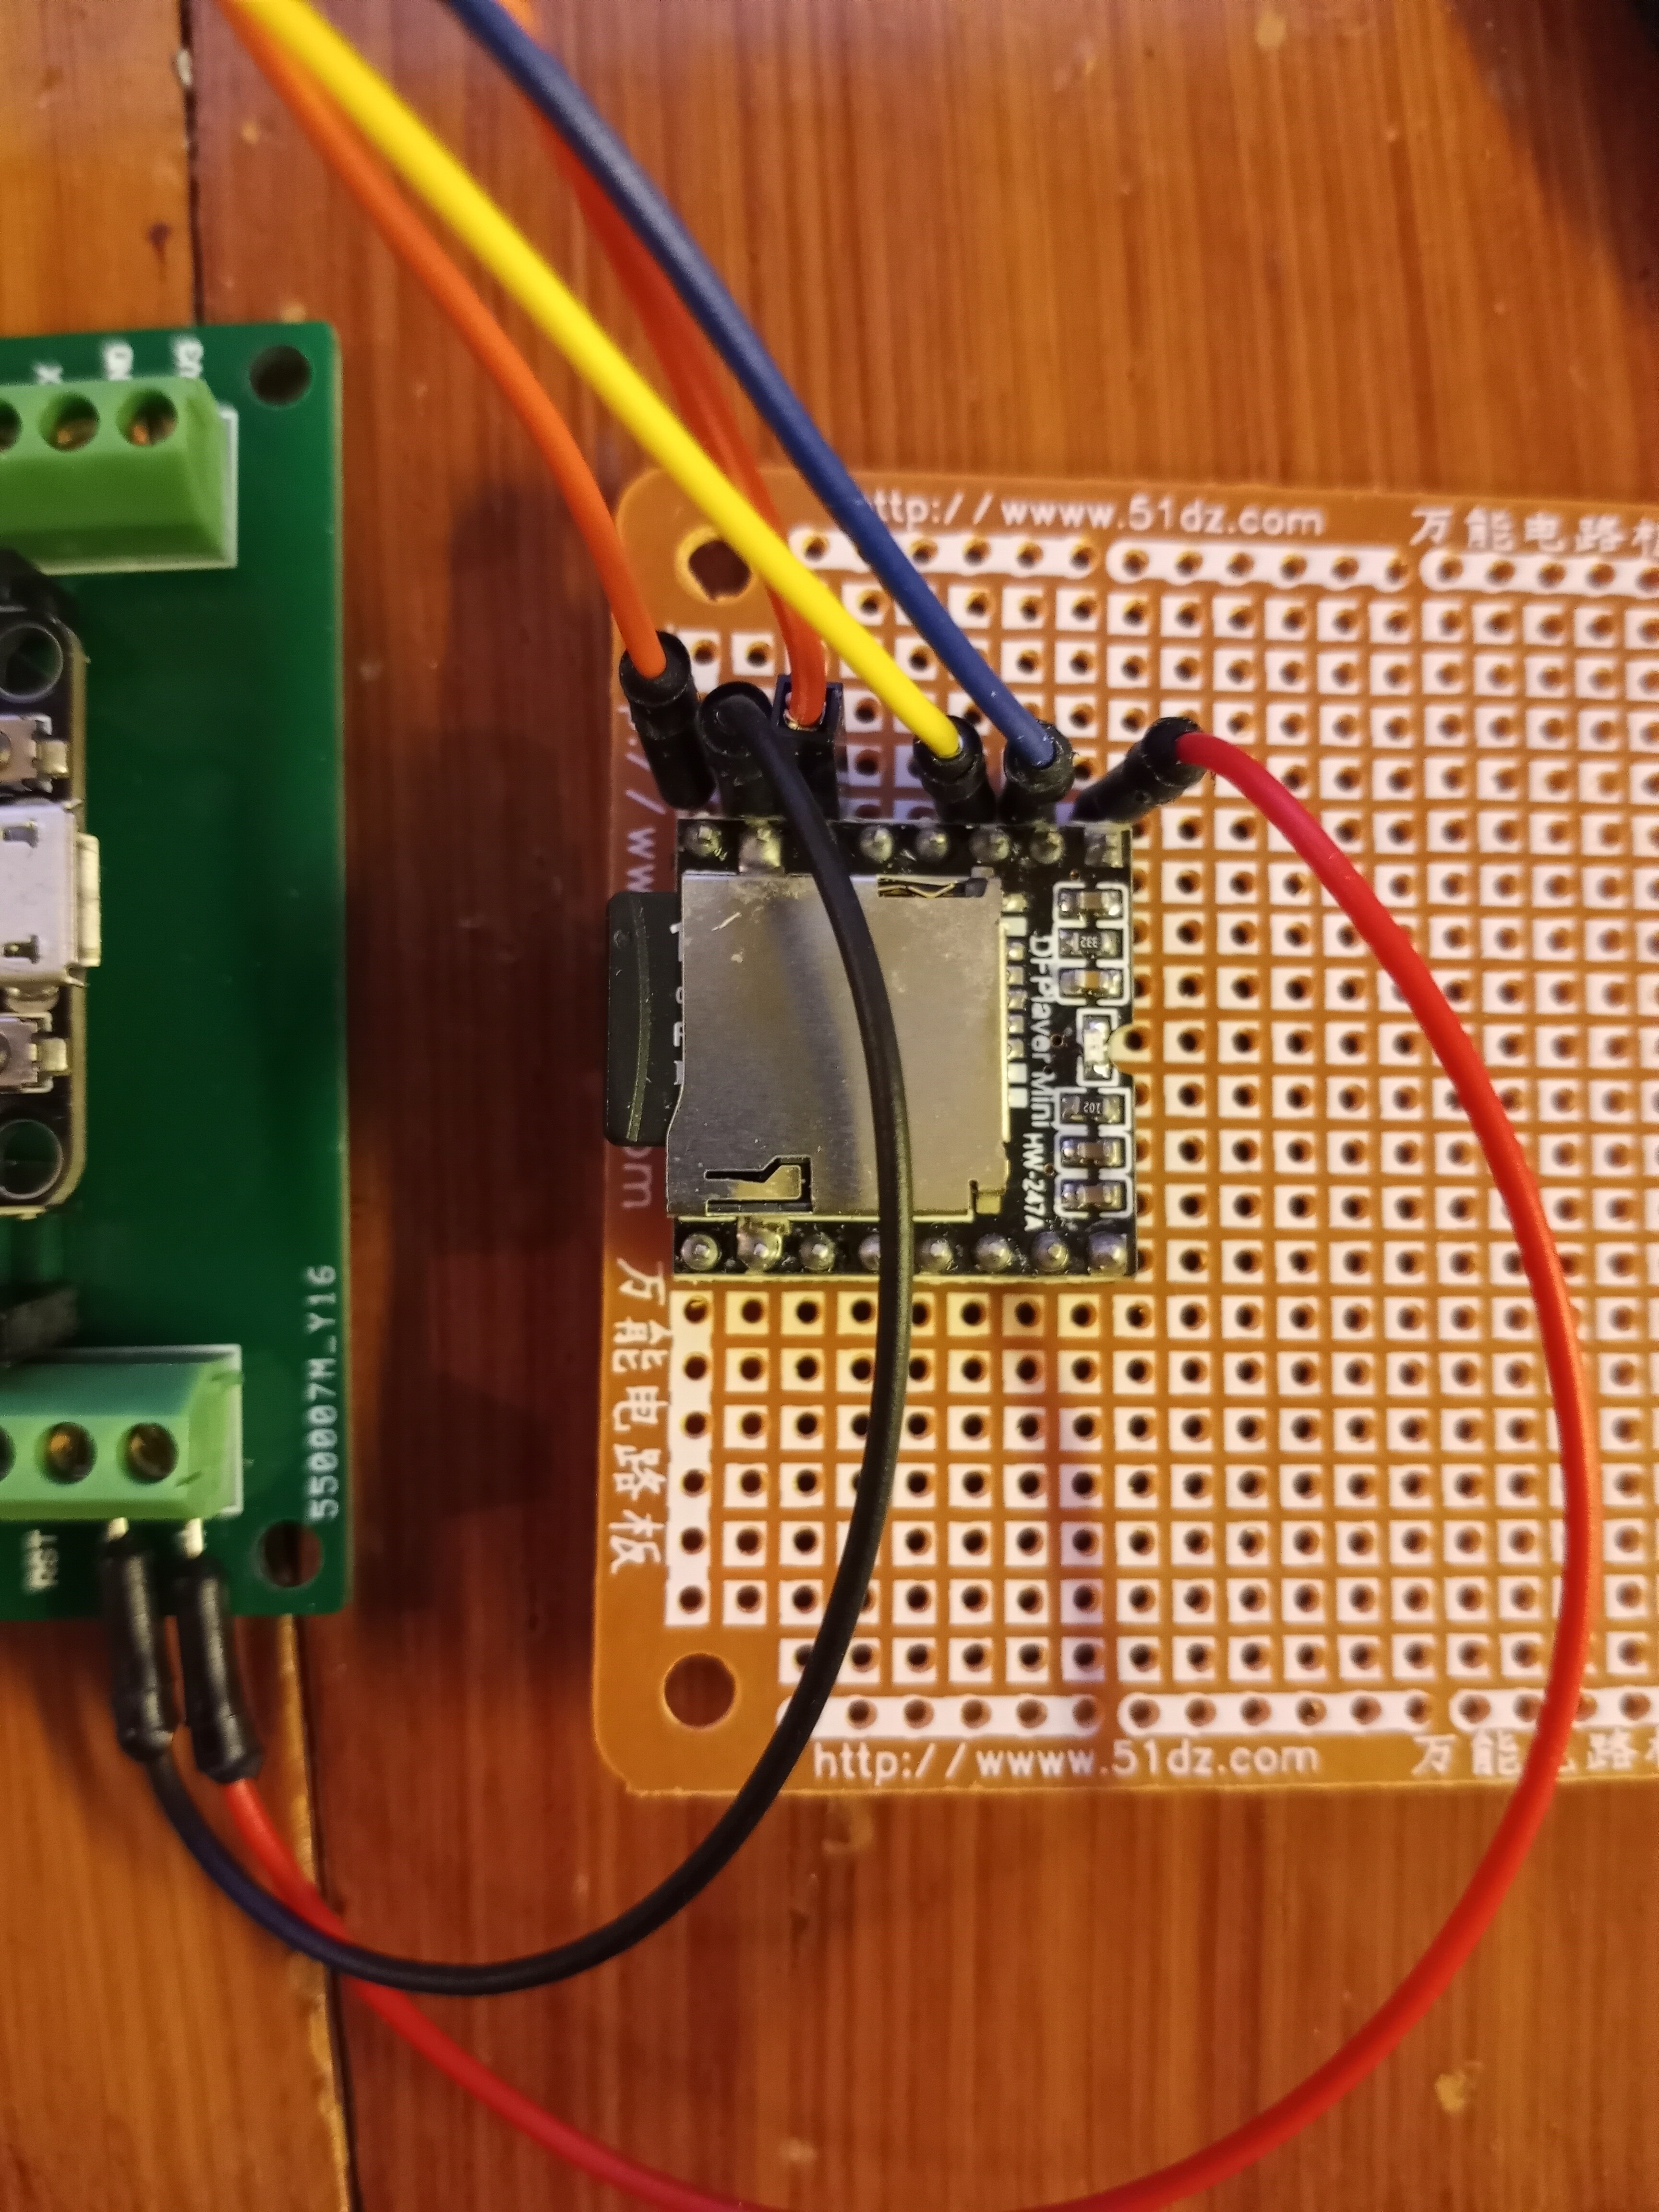
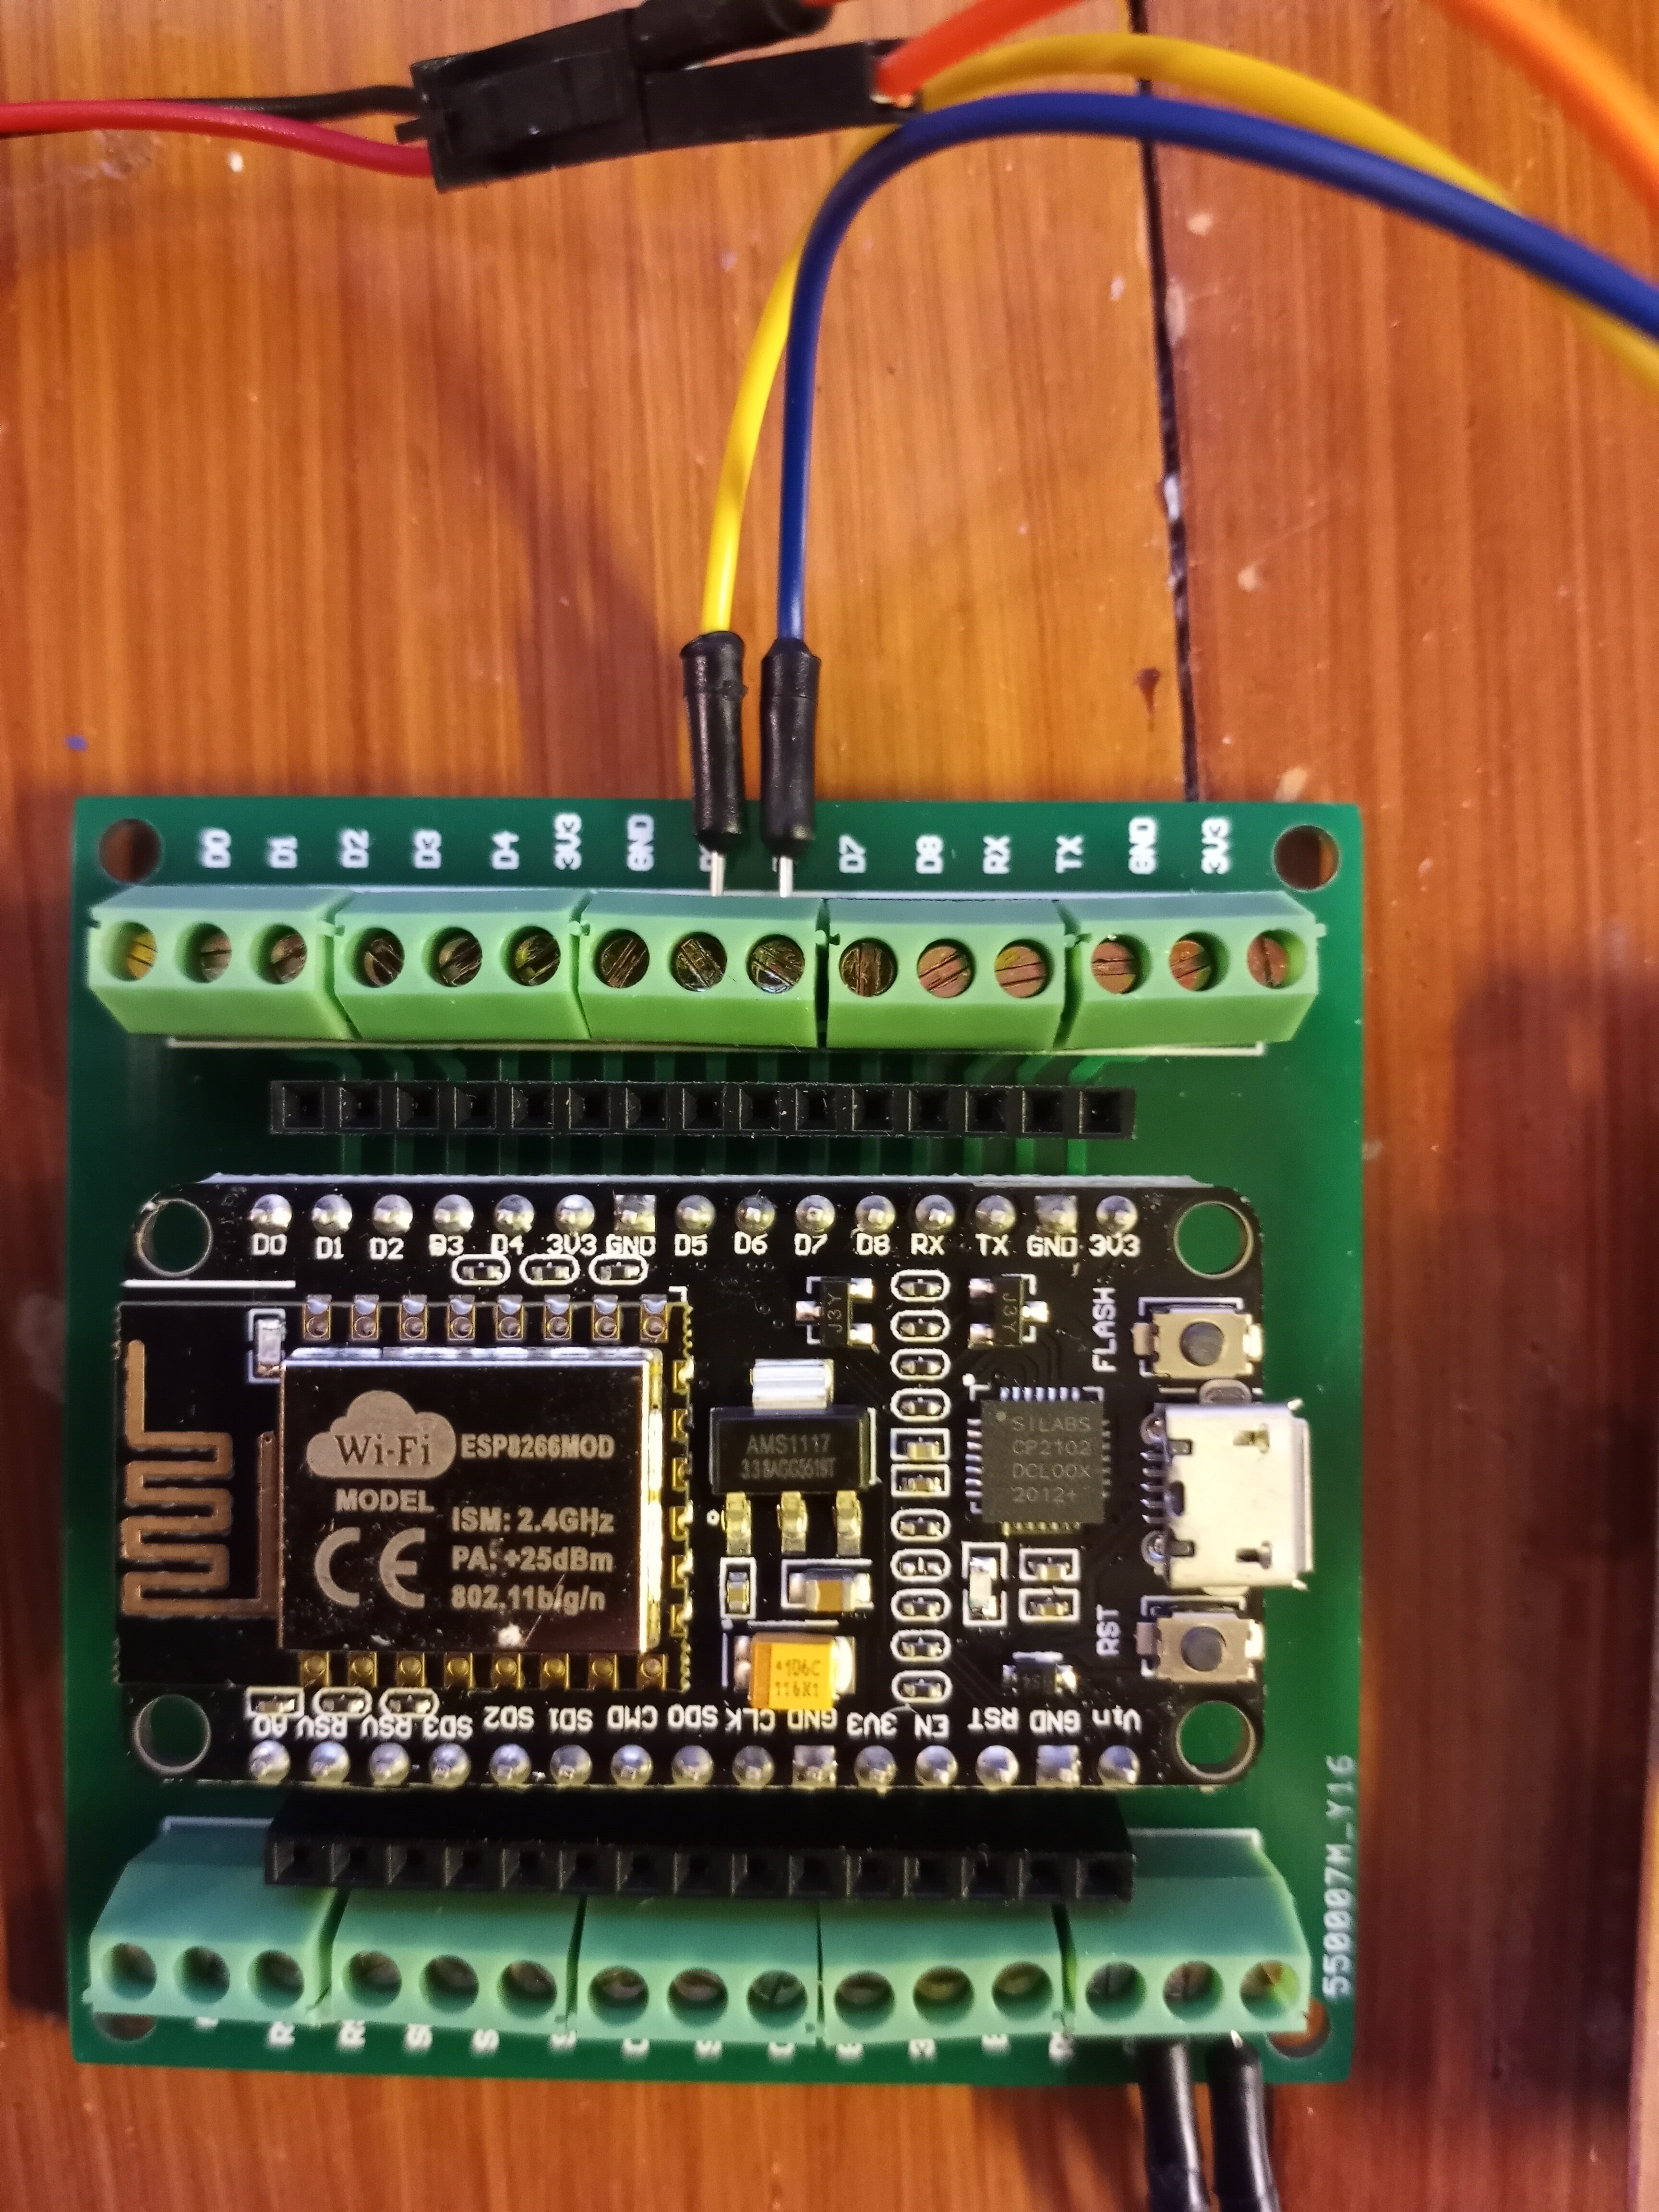
Below is the picture of my setup again.
I have tried a simple webserver setup on the ESP32 that turns on a Led with pin D6 and it works fine. So I am confident that the ESP32 is working, also the servo works.

I have a seperate power supply for the Mini Player and it ground goes to the ESP32.

    /*************************************************************
      This example shows how you can control a DFPlayer MP3 module
      on ESP8266 using Blynk (music player widget) and a Wifi connection

      Hardware:
        - ESP8266 based module e.g. NodeMCU
        - DFPlayer Mini MP3 player 

      App project setup:
      - Button widget attached to V4 :Play track button: OFF value=0, ON value=tracknr
      - Music Player widget attached to V5: shows current tracknr
      - Slider widget attached to V6 : Volume slider: range 0-30
      - Menu settings widget attached to V7: Equaliser selector: values
         1 Normal
         2 Pop
         3 Rock
         4 Jazz
         5 Classic
         6 Bass

       Necessary libraries
        - Blynk:   https://github.com/blynkkk/blynk-library/releases/latest
        - DFPlay:  https://github.com/rwpalmer/DFPlay

     
     *************************************************************/

    /* Comment this out to disable prints and save space */
    #define BLYNK_PRINT Serial
    //#include <SerialESP8266wifi.h>
    #include <ESP8266WiFi.h>
    #include <BlynkSimpleEsp8266.h>
    #include <SoftwareSerial.h>
    #include <Servo.h>

    // D5 is RX of ESP8266, connect to TX of DFPlayer
    // D6 is TX of ESP8266, connect to RX of DFPlayer module
    SoftwareSerial dfPlaySerial(12, 14);

    #include "DFPlay.h"
    DFPlay dfPlay;

    // You should get Auth Token in the Blynk App.
    // Go to the Project Settings (nut icon).
    char auth[] = "xxxxxxxxxxxx";

    // Your WiFi credentials.
    // Set password to "" for open networks.
    char ssid[] = "xxxx";
    char pass[] = "xxxxxxxxxxxx";

    Servo servo;

    void cradle() {
    //you begin your own personal code for servo here
      int pos;

      for (pos = 0; pos <= 180; pos += 1) { // goes from 0 degrees to 180 degrees
        // in steps of 1 degree
        servo.write(pos);              // tell servo to go to position in variable 'pos'
        delay(5);                       // waits 15ms for the servo to reach the position
      }
      for (pos = 180; pos >= 0; pos -= 1) { // goes from 180 degrees to 0 degrees
        servo.write(pos);              // tell servo to go to position in variable 'pos'
        delay(10);                       // waits 15ms for the servo to reach the position
      }
    //your personal code for servo should end here
    }

    BLYNK_WRITE(V3) 
    {
      int pinValue = param.asInt();
      if (pinValue == 1) {    // if Button sends 1
        cradle();             // start the function cradle
        Blynk.run(); // Run rest of show in-between waiting for this loop to repeat or quit.
        int pinValue = 0;  // Set V3 status to 0 to quit, unless button is still pushed (as per below)
        Blynk.syncVirtual(V3); // ...Then force BLYNK_WRITE(V3) function check of button status to determine if repeating or done.
      }
    }


    #define PLAY_MODE_OFF         0
    #define PLAY_MODE_TRACK       1
    #define PLAY_MODE_ALL         2
    int playmode = PLAY_MODE_OFF;

    #define DFPLAY_MEDIA_USB 1
    #define DFPLAY_MEDIA_SD  2

    #define VPIN_PLAYTRACK   V4
    #define VPIN_MUSICPLAYER V5
    #define VPIN_VOLUME      V6
    #define VPIN_EQUALIZER   V7

    int currentTrackCount = -1;

    BLYNK_CONNECTED() {
      // Synchronize volume & equalizer of DFPlayer with Blynk widgets
      Blynk.syncVirtual(VPIN_VOLUME);
      Blynk.syncVirtual(VPIN_EQUALIZER);

      // Update music player widget (play/stop button and label) based on state DFPlayer
      if (currentTrackCount >= 0)
      {
        String trackcountString(currentTrackCount + 1); // Start with 1 instead of 0 in user interface
        Blynk.virtualWrite(VPIN_MUSICPLAYER, "play");
        Blynk.setProperty(VPIN_MUSICPLAYER, "label", trackcountString);
      }
      else
      {
        Blynk.virtualWrite(VPIN_MUSICPLAYER, "stop");
        Blynk.setProperty(VPIN_MUSICPLAYER, "label", " ");
      }
    }

    BLYNK_WRITE(VPIN_PLAYTRACK)
    {
      int tracknr = param.asInt();
    #ifdef BLYNK_PRINT
      BLYNK_PRINT.print("BLYNK_WRITE(VPIN_PLAYTRACK): ");
      BLYNK_PRINT.println(tracknr);
    #endif

      if (tracknr > 0)
      {
        String trackcountString(tracknr);
        dfPlay.play(DFPLAY_MEDIA_SD, 0, tracknr); // Plays tracknr in root folder on SD-card
        playmode = PLAY_MODE_TRACK;
        currentTrackCount = -1;
        Blynk.setProperty(VPIN_MUSICPLAYER, "label", trackcountString);
        Blynk.virtualWrite(VPIN_MUSICPLAYER, "play");
      }
    }


    BLYNK_WRITE(VPIN_MUSICPLAYER)
    {
      String action = param.asStr();
    #ifdef BLYNK_PRINT
      BLYNK_PRINT.print("BLYNK_WRITE(VPIN_MUSICPLAYER): ");
      BLYNK_PRINT.println(action);
    #endif

      if (action == "play") {
        dfPlay.play(DFPLAY_MEDIA_SD); // Plays all tracks in root folder of SD-card
        playmode = PLAY_MODE_ALL;
      }
      if (action == "stop") {
        dfPlay.stop();
      }
      if (action == "next") {
        dfPlay.skip();
      }
      if (action == "prev") {
        dfPlay.back();
      }
    }

    BLYNK_WRITE(VPIN_VOLUME)
    {
      int paramVol = param.asInt();
      uint8_t volume = constrain(paramVol, 0, 30);
    #ifdef BLYNK_PRINT
      BLYNK_PRINT.print("BLYNK_WRITE(VPIN_VOLUME): ");
      BLYNK_PRINT.println(paramVol);
    #endif

      dfPlay.setVolume(volume);
    }

    BLYNK_WRITE(VPIN_EQUALIZER)
    {
      int paramEq = param.asInt();
      uint8_t eq = constrain(paramEq, 1, 6) - 1; // Blynk starts with 1, setEqualizer starts with 0

    #ifdef BLYNK_PRINT
      BLYNK_PRINT.print("BLYNK_WRITE(VPIN_EQUALIZER): ");
      BLYNK_PRINT.println(paramEq);
    #endif

      dfPlay.setEqualizer(eq);
    }

    void updatePlayerState()
    {
      int trackcount;

      if (dfPlay.isPlaying())
      {
        trackcount = (int)dfPlay.getTrackCount();
      }
      else
      {
        trackcount = -1;
        playmode = PLAY_MODE_OFF;
      }

      if (trackcount != currentTrackCount)
      {
        switch (playmode)
        {
          case PLAY_MODE_OFF:
            Blynk.setProperty(VPIN_MUSICPLAYER, "label", " ");
            Blynk.virtualWrite(VPIN_MUSICPLAYER, "stop");
            break;


          case PLAY_MODE_ALL:
            String trackcountString(trackcount + 1); // Start with 1 instead of 0 in user interface
            Blynk.setProperty(VPIN_MUSICPLAYER, "label", trackcountString);
            Blynk.virtualWrite(VPIN_MUSICPLAYER, "play");
            break;
        }

        currentTrackCount = trackcount;
      }
    }

    void setup()
    {
      // Debug console
    #ifdef BLYNK_PRINT
      BLYNK_PRINT.begin(9600);
      BLYNK_PRINT.println("Waiting for connections...");
    #endif

      dfPlaySerial.begin(9600);
      dfPlay.begin(dfPlaySerial);          // Prepares DFPlay for execution

      Blynk.begin(auth, ssid, pass);
      // You can also specify server:
      //Blynk.begin(auth, ssid, pass, "blynk-cloud.com", 80);
      //Blynk.begin(auth, ssid, pass, IPAddress(192,168,1,100), 8080);
    servo.attach(4); //attaches servo to pin 4 (D2 on node mcu)
    }


    void loop()
    {
      Blynk.run();
      dfPlay.manageDevice(); // Sends requests to DFPlayer & processes responses.
      updatePlayerState();
    }
1 Like

As previously recommended… please keep your relevant questions to your own topic and not in that 4+ year old topic :slight_smile: I have moved your last post back here.

Be aware, as your issue is not something average forum users can easily duplicate, you will still need to do a majority of the troubleshooting at your end.

And clarity of your understanding is recommended in order to pass on your questions and discoveries in a meaningful manner…

For example… Don’t refer to your NodeMCU (as it appears in your image) as an ESP32 :stuck_out_tongue: it is an ESP8266 and has different pinouts, libraries, etc. then the ESP32. Perhaps this lack of clarity is where you are running into issues?

You reference running an LED on D5 (GPIO 14) and D6 (GPIO 12)…but there is a difference between a standard ON/OFF signal and a Serial signal… an LED might actually interfere with the Serial signal, so is not a good option for testing and could be a bit of a red herring there.

Using another TTL-Serial adapter to view the signal on a terminal app (I like using Termite) might be a better idea.

I recommend you first confirm proper functionality with your MCU and MP3 board by using non-Blynk code.

1 Like

Thank You.
Lets start fresh. I bought a new nodemcu just in case mine were faulty. I will add a picture of my setup and a sketch that works with the mini player and nodemcu.
Then I will add the BLYNK Sketch I put together that is not working. Can you have a look at the BLYNK one and tell me where I am going wrong. OH the New nodemcu is this one. Follow this link.nodemcu-amica

My Setup!
20210519_000410|375x500

THIS SKETCH WORKS…

/*******************************************************************************
 * DFPlayer_Mini_Mp3, This library provides a quite complete function for      * 
 * DFPlayer mini mp3 module.                                                   *
 * www.github.com/dfrobot/DFPlayer_Mini_Mp3 (github as default source provider)*
 *  DFRobot-A great source for opensource hardware and robot.                  *
 *                                                                             *
 * This file is part of the DFplayer_Mini_Mp3 library.                         *
 *                                                                             *
 * DFPlayer_Mini_Mp3 is free software: you can redistribute it and/or          *
 * modify it under the terms of the GNU Lesser General Public License as       *
 * published by the Free Software Foundation, either version 3 of              *
 * the License, or any later version.                                          *
 *                                                                             *
 * DFPlayer_Mini_Mp3 is distributed in the hope that it will be useful,        *
 * but WITHOUT ANY WARRANTY; without even the implied warranty of              *
 * MERCHANTABILITY or FITNESS FOR A PARTICULAR PURPOSE.  See the               *
 * GNU Lesser General Public License for more details.                         *
 *                                                                             *
 * You should have received a copy of the GNU Lesser General Public            *
 * License along with DFPlayer_Mini_Mp3. If not, see                           *
 * <http://www.gnu.org/licenses/>.                                             *
 *									       *
 ******************************************************************************/

/*
 *	Copyright:	DFRobot
 *	name:		DFPlayer_Mini_Mp3 sample code
 *	Author:		lisper <lisper.li@dfrobot.com>
 *	Date:		2014-05-30
 *	Description:	connect DFPlayer Mini by SoftwareSerial, this code is test on Uno
 *			Note: the mp3 files must put into mp3 folder in your tf card 
 */
#include <SoftwareSerial.h>
#include <DFPlayer_Mini_Mp3.h>

SoftwareSerial mySerial(14, 12); // RX, TX

//
void setup () {
	Serial.begin (9600);
	mySerial.begin (9600);
	mp3_set_serial (mySerial);	//set softwareSerial for DFPlayer-mini mp3 module 
	delay(1);  //wait 1ms for mp3 module to set volume
	mp3_set_volume (6);
}


//
void loop () {        
	mp3_play (1);
	delay (6000);
	mp3_next ();
	delay (6000);
	mp3_prev ();
	delay (6000);
	mp3_play (4);
	delay (6000);
}

/*
   mp3_play ();		//start play
   mp3_play (5);	//play "mp3/0005.mp3"
   mp3_next ();		//play next 
   mp3_prev ();		//play previous
   mp3_set_volume (uint16_t volume);	//0~30
   mp3_set_EQ ();	//0~5
   mp3_pause ();
   mp3_stop ();
   void mp3_get_state (); 	//send get state command
   void mp3_get_volume (); 
   void mp3_get_u_sum (); 
   void mp3_get_tf_sum (); 
   void mp3_get_flash_sum (); 
   void mp3_get_tf_current (); 
   void mp3_get_u_current (); 
   void mp3_get_flash_current (); 
   void mp3_single_loop (boolean state);	//set single loop 
   void mp3_DAC (boolean state); 
   void mp3_random_play (); 
 */

This is my BLYNK Sketch that does not work.
Can you look and see what I am doing wrong Please.

/* Comment this out to disable prints and save space */
#define BLYNK_PRINT Serial
#include <SoftwareSerial.h>
#include <DFPlayer_Mini_Mp3.h>
#include <ESP8266WiFi.h>
#include <BlynkSimpleEsp8266.h>
SoftwareSerial mySerial(14, 12); // RX, TX
// You should get Auth Token in the Blynk App.
// Go to the Project Settings (nut icon).
char auth[] = "***************************";

// Your WiFi credentials.
// Set password to "" for open networks.
char ssid[] = "BELL621";
char pass[] = "****************";

BLYNK_WRITE(V5)
{
  String action = param.asStr();

  if (action == "play") {
    // Do something
    mp3_play (1);
  }
  if (action == "stop") {
    // Do something
    mp3_stop ();
  }
  if (action == "next") {
    // Do something
    mp3_next ();
  }
  if (action == "prev") {
    // Do something
    mp3_prev ();
  }

  Blynk.setProperty(V5, "label", action);
 Serial.print(action);
  Serial.println();
}

void setup()
{
  // Debug console
  Serial.begin(9600);
  
  mySerial.begin (9600);
  
  mp3_set_serial (mySerial);  //set softwareSerial for DFPlayer-mini mp3 module 
  delay(1);  //wait 1ms for mp3 module to set volume
  mp3_set_volume (10);

  //Blynk.begin(auth, ssid, pass);
  // You can also specify server:
  //Blynk.begin(auth, ssid, pass, "blynk-cloud.com", 80);
  Blynk.begin(auth, ssid, pass, IPAddress(192,168,2,61), 8080);
}

void loop()
{
  Blynk.run();
}

Just a stab in the dim (I haven’t used Blynk in a long time and only popped in here for nostalgic sake :innocent: silly me) but I believe your issue has to do with a conflict between SoftwareSerial and WiFi on ESP8266… something I vaguely recalled and had to Google to confirm… and Blynk needs WiFi to work properly, so SoftwareSerial is probably not ideal with it (on the ESP8266 at least).

You can use Hardware Serial instead… Goggle for the correct pins etc.

Of course, that will make it necessary to physically disconnect the Serial connection to the MP3 module each time you need to load in a sketch, or you can try adding OTA for future Over The Air programming.

A little more Googling and I found this… an alternative version of SoftwareSerial that might work with WiFi and Blynk?

Anyhow, I will have to leave you with this and any assistance from others here, as I will likely go back to not being nostalgic :wink:

1 Like

What would be the proper way to write this Please?

if (action == “play”) {
// Do something
Blynk.Write(5, mp3_play (1));
}

Could someone please show me the proper way to write the Action statement?

I have “Blynk.Write(5, mp3_play ());” which gives me an error.

I have “mp3_stop ();” which I am quite sure is not the proper way to write it.
So what should I have in //Do something area.

#include <DFPlayer_Mini_Mp3.h>

BLYNK_WRITE(V5)
{
  String action = param.asStr();

  if (action == "play") {
    // Do something
    Blynk.Write(5, mp3_play ());
  }
  if (action == "stop") {
    // Do something
    mp3_stop ();
  }
  if (action == "next") {
    // Do something
    mp3_next ();
  }
  if (action == "prev") {
    // Do something
    mp3_prev ();
  }

  Blynk.setProperty(V5, "label", action);
  Serial.print(action);
  Serial.println();
}

@Rheal once again, you’re creating work for the moderators by posting your questions in the wrong place. Please keep the discussion about your MP3 play project in this topic, otherwide your posts will be deleted rather than moved to their correct location.

Your previous posts didn’t get any responses for a number of reasons… (1) very few people use the Music Player widget and (2) your question made no sense.

This is the documentation for the Music Player widget, with a link to a sketch which demonstrates how to use the data coming from the widget:

Music Player

Simple UI element with 3 buttons with common music player controls. Every button sends it’s own command to hardware: play, stop, prev, next.

You can change widget state within the app from hardware side with next commands:

Blynk.virtualWrite(Vx, “play”);
Blynk.virtualWrite(Vx, “stop”);

You can also change widget play/stop state with next code (equivalent to above commands):

Blynk.setProperty(V1, "isOnPlay", "false");

Sketch: Music Player

If you are unsure about the values being received from the widget, and your program flow once the values are received, then I’d suggest that you use serial print statements to assist you in debugging.

Pete.

Thank You
I already have that Sketch you provided above in my original question.
All I want to know is what do I put into the //Do something section of that Sketch.

Is it This?

if (action == "play") {
    // Do something
    Blynk.virtualWrite(5, “mp3_play ()”);
  }

or is it this?

if (action == "play") {
    // Do something
    mp3_play (1);
  }

If none of the above then what do I put the play command for this library into your BLYNK statement.
Library is “DFPlayer_Mini_Mp3.h”

Its a very simple question I think

Try button in switch mode on V1 and the music player attached to V2.

BLYNK_WRITE(V1)
{
  if(param.asInt())
  {
    Blynk.virtualWrite(V2, “play”); 
  }
  else 
  {
    Blynk.virtualWrite(V2,“stop”);
}

Hi @daveblynk doing this will update the status of the display widget (presumably a labelled value wdget) on V2 with the correct mode, but it won’t actually make the DFPlayer MP3 module connected to D5 & D6 play the MP3 file.

Pete.

So what happens if you take that first sketch that worked. Remove all that stuff from the void loop. Put a button in switch mode on V1 and add this code to the first sketch. Plus Blynk libraries, WiFi connection etc.


BLYNK_WRITE(V1)
{
  if(param.asInt())
  {
    mp3_play (1);
  }
  else 
  {
    mp3_stop ();
  }
}

Thank You everyone for all the replies.

I finally got it to work. I had a local server set up and created an app. After a lot of different variations in the sketch and frustrating hours I decided on this latest sketch to try connecting to the Blynk server and create a new app. Well it worked. I procedded to delete the app on my local server and created a new one and it also worked. So I would bet that for the past 2 days the problem was on my local server. I have posted the Sketch that I have working using the “DFPlayer_Mini_Mp3.h” Library.
Again thank you all.

What I will be using this for is to control some effects in the Tardis that I am making.

#define BLYNK_PRINT Serial
#include <ESP8266WiFi.h>
#include <BlynkSimpleEsp8266.h>
#include <DFPlayer_Mini_Mp3.h>
#include <SoftwareSerial.h>

SoftwareSerial mp3Serial(D1, D2); // RX, TX
// You should get Auth Token in the Blynk App.
// Go to the Project Settings (nut icon).
char auth[] = "******************************************";

// Your WiFi credentials.
// Set password to "" for open networks.
char ssid[] = "************************";
char pass[] = "*********************";

#define VPIN_PLAYTRACK   V4
#define VPIN_MUSICPLAYER V5
#define VPIN_VOLUME      V6
#define VPIN_EQUALIZER   V7

BLYNK_WRITE(VPIN_MUSICPLAYER)
{
  String action = param.asStr();

  if (action == "play") {
    // Do something
    mp3_play ();
  }
  if (action == "stop") {
    // Do something
    mp3_stop ();
  }
  if (action == "next") {
    // Do something
    mp3_next ();
  }
  if (action == "prev") {
    // Do something
    mp3_prev ();
  }

  Blynk.setProperty(VPIN_MUSICPLAYER, "label", action);
  Serial.print(action);
  Serial.println();
}

BLYNK_WRITE(VPIN_VOLUME)
{
  int paramVol = param.asInt();
  uint8_t volume = constrain(paramVol, 0, 30);
#ifdef BLYNK_PRINT
  BLYNK_PRINT.print("BLYNK_WRITE(VPIN_VOLUME): ");
  BLYNK_PRINT.println(paramVol);
#endif
  mp3_set_volume(volume);
}

void setup () {
  
  Serial.begin (9600);
  Serial.println("Setting up software serial");
  mp3Serial.begin (9600);
  Serial.println("Setting up mp3 player");
  mp3_set_serial (mp3Serial);  
  // Delay is required before accessing player.
  delay(1000); 
  //mp3_set_volume (10);
  //Blynk.begin(auth, ssid, pass);
  // You can also specify server:
  //Blynk.begin(auth, ssid, pass, "blynk-cloud.com", 80);
    Blynk.begin(auth, ssid, pass, IPAddress(192,168,2,61), 8080);
}

void loop () {
  
  Blynk.run();
  
}

You could have saved yourself a lot of hassle by going forward in time by a week, getting your working solution, then bringing it back in time :rofl:

Pete.

LOL Yes I could have, but I needed my Takeoff sound to work to get the Tardis moving. :stuck_out_tongue: