Hi everybody … This topic is ideas rather than issues . I will past here some main reasons our project may sometimes firstly fail uploading or didn’t running in normal way . I will put some reasons and hope my friends adds more …
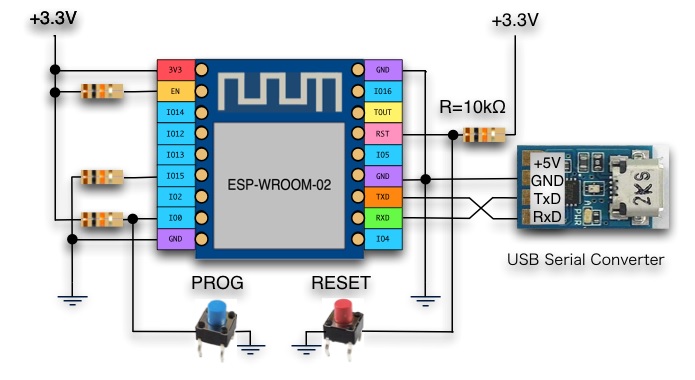
First of all this topic is based upon esp8266 or similar so I attached this circuit as example and it WORKS well with esp8266(WROOMS 02 version) .
TIPS and TRICKES
-
Common ground : if you are using more than breadboard or with Arduino or any other converters , you must GROUND IT ALL to the same ground . that is to connect all grounds
-
Sufficient power supplying : Some times you will need dedicated circuit supplying voltage like 3.3 volts and not only using Arduino as a supply . You may need some components like LM1117 or any other voltage regulator and to use discrete 5volt supply (don’t forgot common ground) .
-
Take care of good connections and not using loose connection breadboards or bad wires .
4.During Uploading you will need to RESET your chip and press PROGRAM button as suggested , for example to the circuit mentioned you will need to press the two buttons and release RESET then release PROGRAM before uploading starts . -
Take care of RX and TX connection . I usually use Arduino with (chip out) connecting RX in Esp8266 to RX in Arduino and TX to TX . That’s differs if you are using USB converter .
some times you put it wrong and uploading fails . -
Pulling up or down some pins is essential , for example pulling up GIO0 , EN , and RST pins thought 10 k resistor and pulling down GIO15 down through 10 k resistor . (That differs with different chips and with uploading or normal operation ) .
-
Do it again! . Sometimes you will need to repeat your steps , for example repeat uploading with different pressing RESET and PROGRAM buttons may works.