Io sto facendo questo con la vecchia versione dove accedo con con admin@blynk.cc etc etc e selezionando custom inserisco il numero ip del mio server. Entro in blynk administration e funziona tutto. Unico problema che la scheda esp non connettendosi al server non si collega all app blynk.con l app blynk iot non c è modo di cambiare il server di accesso o sbaglio?
So you’re using a local server. I missed that, sorry. In this case, downgrade the library to version 0.6.1 and try your sketch again.
There’s no need to add the
#define BLYNK_TEMPLATE_ID           "TMPLxxxxxx"
#define BLYNK_DEVICE_NAME           "Device"
#define BLYNK_AUTH_TOKEN            "YourAuthToken"
You need to show the auth token that you are using here, so we can compare it to the auth token in your app.
You need to post the following…
-
Serial output (not a screenshot, the text copied and pasted from your serial monitor - highlight it and use CTRL-C to copy - and post it with triple backticks at the beginning and end)
-
A screenshot of the Project settings screen in your app, which shows the auth token for your board.
-
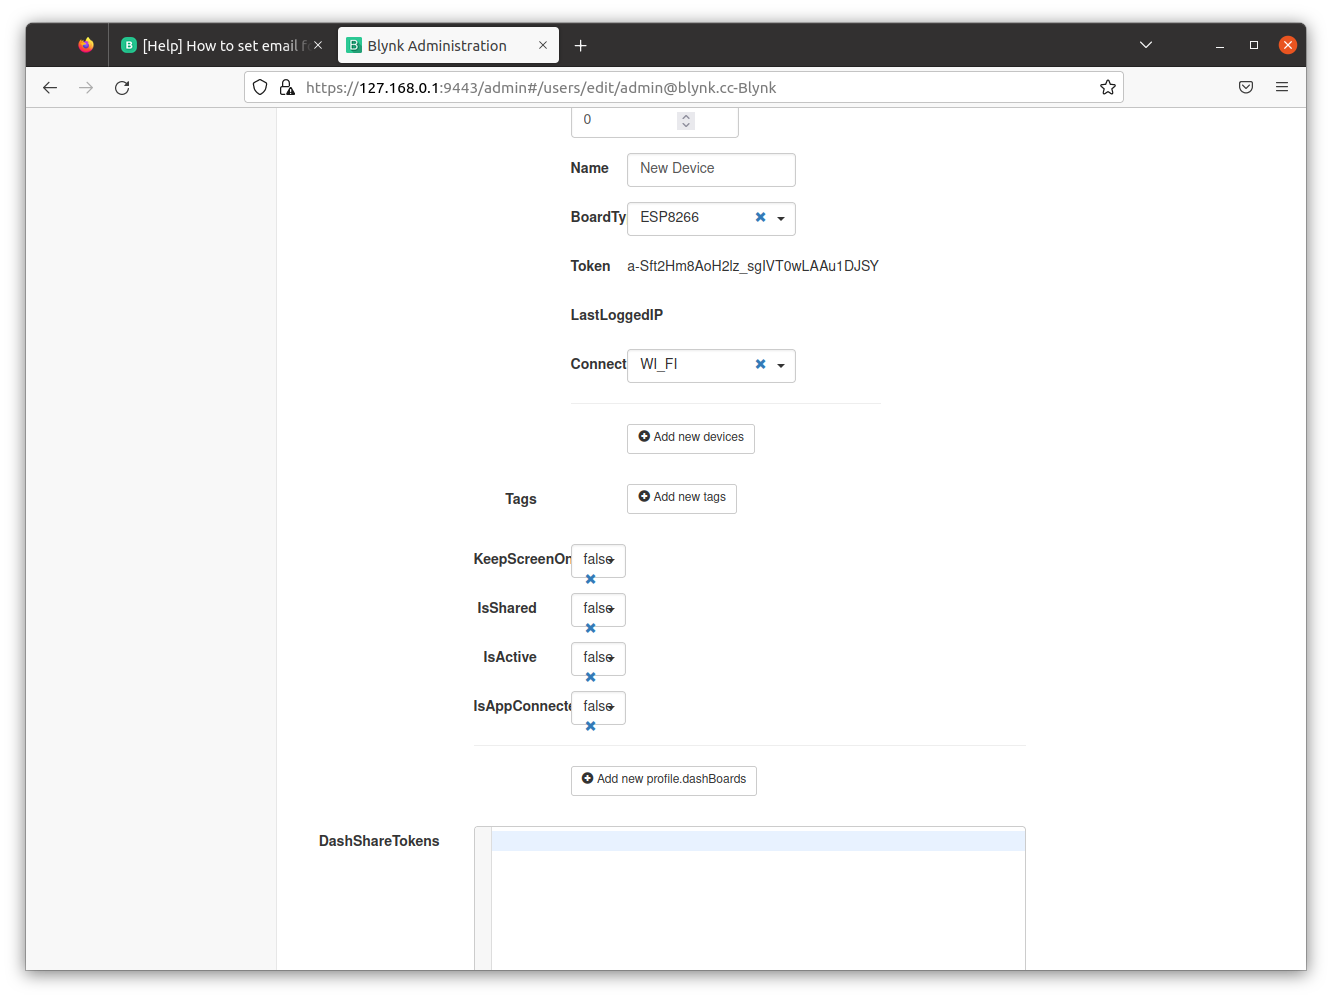
A screenshot of the admin screen for your Blynk Legacy local server which shows the Auth token for your project.
I suspect that you have manually typed your auth token into your sketch and made a mistake, instead of either copying iot from the app and emailing it to yourself from your phone, or copying it from the admin screen of your Blynk server and pasting it into your sketch.
Pete.
#include <BlynkSimpleEsp8266.h>

// You should get Auth Token in the Blynk App.
// Go to the Project Settings (nut icon).
char auth[] = "a-Sft2Hm8AoH2lz_sglVT0wLAAu1DJSY";   //dovete inserire il vostro token

// Your WiFi credentials.
// Set password to "" for open networks.
char ssid[] = "TIM-";                    //nome rete wifi
char pass[] = "Nt";                    //password rete wifi

int led = 1;

BLYNK_WRITE(V0)
{
  led  = param.asInt(); // assigning incoming value from pin V0 to a variable
  if (led == 0) {
    digitalWrite(LED_BUILTIN,HIGH );//  spegne il LED
  }
  else if (led == 1) {
    digitalWrite(LED_BUILTIN, LOW); // accende il LED

  }
}

void setup()
{
  // Debug console
  Serial.begin(9600);
  Blynk.begin(auth, ssid, pass, IPAddress(192,168,1,227), 8080);     //inserite l'ip pubblico del vostro server
  pinMode(LED_BUILTIN, OUTPUT);
}

void loop()
{
  Blynk.run();
}```
How did you get the Auth token that is in your sketch, did you type it manually, email it to yourself from the app and copy/paste it into your sketch, copy/past it from the admin screen, or obtain it some other way?
Pete.
L ho copiato a mano non riesco inviarmelo per email non riesco ad impostarla
Ho il server su un PC con ubuntu dove ho installato anche Arduino ma Arduino non funziona non mi carica le librerie
If you typed it by hand then I think that’s your problem.

The two characters circled in red could either be capital “I” (9th letter of the alphabet) or lower-case “l” (12th letter of the alphabet).
You have typed them as lower-case “l” which may be incorrect for one or both of them.
If you go into the app and look at the device you’ve created you will see the Auth token.
Highlight this and copy it, then open the email client on your phone and paste the Auth token into an email and send it to yourself.
Or, copy the text from the admin screen of the browser (open it on the computer here you are writing your sketch) and paste it directly into your sketch.
Pete.
Funziona finalmente è possibile ricevere una mail ogni volta che aggiungo un device?
Unico problema che ad ogni riavvio devo farlo partire io il server non mi parte in automatico
It’s difficult now that Gmail have removed the option to allow insecure apps, but there have been a few recent posts that explain how to do it. Try searching and you’ll find some info.
Pete.
There is information in the local server documentation about how to enable the server to auto start.
Pete.
Sono riuscito a fare tutto tranne l email