Try at
This works for ESP8266 and ESP32, with or w/o SSL. The configuration data can be saved either in EEPROM or SPIFFS.
Try at
This works for ESP8266 and ESP32, with or w/o SSL. The configuration data can be saved either in EEPROM or SPIFFS.
Using SSL for local server is a little bit more complicated.
I just created and posted a note for creating / installing LetsEncrypt as well as OpenSSL SSL certificates for Local Blynk Server. Hope it’s helpful.
Below is the Notes:
Any problems, please do not hesitate to open an issue:
Updated: Dec 17th 2019
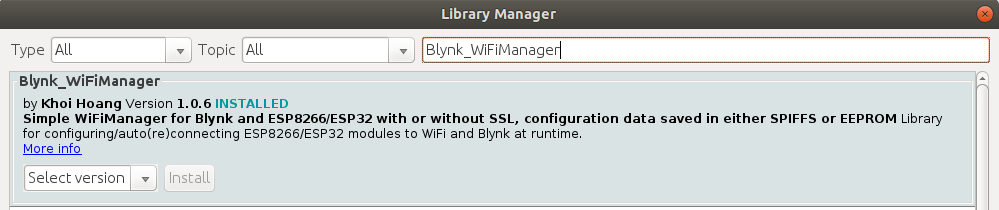
Blynk_WiFiManager libraries v1.0.2 just got included into Arduino Library Manager.
Now you can install this library directly from Arduino Library Manager.
Updated Dec 29th 2019
Included in Platform.io
Updated: Jan 08th 2020
Releases v1.0.4
Why this version
I’m really fed-up with the unfriendly, confusing and cryptic DHCP hostnames such as ESP_XXXXXX, espressif, etc., using ChipID.
Thanks to an issue opened in library ESP_WiFiManager (https://github.com/khoih-prog/ESP_WiFiManager), I decided to add this option to have built-in, yet configurable DHCP hostname to these libraries.
Now you can easily specify and have the friendly, identifiable, RFC-952-conformed DHP hostnames associated with your boards, such as SmartFarm-DeepSleep-1, Irrigation, Master-Controller, etc. You’ll be happier to have a look at your WiFi Router DHCP list and find out which is which.
New in this version
RFC-952 DHCP hostname and setHostname()
Updated: Jan 20th 2020
Releases v1.0.5
Why this version
Normally, the default Portal IP (192.168.4.1), SSID and PW as well as the dynamically allocated board’s IP address are good enough.
In special cases where there is conflict, if static IP is required or bad router’s DNS settings, you can use the new features to force the configurable IP addresses. But please use with care to avoid potential issues.
New in this version
Add new features to enable :
Following is the sample terminal output when running example ESP32WM_Config with SSL option true
Starting ...
[34] RFC925 Hostname = ESP32-WM-Config
[46] Header = SSL_ESP32, SSID = ***, PW = ***
[46] Server = account.duckdns.org, Port = 9443, Token = ***
[47] Board Name = ESP32-WM-SSL-Config
[50]
    ___  __          __
   / _ )/ /_ _____  / /__
  / _  / / // / _ \/  '_/
 /____/_/\_, /_//_/_/\_\
        /___/ v0.6.1 on ESP32

[146] Use static IP
[151] connectToWifi: start
[402] connectToWifi: connected OK
[402] IP = 192.168.2.230, GW = 192.168.2.1, SN = 255.255.255.0
[402] DNS1 = 192.168.2.1, DNS2 = 8.8.8.8
[403] begin: WiFi connected. Try connecting to Blynk
[408] BlynkArduinoClient.connect: Connecting to account.duckdns.org:9443
[3684] Certificate OK
[3696] Ready (ping: 10ms).
[3763] begin: WiFi and Blynk connected

Blynk ESP32 using EEPROM connected. Board Name : ESP32-WM-SSL-Config
EEPROM size = 4096 bytes, EEPROM start address = 1024 / 0x400
Update Feb 6th 2020
New in Version v1.0.6
Update Feb 18th 2020
New in Version v1.0.7
The following is the sample terminal output when running example ESP8266WM_Config
Starting ...
[65] RFC925 Hostname = ESP8266-WM-Config
[66] Calc Cksum = 0x309d, Read Cksum = 0x309d
[66] Header = ESP8266, Board Name = ESP8266-Multi-WM
[67] SSID = ****, PW = ****
[70] SSID1 = ****1, PW1 = ****1
[74] Server = 192.168.2.112, Token = ****
[80] Server1 = account.duckdns.org, Token1 = ****
[86] Port = 8080
[88] Connecting MultiWifi...
[11276] WiFi connected after time: 2
[11276] SSID: ****, RSSI = -45                                 <= Connected to SSID
[11276] Channel: 2, IP address: 192.168.2.91
[11277] bg: WiFi connected. Try Blynk
[11279]
    ___  __          __
   / _ )/ /_ _____  / /__
  / _  / / // / _ \/  '_/
 /____/_/\_, /_//_/_/\_\
        /___/ v0.6.1 on NodeMCU

[11292] BlynkArduinoClient.connect: Connecting to 192.168.2.112:8080  <= Try Server
[11325] Ready (ping: 19ms).                                  <= Connected to Server
[11392] Connected to Blynk Server = 192.168.2.112, Token  = ****
[11392] bg: WiFi+Blynk connected
Blynk ESP8288 using EEPROM connected. Board Name : ESP8266-Multi-WM
EEPROM size = 4096 bytes, EEPROM start address = 512 / 0x200
BRB
[101232] run: WiFi lost. Reconnect WiFi+Blynk                  <= Lost SSID
[101232] Connecting MultiWifi...
[106316] WiFi connected after time: 1
[106317] SSID: ****1, RSSI = -62                               <= Connected to SSID1
[106317] Channel: 4, IP address: 192.168.2.91
[106317] run: WiFi reconnected. Connect to Blynk
[106320] BlynkArduinoClient.connect: Connecting to 192.168.2.112:8080   <= Try Server
[106352] Ready (ping: 11ms).                                   <= Connected to Server
[106419] run: WiFi+Blynk reconnected
RB
[165434] Heartbeat timeout                                              <= Lost Server
[165735] run: Blynk lost. Connect Blynk
[165735]
    ___  __          __
   / _ )/ /_ _____  / /__
  / _  / / // / _ \/  '_/
 /____/_/\_, /_//_/_/\_\
        /___/ v0.6.1 on NodeMCU

[165741] BlynkArduinoClient.connect: Connecting to 192.168.2.112:8080  <= Server lost
[170741]
    ___  __          __
   / _ )/ /_ _____  / /__
  / _  / / // / _ \/  '_/
 /____/_/\_, /_//_/_/\_\
        /___/ v0.6.1 on NodeMCU

[170743] BlynkArduinoClient.connect: Connecting to account.duckdns.org:8080 <= Try Server1
[170781] Ready (ping: 9ms).
[170848] Connected to Blynk Server = account.duckdns.org, Token  = **** <= Connected to Server1
[170848] run: Blynk reconnected
RBRBRBRBRBRBRB RBRB
You can see that the system automatically detects and connects to the best or available WiFi APs and/or Blynk Servers, whenever interruption happens. This feature is very useful for systems requiring high degree of reliability.
Update Feb 24th 2020
Why this version
Update Mar 12th 2020
Why this version
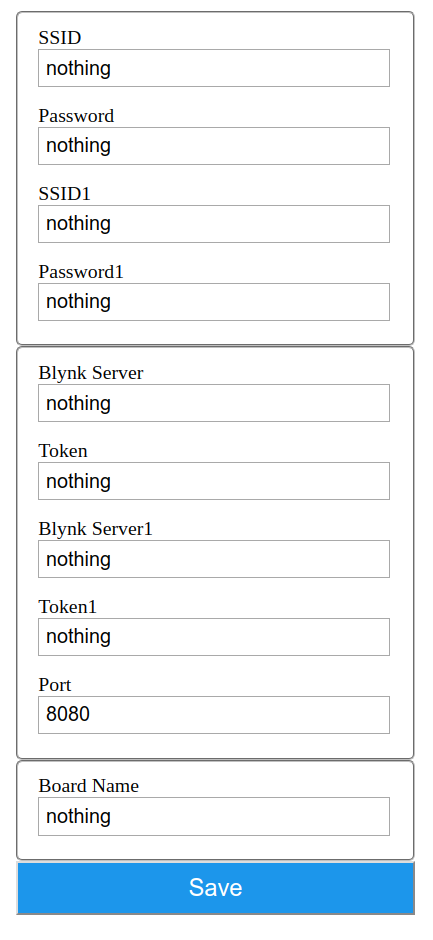
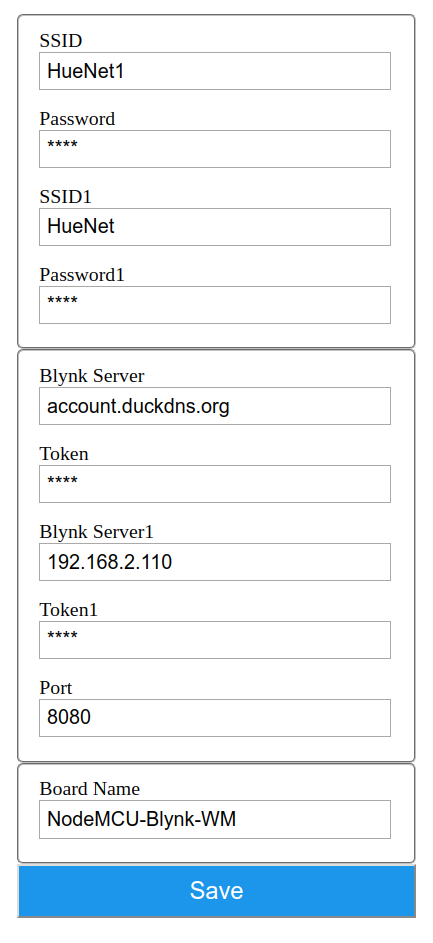
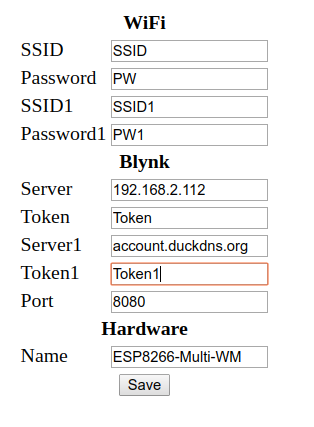
How to use Config Portal
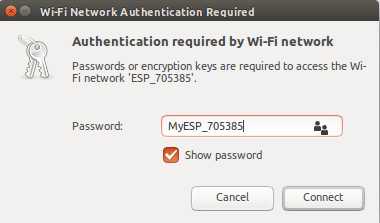
First, connect your (PC, Laptop, Tablet, phone, etc.) WiFi to Config Portal AP, then enter the WiFi password :

After you connected, please, go to http://192.168.4.1 or the configured AP IP. The Config Portal screen will appear:
Enter your WiFi and Blynk Credentials
Then click Save. The system will auto-restart. You will see the board’s built-in LED turned OFF. That means, it’s already connected to your Blynk server successfully.
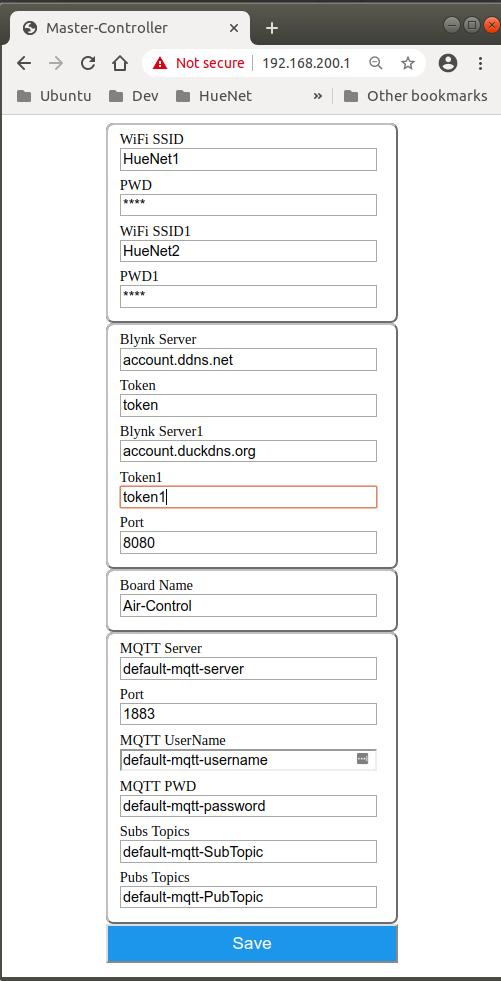
By just adding the following sample code snippet, you can add dynamic parameters and use them i your sketch. For example: MQTT Credentials, etc.
#define USE_DYNAMIC_PARAMETERS     true

/////////////// Start dynamic Credentials ///////////////

//Defined in <BlynkSimpleEsp8266_WM.h> and <BlynkSimpleEsp8266_SSL_WM.h>
/**************************************
  #define MAX_ID_LEN                5
  #define MAX_DISPLAY_NAME_LEN      16

  typedef struct
  {
  char id             [MAX_ID_LEN + 1];
  char displayName    [MAX_DISPLAY_NAME_LEN + 1];
  char *pdata;
  uint8_t maxlen;
  } MenuItem;
**************************************/

#if USE_DYNAMIC_PARAMETERS

#define MAX_MQTT_SERVER_LEN      34
char MQTT_Server  [MAX_MQTT_SERVER_LEN + 1]   = "";

#define MAX_MQTT_PORT_LEN        6
char MQTT_Port   [MAX_MQTT_PORT_LEN + 1]  = "";

#define MAX_MQTT_USERNAME_LEN      34
char MQTT_UserName  [MAX_MQTT_USERNAME_LEN + 1]   = "";

#define MAX_MQTT_PW_LEN        34
char MQTT_PW   [MAX_MQTT_PW_LEN + 1]  = "";

#define MAX_MQTT_SUBS_TOPIC_LEN      34
char MQTT_SubsTopic  [MAX_MQTT_SUBS_TOPIC_LEN + 1]   = "";

#define MAX_MQTT_PUB_TOPIC_LEN       34
char MQTT_PubTopic   [MAX_MQTT_PUB_TOPIC_LEN + 1]  = "";

MenuItem myMenuItems [] =
{
  { "mqtt", "MQTT Server",      MQTT_Server,      MAX_MQTT_SERVER_LEN },
  { "mqpt", "Port",             MQTT_Port,        MAX_MQTT_PORT_LEN   },
  { "user", "MQTT UserName",    MQTT_UserName,    MAX_MQTT_USERNAME_LEN },
  { "mqpw", "MQTT PWD",         MQTT_PW,          MAX_MQTT_PW_LEN },
  { "subs", "Subs Topics",      MQTT_SubsTopic,   MAX_MQTT_SUBS_TOPIC_LEN },
  { "pubs", "Pubs Topics",      MQTT_PubTopic,    MAX_MQTT_PUB_TOPIC_LEN },
};

uint16_t NUM_MENU_ITEMS = sizeof(myMenuItems) / sizeof(MenuItem);  //MenuItemSize;

#else

MenuItem myMenuItems [] = {};

uint16_t NUM_MENU_ITEMS = 0;
#endif

/////// // End dynamic Credentials ///////////
#define USE_DYNAMIC_PARAMETERS false
or
/////////////// Start dynamic Credentials ///////////////

MenuItem myMenuItems [] = {};

uint16_t NUM_MENU_ITEMS = 0;
/////// // End dynamic Credentials ///////////
First, connect your (PC, Laptop, Tablet, phone, etc.) WiFi to Config Portal AP, then enter the WiFi password :

After you connected, please, go to http://192.168.4.1 or the configured AP IP. The Config Portal screen will appear:
Enter your WiFi and Blynk Credentials:
Then click Save. The system will auto-restart. You will see the board’s built-in LED turned OFF. That means, it’s already connected to your Blynk server successfully.
Thanks to thorathome in GitHub and thorathome in Blynk to test, suggest and encourage to add those new features in v1.0.13, such as Default Credentials/Dynamic Parms, Configurable Config Portal Title, DRD. See WM Config Portal using BlynkSimpleEsp32/8266_WM.h.
If it cannot connect to the Blynk server in 30 seconds, no valid stored Credentials or Double Reset is detected within 10s, it will switch to Configuration Mode. You will see your built-in LED turned ON. In Configuration Mode, it starts an AP with default name ESP_xxxxxx and password MyESP_xxxxxx or configurable name and password you specified. The AP IP address is default at 192.168.4.1 or configured IP (e.g. 192.168.200.1).
First, connect your (PC, Laptop, Tablet, phone, etc.) WiFi to Config Portal AP, then enter the WiFi password :
After you connected, please, go to http://192.168.4.1 or the configured AP IP. The following Config Portal screen will appear:
After you connected, please, go to http://192.168.4.1 or the configured AP IP. The following Config Portal screen will appear:
Enter your WiFi and Blynk Credentials:
Then click Save. The system will auto-restart. You will see the board’s built-in LED turned OFF. That means, it’s already connected to your Blynk server successfully.
// Set config portal channel, default = 1. Use 0 => random channel from 1-13 to avoid conflict
  Blynk.setConfigPortalChannel(0);
See this example and modify as necessary
bool LOAD_DEFAULT_CONFIG_DATA = true;
bool LOAD_DEFAULT_CONFIG_DATA = false;
/// Start Default Config Data //////////////////

/*
  // Defined in <BlynkSimpleEsp32_WM.h> and <BlynkSimpleEsp32_SSL_WM.h>

  #define SSID_MAX_LEN      32
  #define PASS_MAX_LEN      64

  typedef struct
  {
  char wifi_ssid[SSID_MAX_LEN];
  char wifi_pw  [PASS_MAX_LEN];
  }  WiFi_Credentials;

  #define BLYNK_SERVER_MAX_LEN      32
  #define BLYNK_TOKEN_MAX_LEN       36

  typedef struct
  {
  char blynk_server[BLYNK_SERVER_MAX_LEN];
  char blynk_token [BLYNK_TOKEN_MAX_LEN];
  }  Blynk_Credentials;

  #define NUM_WIFI_CREDENTIALS      2
  #define NUM_BLYNK_CREDENTIALS     2

  typedef struct Configuration
  {
  char header         [16];
  WiFi_Credentials  WiFi_Creds  [NUM_WIFI_CREDENTIALS];
  Blynk_Credentials Blynk_Creds [NUM_BLYNK_CREDENTIALS];
  int  blynk_port;
  char board_name     [24];
  int  checkSum;
  } Blynk_WM_Configuration;

*/

bool LOAD_DEFAULT_CONFIG_DATA = true;
//bool LOAD_DEFAULT_CONFIG_DATA = false;

Blynk_WM_Configuration defaultConfig =
{
  //char header[16], dummy, not used
#if USE_SSL
  "SSL",
#else
  "NonSSL",
#endif
  //WiFi_Credentials  WiFi_Creds  [NUM_WIFI_CREDENTIALS]
  //WiFi_Creds.wifi_ssid and WiFi_Creds.wifi_pw
  "SSID1", "password1",
  "SSID2", "password2",
  // Blynk_Credentials Blynk_Creds [NUM_BLYNK_CREDENTIALS];
  // Blynk_Creds.blynk_server and Blynk_Creds.blynk_token
  "account.ddns.net",     "token",
  "account.duckdns.org",  "token1",
  //int  blynk_port;
#if USE_SSL
  9443,
#else
  8080,
#endif
  //char board_name     [24];
  "Air-Control",
  //int  checkSum, dummy, not used
  0
};

/////////// End Default Config Data /////////////
#define USE_DYNAMIC_PARAMETERS      true

/////////////// Start dynamic Credentials ///////////////

//Defined in <BlynkSimpleEsp32_WM.h> and <BlynkSimpleEsp32_SSL_WM.h>
/**************************************
  #define MAX_ID_LEN                5
  #define MAX_DISPLAY_NAME_LEN      16

  typedef struct
  {
  char id             [MAX_ID_LEN + 1];
  char displayName    [MAX_DISPLAY_NAME_LEN + 1];
  char *pdata;
  uint8_t maxlen;
  } MenuItem;
**************************************/

#if USE_DYNAMIC_PARAMETERS

#define MAX_MQTT_SERVER_LEN      34
char MQTT_Server  [MAX_MQTT_SERVER_LEN + 1]   = "default-mqtt-server";

#define MAX_MQTT_PORT_LEN        6
char MQTT_Port   [MAX_MQTT_PORT_LEN + 1]  = "1883";

#define MAX_MQTT_USERNAME_LEN      34
char MQTT_UserName  [MAX_MQTT_USERNAME_LEN + 1]   = "default-mqtt-username";

#define MAX_MQTT_PW_LEN        34
char MQTT_PW   [MAX_MQTT_PW_LEN + 1]  = "default-mqtt-password";

#define MAX_MQTT_SUBS_TOPIC_LEN      34
char MQTT_SubsTopic  [MAX_MQTT_SUBS_TOPIC_LEN + 1]   = "default-mqtt-SubTopic";

#define MAX_MQTT_PUB_TOPIC_LEN       34
char MQTT_PubTopic   [MAX_MQTT_PUB_TOPIC_LEN + 1]  = "default-mqtt-PubTopic";

MenuItem myMenuItems [] =
{
  { "mqtt", "MQTT Server",      MQTT_Server,      MAX_MQTT_SERVER_LEN },
  { "mqpt", "Port",             MQTT_Port,        MAX_MQTT_PORT_LEN   },
  { "user", "MQTT UserName",    MQTT_UserName,    MAX_MQTT_USERNAME_LEN },
  { "mqpw", "MQTT PWD",         MQTT_PW,          MAX_MQTT_PW_LEN },
  { "subs", "Subs Topics",      MQTT_SubsTopic,   MAX_MQTT_SUBS_TOPIC_LEN },
  { "pubs", "Pubs Topics",      MQTT_PubTopic,    MAX_MQTT_PUB_TOPIC_LEN },
};

uint16_t NUM_MENU_ITEMS = sizeof(myMenuItems) / sizeof(MenuItem);  //MenuItemSize;

#else

MenuItem myMenuItems [] = {};

uint16_t NUM_MENU_ITEMS = 0;
#endif


/////// // End dynamic Credentials ///////////
#define USE_DYNAMIC_PARAMETERS false
or
/////////////// Start dynamic Credentials ///////////////

MenuItem myMenuItems [] = {};

uint16_t NUM_MENU_ITEMS = 0;
/////// // End dynamic Credentials ///////////
Hello.
just want to give some insights regarding SSL certificate. Blynk server automatically updates the certificate 20 days before the expiration (in case it was generated with Blynk server). Also, very soon Let’s Encrypt will allow to retrieve certificates for IPs only, so no need in the domain name will be necessary.
I like what you have started. I have a few observations and questions.
I have been playing with this a bit and wonder if it can have the config portal auto start as it does in some other wifi managers. I have not played with this much as it just worked for me in the wifi manager that I have been using.
I use more than one auth code in some projects that use bridge. It would be nice to be able to have the codes paired. I need them next to each other and to change when I change blynk servers. Can This happen in the current code?
I think it would be nicer to move more things out of the code and into the defines. Make is easy to just look at the defines and fill in a few things and be up and running.
I removed the DHT code from the last example and moved things around a bit to make it easier for me.
I like the double reset option and the ability to use different wifi and blynk servers, I can see a lot of potential.
Let’s Encrypt will allow to retrieve certificates for IPs only, so no need in the domain name will be necessary.
Thanks for the info. When do you think that’s ready? How about OpenSSL?
But the majority of people (without more expensive static WAN IP) is using DDNS and still must use domain name.
BTW, great Blynk system you guys have created and made me enjoy, learn, work and think again.
Dear @Gyromike
if it can have the config portal auto start as it does in some other wifi managers
Can you clarify? I think Config Portal must start only when absolutely necessary.
Please try, explore, suggest and help find/kill bugs as there is so much a small guy can do.
I just recently got help from people in this forum (@thorathome, @mikekgr, etc.) to enhance, fix the libs.
You’re very welcome to give a free hand, either open issues, suggestions here or GitHub, especially as you’re an experienced programmer.
Plsalso see
I use more than one auth code in some projects that use bridge. It would be nice to be able to have the codes paired. I need them next to each other and to change when I change blynk servers. Can This happen in the current code?
Please explore and I think this feature is ready from recent MultiWiFi/MultiBlynk release v1.0.7
I think it would be nicer to move more things out of the code and into the defines. Make is easy to just look at the defines and fill in a few things and be up and running.
Examples are redesigned to separate Credentials / Defines / Dynamic Params / Code so that you can change Credentials / Dynamic Params quickly for each device.
Just done in the latest version v1.0.13
In regards to autostart. What I really need is for it to open the portal from the phone when it connects to the portal wifi so that I am not required to go to the browser and enter the ip address. This happens with other wifi managers.
I see that I can add additional config data. but the point made here is that the blynk key needs to be connected to the blynk server. in my case I need two keys tied to each server others may need more.
In regards to autostart. What I really need is for it to open the portal from the phone when it connects to the portal wifi so that I am not required to go to the browser and enter the ip address. This happens with other wifi managers.
That’s good to have. Could you help exploring how they do that. I’m having too much in my plate now. Certainly will add this good feature when ready.
in my case I need two keys tied to each server others may need more.
So the current 2 Blynk Servers / Blynk Tokens are not enough? You need to add more BlynkServers/Tokens in dynamic Config Data and have them used to auto-connect to Blynk?
I’ll explore this option whenever having time, but I’m afraid this feature is not popular and necessary.
Please discuss with use cases.
BTW, these discussions are becoming too technical for the people in this forum. I think I’ll create a Blynk_WM_Dev private repository and invite people interested and willing to contribute to participate, collaborate, enhance, maintain, etc. Certainly will invite you in if you’re OK with that.
I think what @Gyromike was saying is that he is using Bridge code in Blynk to communicate with multiple devices that have different auth codes. The server setting would be the same, but there would be multiple auth codes, one for each device.
This is the recommended way (in fact the only real way) of passing data between devices and is quite common.
This post from @Gunner explains the basics in a sort of “Blynk Bridge for Dummies” way ![]()
Pete.
Thanks @PeteKnight for the clarification.
I think we can already do that by specifying in the dynamic Params, then read/use/put them in the Blynk Bridge auth very similar to using to access MQTT server.
The dynamic Params feature is very good in this use case, as we don’t know ahead how many params/auths to be used for each application. It’s totally up to the users to specify and use.
For example
#if USE_DYNAMIC_PARAMETERS

#define MAX_BLYNK_AUTH_LEN      32
char Auth_A  [MAX_BLYNK_AUTH_LEN + 1]   = "token_A";
char Auth_B  [MAX_BLYNK_AUTH_LEN + 1]   = "token_B";
char Auth_C  [MAX_BLYNK_AUTH_LEN + 1]   = "token_C";
....
BLYNK_CONNECTED()
{
  bridgeA.setAuthToken(Auth_A); // Token of the receiving hardware A
  bridgeB.setAuthToken(Auth_B); // Token of the receiving hardware B
  bridgeC.setAuthToken(Auth_C); // Token of the receiving hardware C
}
Does that make it change when you change servers?
Perhaps I just need to better understand the documentation.
Again thanks to thorathome in GitHub and thorathome in Blynk for testing, bug finding, feature adding, README rewriting, collaborating, etc…
@khoih
I am impressed by the developments of the BlynkSimpleEsp8266 WifiManager library.
Is there a way to get similar functionality for the BlynkSimpleShieldEsp8266 library, used for projects that require more complex Mega I/O?
Thanks for your encouraging words.
There are several ESP8266 AT-command libraries developed with similar functionalities such as:
You’re very welcome to use and give feedbacks, enhancement requests, bug reports, etc.
Regards,
@khoih
Thanks for this clear overview!
For an Arduino Mega + ESP8266 shield libray to use for dynamic WifiManager functionality is ESP_AT_WM_Lite. Light means fewer parameters to configure? Ex. SSID and PW is fixed to the ugly ESP_AT_**** MyESP_AT_***?
It’s good that you start exploring the libs.
Depending on how much memory you can spare, you can turn ON or OFF the dynamic params by using
#define USE_DYNAMIC_PARAMETERS true
Ex. SSID and PW is fixed to the ugly ESP_AT_**** MyESP_AT_***?
The SSID and PW for Config Portal are configurable by using the function
void setConfigPortal(String ssid = "", String pass = "")
For example, in README
In
Configuration Portal Mode, it starts an AP calledESP_AT_XXXXXX. Connect to it using theconfigurable passwordyou can define in the code. For example,MyESP_AT_XXXXXX(see examples):// SSID and PW for Config Portal String ssid = "Your-Config-Portal-SSID"; String password = "Your-Config-Portal-SSID-PW";
And use the function in setup()
void setup()
{
// Debug console
Serial.begin(115200);
while (!Serial);//delay(1000);
Serial.print(F("\nStart Mega_ESP8266Shield on "));
Serial.println(BOARD_TYPE);// initialize serial for ESP module
EspSerial.begin(115200);ESP_AT_WiFiManager = new ESP_AT_WiFiManager_Lite(&EspSerial, ESP8266_BAUD);
// Optional to change default AP IP(192.168.4.1) and channel(10)
//ESP_AT_WiFiManager->setConfigPortalIP(IPAddress(192, 168, 120, 1));
ESP_AT_WiFiManager->setConfigPortalChannel(1);// To configure Config Portal SSID and PW
ESP_AT_WiFiManager->setConfigPortal(ssid, password);ESP_AT_WiFiManager->begin();
}