umm, I forgot something… are you programming the sonoff with a ftdi, isn’t it?
All the trials that you are doing, are you powering the sonoff with the ftdi or you are disconnecting it and running it connecting it to wall socket?
I told you that because the ftdi don’t have enough power to run a esp8266 that draws almost 1A…
In this case, when the wifi starts the esp8266 draw many current and reset happens… so just flash it with ftdi, then disconnect the ftdi, and connect the sonoff to the wall socket.
2 Likes
Yes, that is what you ought to do currently (at least to debug the setup). And as pointed: use OTA update, define credentials at the beginning of the sketch. You will hardly notice a lack of WiFi Manager.
1 Like
To me it looks as if you are missing some libraries for the WifManager. I’d make sure you got them all.
#include <FS.h>                   //this needs to be first, or it all crashes and burns...

#include <ESP8266WiFi.h>          //https://github.com/esp8266/Arduino
#include <BlynkSimpleEsp8266.h>
//needed for library
#include <DNSServer.h>
#include <ESP8266WebServer.h>
#include <WiFiManager.h>          //https://github.com/tzapu/WiFiManager
#include <SimpleTimer.h>
#include <ArduinoJson.h>          //https://github.com/bblanchon/ArduinoJson


#define BLYNK_PRINT Serial    // Comment this out to disable prints and save space
//#define BLYNK_DEBUG


//define your default values here, if there are different values in config.json, they are overwritten.
//char mqtt_server[40];
//char mqtt_port[6] = "8080";
char blynk_token[34] = "YOUR_BLYNK_TOKEN";

//flag for saving data
bool shouldSaveConfig = false;

//callback notifying us of the need to save config
void saveConfigCallback () {
  Serial.println("Should save config");
  shouldSaveConfig = true;
}


void setup() {
  // put your setup code here, to run once:
  Serial.begin(115200);
  Serial.println();

  //clean FS, for testing
  //SPIFFS.format();

  //read configuration from FS json
  Serial.println("mounting FS...");

  if (SPIFFS.begin()) {
    Serial.println("mounted file system");
    if (SPIFFS.exists("/config.json")) {
      //file exists, reading and loading
      Serial.println("reading config file");
      File configFile = SPIFFS.open("/config.json", "r");
      if (configFile) {
        Serial.println("opened config file");
        size_t size = configFile.size();
        // Allocate a buffer to store contents of the file.
        std::unique_ptr<char[]> buf(new char[size]);

        configFile.readBytes(buf.get(), size);
        DynamicJsonBuffer jsonBuffer;
        JsonObject& json = jsonBuffer.parseObject(buf.get());
        json.printTo(Serial);
        if (json.success()) {
          Serial.println("\nparsed json");

          //strcpy(mqtt_server, json["mqtt_server"]);
          //strcpy(mqtt_port, json["mqtt_port"]);
          strcpy(blynk_token, json["blynk_token"]);

        } else {
          Serial.println("failed to load json config");
        }
      }
    }
  } else {
    Serial.println("failed to mount FS");
  }
  //end read


  // The extra parameters to be configured (can be either global or just in the setup)
  // After connecting, parameter.getValue() will get you the configured value
  // id/name placeholder/prompt default length
  //WiFiManagerParameter custom_mqtt_server("server", "mqtt server", mqtt_server, 40);
  //WiFiManagerParameter custom_mqtt_port("port", "mqtt port", mqtt_port, 6);
  WiFiManagerParameter custom_blynk_token("blynk", "blynk token", blynk_token, 33);

  //WiFiManager
  //Local intialization. Once its business is done, there is no need to keep it around
  WiFiManager wifiManager;

  //set config save notify callback
  wifiManager.setSaveConfigCallback(saveConfigCallback);

  //set static ip
  //wifiManager.setSTAStaticIPConfig(IPAddress(10,0,1,99), IPAddress(10,0,1,1), IPAddress(255,255,255,0));

  //add all your parameters here
  //wifiManager.addParameter(&custom_mqtt_server);
  //wifiManager.addParameter(&custom_mqtt_port);
  wifiManager.addParameter(&custom_blynk_token);

  //reset settings - for testing
  //wifiManager.resetSettings();

  //set minimu quality of signal so it ignores AP's under that quality
  //defaults to 8%
  //wifiManager.setMinimumSignalQuality();

  //sets timeout until configuration portal gets turned off
  //useful to make it all retry or go to sleep
  //in seconds
  //wifiManager.setTimeout(120);

  //fetches ssid and pass and tries to connect
  //if it does not connect it starts an access point with the specified name
  //here  "AutoConnectAP"
  //and goes into a blocking loop awaiting configuration
  if (!wifiManager.autoConnect("Wifi_Manager", "password")) {
    Serial.println("failed to connect and hit timeout");
    delay(3000);
    //reset and try again, or maybe put it to deep sleep
    ESP.reset();
    delay(5000);
  }

  //if you get here you have connected to the WiFi
  Serial.println("connected...yeey :)");

  //read updated parameters
  //strcpy(mqtt_server, custom_mqtt_server.getValue());
  //strcpy(mqtt_port, custom_mqtt_port.getValue());
  strcpy(blynk_token, custom_blynk_token.getValue());

  //save the custom parameters to FS
  if (shouldSaveConfig) {
    Serial.println("saving config");
    DynamicJsonBuffer jsonBuffer;
    JsonObject& json = jsonBuffer.createObject();
    //json["mqtt_server"] = mqtt_server;
    //json["mqtt_port"] = mqtt_port;
    json["blynk_token"] = blynk_token;

    File configFile = SPIFFS.open("/config.json", "w");
    if (!configFile) {
      Serial.println("failed to open config file for writing");
    }

    json.printTo(Serial);
    json.printTo(configFile);
    configFile.close();
    //end save
  }

  //Serial.println("local ip");
  //Serial.println(WiFi.localIP());

  Blynk.config(blynk_token);
  bool result = Blynk.connect();

if (result != true)
{
  Serial.println("BLYNK Connection Fail");
  Serial.println(blynk_token);
  wifiManager.resetSettings();
  ESP.reset();
  delay (5000);
}
else
{
  Serial.println("BLYNK Connected");
}
 //timers and stuff here
}

void loop() {

Blynk.run();

}
In such case I’d expect a compiler error. And note, that those devices stopped working “just like that”!
well I for sure don’t see this one:
#include <FS.h> //this needs to be first, or it all crashes and burns...
or
#include <ArduinoJson.h> //https://github.com/bblanchon/ArduinoJson
I think the comment for the first one kinda says it all.
I’m just saying that if trying to use WifiManager, there are some key components missing.
Edit: I guess that is only needed when adding the BLYNK_TOKEN input. Guess my comments can be ignored.
1 Like
Then perhaps you could try to release that. I don’t remember the circumstances (most probably not ESP or Blynk related) but I had some day problems with Mac and IP binding (Asus router)
Good point, but don’t forget to disconnect from your computer before plugging it into the mains.
Another good reason to go for OTA updates so you can put the whole thing back together and power it from the mains then do a wireless update.
Pete.
Although NOT RECOMMENDED, I’m flashing all my Sonoffs being connected to mains. They are all fine and healthy ![]()
Think I just heard a very big bang from the direction of Poland!
Pete.
1 Like
Yea, that’s nothing… I’m sure it came from Warsaw (capital) - it might be they just finally pissed off someone, and I’m from Wrocław - hopefully safe… 
FS.h is only necessary if you’re passing custom credentials (e.g. a Blynk token) via WiFiManager.
Hello all,
My apologies for being late. I went down the rabbithole of ESP - and found these source
https://arduino-esp8266.readthedocs.io/en/2.4.0-rc2/index.html (good to start with)
https://tttapa.github.io/ESP8266/Chap01%20-%20ESP8266.html (this one is amazing)
This is by far the greatest compilation of everything esp related I have seen. Really cleared my doubts. I took all the suggestions, I changed my code to the following:
#include <ESP8266WiFi.h>        // Wifi library for ESP
#include <BlynkSimpleEsp8266.h> // Blynk library
#include <ArduinoOTA.h>         // Library for over the air updates
#include <DHT.h>                // DHT thermocouple/ humidity sensor
#include <ESP8266mDNS.h>        // mDNS server

// Wifi, OTA, blynk credentials
const char* ssid     = "XXX";                          // SSID
const char* password = "XXX";                // Password
char auth[] = "XXX";        // Get token from Blynk
const char* OTAName = "XXX"; // OTA name
const char* OTAPassword = "XXX";             // OTA Password
const char* mdnsName = "bedroom_standing_lamp";          // Domain name for the mDNS responder

// Pins for blynk
#define VPIN V1               // For Relay
#define VPIN_T V2             // For temperature data
#define VPIN_H V3             // For humidity data
#define VPIN_F V4             // For temperature in farenheit
#define VPIN_tag V20          // For all relays in a tag

// Pin for temperature-humidity sensor
#define DHTTYPE DHT22
#define DHTPIN 14

// On/off callbacks, PINS
boolean LampState = 0;
boolean SwitchReset = true;   // Flag indicating that the hardware button has been released
const int TacSwitch = 0;      // Pin for hardware momentary switch. On when grounded
const int RelayPin = 12;      // Relay switching pin. Relay is pin 12
const int LED = 13;           // On / Off indicator LED. Onboard LED is 13 on Sonoff
void lightOn();               // Function for switching light ON
void lightOff();              // Function for switching light OFF

// Define DHT, Blynk timer
BlynkTimer timer;             // Blynk timer
DHT dht(DHTPIN, DHTTYPE);     // Define DHT

void setup()
{
  // Serial port
  Serial.begin(74880);
  Serial.println("Starting bedroom: standing lamp with temperature sensor");

  // Setup all the pins, and initial state
  pinMode(RelayPin, OUTPUT);        // Relay pin to OUTPUT
  digitalWrite(RelayPin, LOW);      // Switch OFF relay initially
  pinMode(LED, OUTPUT);             // LED pin to OUTPUT
  digitalWrite(LED, HIGH);          // Switch OFF LED (pulled up)
  pinMode(TacSwitch, INPUT_PULLUP); // Tactile Switch as INPUT

  // Wifi connection and services
  startWiFi();                      // Connect to WIFI
  startOTA();                       // Start OTA servers
  startMDNS();                      // Start the mDNS server

  // Start configuration
  Blynk.config(auth);               // Connect to Blynk

  // Check button, temperature and humidity periodically
  timer.setInterval(100, ButtonCheck);
  timer.setInterval(300000, temp_humidity);

  // Switch off relay initially
  lightOff();
  // DHT begining
  dht.begin();
}

void loop()
{
  Blynk.run();
  ArduinoOTA.handle();
  timer.run();
}

// Toggle the relay on
void lightOn() {
    Serial.println("Bedroom lights ON!...");
    digitalWrite(RelayPin, HIGH);
    digitalWrite(LED, LOW);
    LampState = 1;
    Blynk.virtualWrite(VPIN, HIGH);     // Sync the Blynk button widget state
}

// Toggle the relay off
void lightOff() {
    Serial.println("Bedroom lights OFF ...");
    digitalWrite(RelayPin, LOW);
    digitalWrite(LED, HIGH);
    LampState = 0;
    Blynk.virtualWrite(VPIN, LOW);      // Sync the Blynk button widget state
}

// Handle switch changes originating on the Blynk app
BLYNK_WRITE(VPIN){
  int SwitchStatus = param.asInt();

  Serial.println("Blynk switch for bedroom lights activated");

  // For use with IFTTT, toggle the relay by sending a "2"
  if (SwitchStatus == 2){
    ToggleRelay();
  }
  else if (SwitchStatus == 1){
    lightOn();
  }
  else if (SwitchStatus == 3){ // Cycle it once
    lightOff();
    delay(300);
    lightOn();
  }
  else if (SwitchStatus == 4){ // Cycle it twice
    lightOff();
    delay(300);
    lightOn();
    delay(300);
    lightOff();
    delay(300);
    lightOn();
  }
  else lightOff();
}

//Read the sensor for temperature and humidity
  void temp_humidity(){
  float h = dht.readHumidity();
  float t = dht.readTemperature();
  float t_f = dht.readTemperature(true);

  Blynk.virtualWrite(VPIN_T, t);
  Blynk.virtualWrite(VPIN_H, h);
  Blynk.virtualWrite(VPIN_F, t_f);
}

// Handle hardware switch activation
void ButtonCheck(){
  // look for new button press
  boolean SwitchState = (digitalRead(TacSwitch));

  // toggle the switch if there's a new button press
  if (!SwitchState && SwitchReset == true){
    Serial.println("Hardware switch for coffee activated");
    if (LampState){
      lightOff();
    }
    else{
      lightOn();
    }

    // Flag that indicates the physical button hasn't been released
    SwitchReset = false;
    delay(50);            //debounce
  }
  else if (SwitchState){
    // reset flag the physical button release
    SwitchReset = true;
  }
}

// Toggle relay
void ToggleRelay(){
  LampState = !LampState;

  if (LampState){
    lightOn();
  }
  else lightOff();
}

// Connect wifi
void startWiFi() { // Start a Wi-Fi access point, and try to connect to some given access points. Then wait for either an AP or STA connection
  WiFi.begin(ssid, password);                 // Connect to the network
  Serial.print("Connecting to ");
  Serial.print(ssid); Serial.println(" ...");
  int i = 0;
  while (WiFi.status() != WL_CONNECTED) {     // Wait for the Wi-Fi to connect
    delay(1000);
    Serial.print(++i); Serial.print(' ');
  }
  Serial.println('\n');
  Serial.println("Connection established!");
  Serial.print("IP address:\t");
  Serial.println(WiFi.localIP());             // Print IP address
}

// Start to OTA server
void startOTA() {                             // Start the OTA service
  ArduinoOTA.setHostname(OTAName);            // Hostname for OTA
  ArduinoOTA.setPassword(OTAPassword);        // Password for OTA

  ArduinoOTA.onStart([]() {
    Serial.println("Start");
    digitalWrite(RelayPin, 0);                // Switch OFF the relay while updating
  });
  ArduinoOTA.onEnd([]() {
    Serial.println("\r\nOTA Flash complete");
  });
  ArduinoOTA.onProgress([](unsigned int progress, unsigned int total) {
    Serial.printf("Progress: %u%%\r", (progress / (total / 100)));
  });
  ArduinoOTA.onError([](ota_error_t error) {
    Serial.printf("Error[%u]: ", error);
    if (error == OTA_AUTH_ERROR) Serial.println("Auth Failed");
    else if (error == OTA_BEGIN_ERROR) Serial.println("Begin Failed");
    else if (error == OTA_CONNECT_ERROR) Serial.println("Connect Failed");
    else if (error == OTA_RECEIVE_ERROR) Serial.println("Receive Failed");
    else if (error == OTA_END_ERROR) Serial.println("End Failed");
  });
  ArduinoOTA.begin();
  Serial.println("OTA server ready\r\n");
}

// Start mDNS
void startMDNS() { // Start the mDNS responder
  MDNS.begin(mdnsName);                        // start the multicast domain name server
  Serial.print("mDNS responder started: http://");
  Serial.print(mdnsName);
  Serial.println(".local");
}
Essentially, got rid of WifiManager, I was using OTA before, but with the current code it seems to be much less flaky. Once I uploaded the sketch - everything worked. My serial port output is:
Starting bedroom: standing lamp with temperature sensor
Connecting to XXXX ...
1 2 3 4

Connection established!!
IP address:	192.168.0.108
OTA server ready

mDNS responder started: http://bedroom_standing_lamp.local
Bedroom lights OFF ...
And the OTA:
Blynk works perfectly, and everything with IFTTT and Google assistant started working instantly:
Thanks a lot!
PS: I read somewhere (and saw photos) that flashing blynk while connected to mains is a big NO NO. Interesting to see it works if you live your life on the edge.
2 Likes
I’m quite fine ![]() It’s just I’ve been flashing a lot of devices before Sonoffs while connected to some PSU’S and couldn’t figure out what the heck is the difference, so…
It’s just I’ve been flashing a lot of devices before Sonoffs while connected to some PSU’S and couldn’t figure out what the heck is the difference, so…
As of the issuees: Always good to figure it out by ourselves.
Hey all,
First of all, thanks a lot for all the hep on this forum. My sonoffs are running for a couple of days, and initially I saw some interrupts in data stream. I added a function that feeds watchdog every 30 seconds, and these things have been really really robust since then.
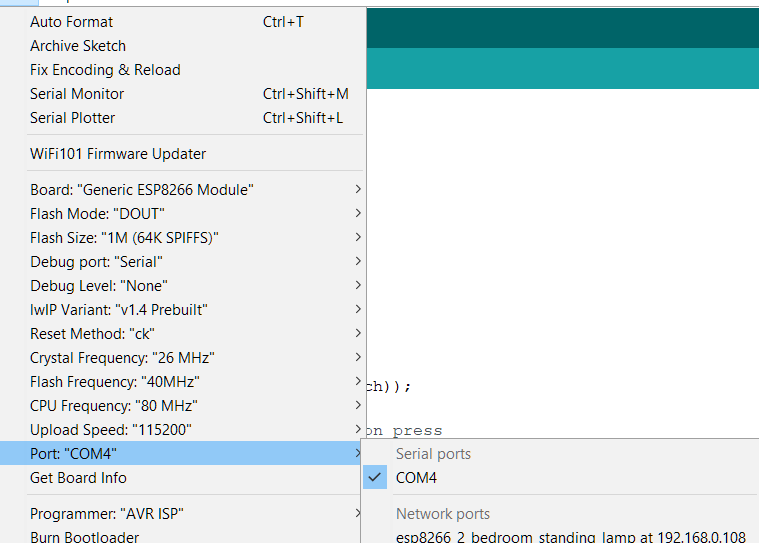
Just one observation/ issue - My OTA seems a little flaky. I sometimes get all of the esp’s listed under ports, as shown below:
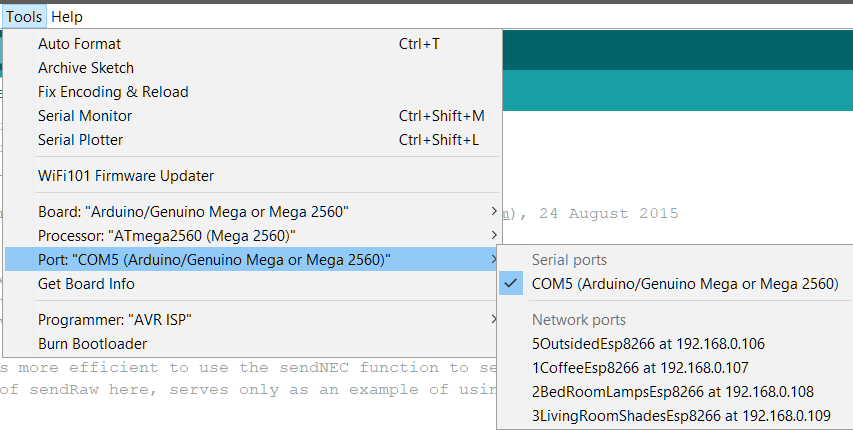
And sometimes all of them are gone - as shown below. These photos were taken after a sleep-resume cycle, and restarting IDE did not help. I would sometimes start the computer again or look after a while and find all of the network ports listed again.
Is there a way to force-scan OTA ports in Arduino IDE? What causes this issue? Windows? Arduino? ESPs? DHCP settings on my router (remember ESP is connected to blynk, so probably not the DHCP)?
Not only it’s not recommended, it’s strictly forbidden. Don’t do that. This is very dangerous, you are at huge risk of electric shock and you could easily end up with your PC completely destroyed, and you’re risking your life for a very stupid reason. You just had luck, end this bad practice immediately. Not to mention that some newbie will see your post and try to do the same with fatal results.
 Don’t put this kind of posts, please. I will NOT recommend this method - and I stated it clearly.But you shouldn’t post untrue here: No, with devices using PSU’s, where there is galvanic separation between primary and secondary circuits this is not unsafe, not to mention forbidden. There is no law forbidding it, at least in Poland. There were days, where flashing was possible ONLY through connecting PC with CONNECTED device, and I did it hundreds of times. I assume people working with mains (or higher voltage) are educated well enough, and responsible for what they are doing. The principal rule is to know the circuit you are working with!! These are not P&P devices, but documentation is freely available, and I’m not talking about Youtube. But once more: if the Youtube is the only source of information for some newbie, then YES: it is unsafe, might be dangerous, and should be definitely avoided. Full stop.
2 Likes
Marvin, you have to open the device which is attached to mains in order to flash. Why would you do such a thing, when it’s clear that every single USB bridge can provide more than enough power to flash every single Sonoff ever produced? I flashed many Sonoffs, Basic, TH10, TH16, and never had any trouble using usual routine, so why on earth would you want to attach it to mains while flashing? What’s the reason for the risk? I know my circuits very well, that’s why I would never, ever rely on galvanic isolation on a cheap Chinese device. Speaking of truth, it’s simply not true that any of them need to be flashed while connected to mains, so please prove me wrong here. I’m not talking about Youtube, there’s a lot of newbies here as well, after reading your post some of them could get wrong idea.
That’s exactly what I wanted to ask you. It’s just irresponsible and dangeorus.
Guys… disclaimers have been made from both sides… suggestions can be made, noobs have been warned (assuming they read  ) but no sense in trying to control other members opinions to match yours
@zodiac I don’t have any sonoffs yet (on order) so I am just guessing if they don’t have enough memory for OTA… and if not, then I can see a reason to flash them on location, if sketch changes are required… possibly safer, or at least more practical (if you know what you are doing) then disconnecting from the wiring… besides, there are such things as circuit breakers that can be tripped before said flashing, as is common when working on any mains (I hope  )… and since, as you stated, in order to flash you probably need a USB-TTL anyhow, so power is covered.
1 Like
I’m using OTA on every single one of them. All Sonoffs have at least 1MB which is enough. Once again, there is no reason to flash it while attached to mains, this is simply a very bad practice and should be avoided at all cost.