Arduino-based Camera Slider project using Blynk

Construction -
Iteration 2.2 - Z-axis (tilt) motion. Rather than just add a clone tilt mount on top of the pan mount, I want to spend some time cruising the Internet in the quest for a cheap pan/tilt mount that handles NEMA17 stepper-motors. I will revisit the Z-axis step at a later date. I’m going to jump ahead to the Software Iteration phase of the project and get started using Blynk to control everything.

Software Transition -
Iteration 3.0 - First, design a Blynk App to control the stepper-motor controller.
Here is my short-list of desirable features that would be great to implement:

App parameters :
Total rail length 20-1,023 mm start to stop.
X-axis length 20-1,023 mm (base to object)
Y-axis length 20-1,023 mm (rail-to-object)
Z-axis tilt 0-180 degrees
App sliders :
Delay time (15-1,023 seconds)
Rail speed (15-1,023 seconds)
App switches :
Object tracking (OFF/ON)
Delayed start (OFF/ON)
App controls :
[Start]
[Stop]
[Continue]
Stepper data displayed :
Object Tracking – Arctangent of the object height to X-axis length ratio, in degrees.
Axis Tracking – stepper-motor X-Y-Z axis telemetry displayed on OLED readout.

Software Transition -
Iteration 3.1 - App completed, now finalize the conceptual breadboard design.


All the short-list desirable features were implemented in the Blynk App layout shown above running on my iPhone. The App transmits to the Blynk cloud server, and then back down to the HelTec ESP8266 Blynk message broker, and then ultimately to the Arduino Zero stepper-motor controller. The camera slider will in-turn respond to the command(s) and transmit positional axis location telemetry back to the OLED display in real-time.

Next milestone: simulated sending the positional telemetry information back to the HelTec ESP8266 executing Blynk. Final step will be to show the X & Y slider coordinates on the blue OLED display. Can the refresh rate on the display can keep up with the speed of the incoming telemetry data? If not, I may have to display every other line, every other forth line, or something else.

Telemetry data below shows a timestamp, X-axis position along the rail, Y-axis position from the rail to the tracking object (“height”), the arctangent angle of the Y & X coordinates, stepper Motor 1 speed, stepper Motor 2 speed, stepper Motor 3 Z-axis speed and PAN angle.
You can see M1 is constant, while M2 is continually adjusted as the motor rides down the rail.
M3 speed and PAN angle will be zero until a 3rd stepper-motor is mounted to the camera platform on the trolley.

10:46:34.574 -> 
10:46:34.574 -> Blynk Online Message Broker (the BOMB)
10:46:34.608 -> Oasis Drive router
10:46:34.608 -> [261] Connecting to ATnT
10:46:37.635 -> [3304] Connected to WiFi
10:46:37.635 -> [3304] IP: 192.168.1.80
10:46:37.668 -> [3304] 
10:46:37.668 ->     ___  __          __
10:46:37.701 ->    / _ )/ /_ _____  / /__
10:46:37.735 ->   / _  / / // / _ \/  '_/
10:46:37.769 ->  /____/_/\_, /_//_/_/\_\
10:46:37.802 ->         /___/ v0.6.1 on NodeMCU
10:46:37.836 -> 
10:46:37.836 -> [3380] Connecting to blynk-cloud.com:80
10:46:37.869 -> [3566] <[1D|00|01|00]
10:46:37.972 -> [3665] >[00|00|01|00|C8]
10:46:37.972 -> [3665] Ready (ping: 98ms).
10:46:38.007 -> [3665] Free RAM: 48568
10:46:38.041 -> [3732] <[11|00|02|00]Hver[00]0.6.1[00]h-beat[00]30[00]
10:46:38.176 -> [3845] >[00|00|02|00|C8]
10:46:38.210 -> [3846] <[14|00|03|00|09]vw[00]19[00]clr
10:46:38.243 -> [3913] <[14|00|04|00]Fvw[00]19[00]
10:46:38.344 -> [3990] <[14|00|05|00|1A]vw[00]19[00]2020-0524[0D|0A|0D|0A]
10:47:08.147 -> [33846] <[06|00|06|00|00]
(telemetry starts here ---)
10:47:26.717 -> PX:0.03 PY:30.94 A:30.96  M1:1590.50 M2:0.00 M3:0.00 PAN:0.00
10:47:26.784 -> PX:1.01 PY:30.91 A:30.88  M1:1590.50 M2:-59.36 M3:0.00 PAN:0.00
10:47:26.851 -> PX:1.99 PY:30.83 A:30.80  M1:1590.50 M2:-58.74 M3:0.00 PAN:0.00
10:47:26.918 -> PX:2.96 PY:30.77 A:30.72  M1:1590.50 M2:-58.83 M3:0.00 PAN:0.00
10:47:26.986 -> PX:3.94 PY:30.68 A:30.63  M1:1590.50 M2:-58.93 M3:0.00 PAN:0.00
10:47:27.053 -> PX:4.91 PY:30.60 A:30.55  M1:1590.50 M2:-59.01 M3:0.00 PAN:0.00
10:47:27.121 -> PX:5.89 PY:30.52 A:30.47  M1:1590.50 M2:-59.11 M3:0.00 PAN:0.00
10:47:27.188 -> PX:6.87 PY:30.43 A:30.38  M1:1590.50 M2:-59.97 M3:0.00 PAN:0.00
10:47:27.258 -> PX:7.85 PY:30.35 A:30.30  M1:1590.50 M2:-59.30 M3:0.00 PAN:0.00

Speed Bump #1: When I add the statement #include “heltec.h” to the Arduino “BOMB” sketch, it starts up and executes fine. But when I attempt to execute an OLED call to
Heltec.display->clear();, the serial monitor log contains “gibberish” endlessly repeating this exception error (29) sequence over and over again:

08:40:32.661 -> Exception (29):
08:40:32.694 -> epc1=0x4000e1b2 epc2=0x00000000 epc3=0x00000000 excvaddr=0x00000000 depc=0x00000000
08:40:32.763 -> 
08:40:32.763 -> >>>stack>>>
08:40:32.797 -> 
08:40:32.797 -> ctx: cont
08:40:32.797 -> sp: 3ffffd90 end: 3fffffc0 offset: 01a0
08:40:32.831 -> 3fffff30:  3fffdad0 3ffeef8c 00002580 402029c9  
08:40:32.898 -> 3fffff40:  00000040 00000000 feefeffe feefeffe  
08:40:32.932 -> 3fffff50:  feefeffe feefeffe feefeffe feefeffe  
08:40:33.000 -> 3fffff60:  feefeffe feefeffe feefeffe feefeffe  
08:40:33.034 -> 3fffff70:  feefeffe feefeffe feefeffe feefeffe  
08:40:33.100 -> 3fffff80:  feefeffe feefeffe feefeffe feefeffe  
08:40:33.134 -> 3fffff90:  feefeffe feefeffe feefeffe 3ffef0b8  
08:40:33.203 -> 3fffffa0:  3fffdad0 00000000 3ffef078 40206198  
08:40:33.237 -> 3fffffb0:  feefeffe feefeffe 3ffe84fc 40101591  
08:40:33.306 -> <<<stack<<<

There is some apparent code collision between the Blynk code and the HelTec OLED code. HelTec responded to my inquiry immediately; I will let them see what they can find, and will just concentrate on finishing off the App.

What does your exception decoder say?
Is there any chance that it’s a power supply issue?

Pete.

Hey, Pete, thanks for looking. The HelTec board works fine running my Blynk code, and the OLED display runs fine standalone using the standard ESP8266 library instead of the BlynkESP8266 library, so I am not suspecting a power supply issue right now. HelTec gave me a direct contact to work with at their factory; they were very responsive to my inquiry.

Exception 29 is well-documented on the Internet: ESP8266 Exception 29.
Exception 29 is ‘storeprohibitedcause,’ meaning that code tried to write to a protected area in memory. The value given for “excvaddr” shows the virtual memory address that caused the exception.
I also saw suggestions that it was caused by unstable power. I’m not suspecting this.

Speed Bump detour; back on track again. Changed the order of initialization of the OLED code libraries and Blynk code libraries in the sketch code startup{}, and downloaded the latest version of <heltec.h>. Here is Blynk running on the HelTec board. I really like their WiFi Kit 8 OLED display over the standard Arduino 16X2 LCD display.

Updated project budget:

The Arduino Zero Devia controller board costs $38, HelTec ESP8266 OLED display $12, bi-directional 3.3V-5V Voltage Level shifter $0.75, Blue 3mm LED - $0.10, 220 ohm 1/8 watt resistor $0.10, custom PCB to hold all the parts for $2+shipping – I used JLCPCB, Blynk “Energy Credits” (widgets) for the Blynk App UI $7, and an optional rechargeable 12V 2A lithium battery $53. Also add 2 4-pin header cables @ $0.80 each to connect the Devia Controller to the Heltec PCB board, or just use good PCB jumper wires like Schmartboard ones. You can also download their free Arduino sketch slider code from their website.

The JJRobots Camera Slider comes as a kit with all slider parts and includes an Arduino Zero Devia Controller; the entry price is just $72. You need to add these “optional” parts to complete the kit: 3D-plastic printed parts, a 12V 2A power supply (USA/EUR/UK plug type), camera swivel mount, 700 mm 2020 BLACK anodized aluminum v-slot profile rail, and 2 x NEMA 17 stepper motor (MT-1703HS168A) + 75 cm + 14 cm cable (with plug and play connectors). My total price for everything was $194 which included fast Fedex shipping from the UK.

The Neewer 1000mm manual camera slider is available for $86 on Amazon. Add a NEMA-17 stepper motor, motor bracket, 2 pulleys, a timing belt, cables, Arduino Devia controller, two stepper cables and a pulley bracket

1 Like

Three … two … one … ignition !!

With the latest fix from HelTec to get Blynk running in their WiFi Kit 8 ESP8266 OLED board, everything is working now, pretty much the way I had envisioned it. My Blynk App talks to to the HelTec message broker from the Blynk Cloud, which in turn sends the commands to the Arduino Zero stepper-motor controller. The 1st picture is a screenshot of the Blynk App UI, The 2nd picture shows the Blynk logon to the Cloud when the HelTec powers up.

The main reason for using the HelTec ESP8266 was to send positional telemetry to its OLED display in real-time as the slider moves down the rail. The Arduino Zero Devia controller has unused pins; one analog and one digital. Everything else connects to a servo or stepper. I reprogrammed digital pin D13 using firmware commands to work as a serial UART; it worked, but pin D10 isn’t working yet to get the telemetry back from the Zero. Hopefully just more testing and debug needed.

The HelTec OLED board takes only 4 wires to connect: Vcc, Gnd, Data In and Data Out. It looks like an ESP8266 to the Arduino IDE. The Blynk cellphone App sends camera slider commands up to the Blynk Cloud and then back to a receiving device, kinda like a moon-bounce. If you want to take your camera slider into the field away from your home WiFi router, enable your cellphone hotspot mode and use it as the Blynk router instead. You’ll also need a rechargeable 12V 2A lithium battery to drive the electronics and the NEMA stepper motors if you use your slider in the field.

The third picture shows the Devia Controller board inside a standard Arduino crystal project case, I don’t think air flow will be adequate with the top lid closed even though I am using ultra-large blue-aluminum 3D plastic printing heatsinks instead of much smaller plain ones. I will have to rethink this …
The fourth picture is a prototype PCB plugboard with the HelTec OLED display and its logic.

=> New seven-minute Blynk project video: Blynk Camera Slider Project 2020-0607


2 Likes

Stepper Motor Drivers – technology shift …
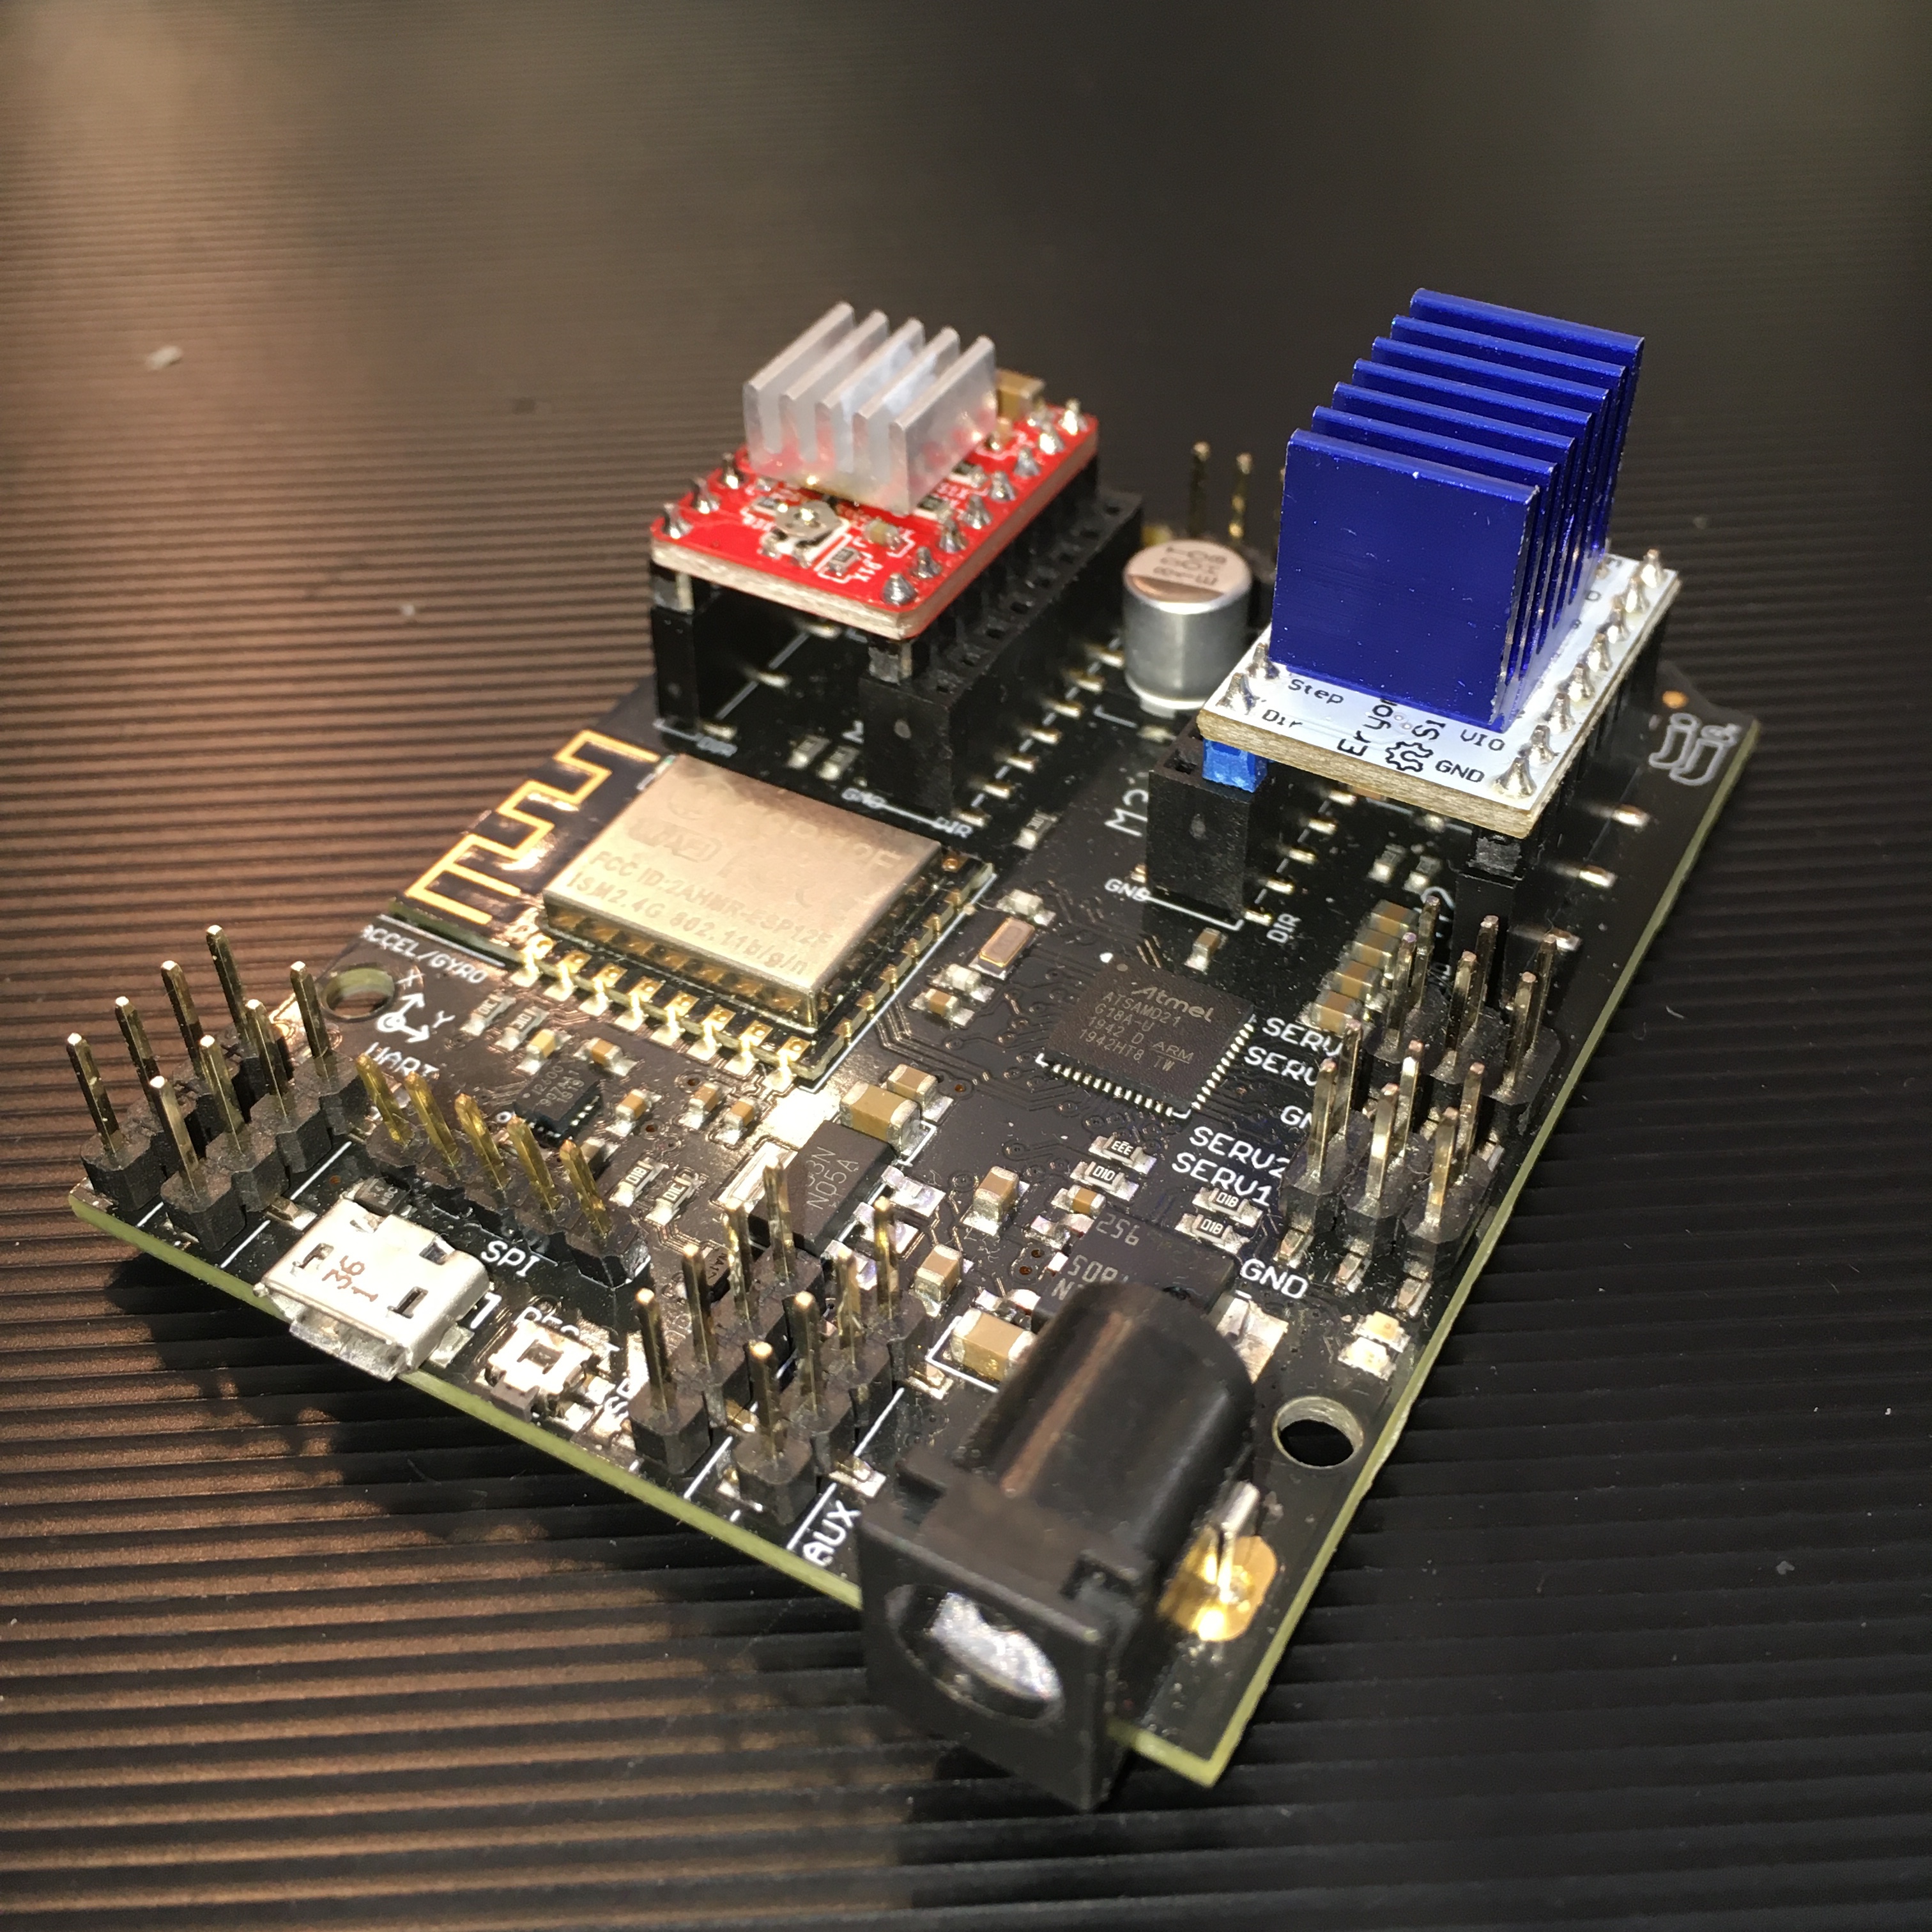
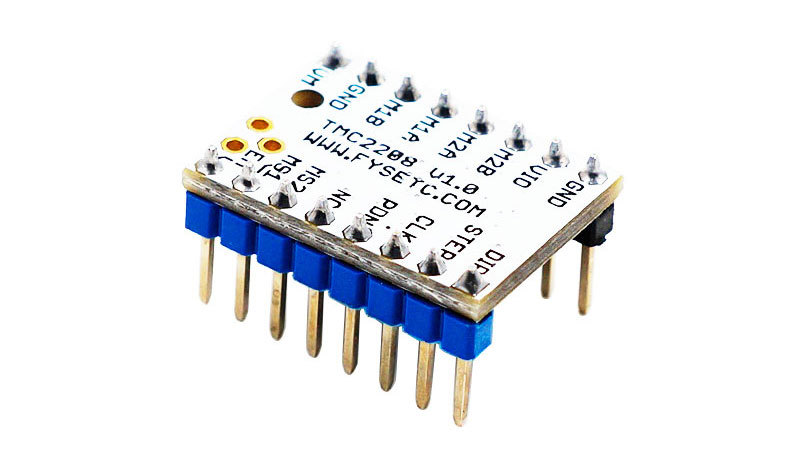
The older classic A4988 board has been updated with the newer TMC2208 board. Pictured below is a Devia Controller board with two stepper motor drivers installed for comparison. The red one on the left with the small aluminum heatsink is the older A4988; the white one on the right with the larger blue aluminum heatsink is the TMC2208. If you made a camera slider in the past and thought it seemed “noisy” while running, the newer ultra-quiet driver can help.
See the product Wiki website at: TMC2208 Wiki.

1 Like

Blynk Message Broker board evolution: from breadboard to prototype shield to AutoDesk EAGLE PCB layout. Could not find a board definition layout for the HelTec Wifi Kit 8 board anywhere on the Internet (it’s too new), so I improvised. Just take the standard layout for an Arduino NANO board and use it instead. There are fewer pins used, but otherwise they have the same pin layout, pin size, pin spacing, etc. I just relabeled the original pins to match the HelTec board. Hopefully, an Eagle part definition for the Heltec WiFi Kit 8 board will become available soon and I can use it next time instead of the hacked NANO layout and pinout definitions again.


2020-06-22_8-36-23 BOMB board 1D

1 Like

PCBs received 6 days early! Will figure out prototype packaging for both my JJRobots and Neewer camera sliders to hold the Arduino Devia board and the Blynk Messenger board together as a rigid unit. Will probably use hex standoffs.

Pictures 2, 3, and 4 are a preview with the Heltec OLED display mounted to the PCB board with a minimal bunch of components. The wiring harness connects everything to the Devia slider controller 4-pin headers at J16 and J17 so that Blynk can communicate with it to control the stepper-motors. The harness curls up nicely and fits inside the crystal acrylic plexiglass project case.

NOTE - the stepper headers on the Devia have only 4 solder pads each; be extremely careful when disconnecting cables and wires that you don’t pull up them up from the PCB board. I use needle-nose pliers on the headers to solve this. JJR is epoxying the headers until their next board production run.

There are 4 packaging scenarios – 2 camera sliders (JJRobots and Neewer), and two Blynk message boards. If you use the Heltec board, stack it on top of the Devia with taller spacers to allow adequate ventilation for the stepper-driver heatsinks below.

If the cool Heltec WiFi Kit 8 OLED display isn’t your thing, just use a Wemos D1 Mini as the Blynk ESP8266 message board. It has the same standard Arduino drill hole layout as the Devia controller, so mount both of them on hex standoffs with adequate room to connect the two boards. Stack the Devia on top for better ventilation of the stepper-driver heatsinks. Here are four pics of this configuration:

This is the JJRobots Camera Slider with the Devia Controller mounted on the stepper-motor rail end on its side underneath an orange 3D-printed plastic cover. To add Blynk connectivity, first unscrew two Philips screws to release the cover. Attach the Heltec PCB board mounted on aluminum hex standoffs as shown in two of the existing screw holes. Instead of using the original bulky wiring harness again, this time I used Schmartboard jumpers to connect to power, data, and ground between the boards.

If you choose to go with a generic ESP8266 for the Blynk message broker board instead of the Heltec, here is a Wemos D1 Mini stacked beneath the Devia Controller board on the JJRobots slider using hex standoffs. You can even install their original orange 3D-printed plastic cover right back on the Devia Controller. The Wemos D1 has the same board dimensions & drill holes, so this is an easy solution.

1 Like

This is the Arduino sketch code used to communicate between the Blynk On-Line Message Broker “BOMB” (NodeMCU, Wemos D1Mini, or Heltec WiFiKit8 configuration) and the Arduino Zero stepper-motor “Devia” controller. It receives commands from the Blynk cellphone App via the Blynk Cloud, and sends them to the Devia. Maybe not the final version, but close enough to see what is going on under the covers. This code matches the Blynk App UI screenshot previously posted on this project thread.

/* ************************************************************
  Blynk is a platform with iOS and Android apps to control the
  Arduino and Raspberry Pi for the IOT (Internet of Things).
  You can easily build graphic interfaces for all your
  projects by simply dragging and dropping widgets.

    Downloads, docs, tutorials: http://www.blynk.cc
    Sketch generator:           http://examples.blynk.cc
    Blynk community:            http://community.blynk.cc
    Follow us:                  http://www.fb.com/blynkapp
                                http://twitter.com/blynk_app

  The Blynk library is licensed under MIT license;
  Therefore, this example code is also in the public domain.
 *************************************************************
  WARNING!
  It's very tricky to get it working. Please read this article:
  http://help.blynk.cc/hardware-and-libraries/arduino/esp8266-with-at-firmware
  This example shows how values can be pushed from Arduino to
  the Blynk App.
  NOTE: BlynkTimer provides SimpleTimer functionality:
  http://playground.arduino.cc/Code/SimpleTimer
 ************************************************************ */

// Blynk On-line Message Broker (The "BOMB")
// License: Open Software GPL License v2
// Copyright (C) 2020 All Rights Reserved
// Author: Michael Stoddard (BaxRoad.com)
// Timeline:
// 2020-0401 Inception
// 2020-0422 Elaboration
// 2020-0423 Construction
// 2020-0501 Software Transition
// 2020-0701 Support
// Updates:
// 2020-0609 Add BXTD Time Delay and X5CS Speed SET messages
// 2020-0609 Add Heltec display invert & CLEAR commands
// 2020-0621 Use #ifdef conditional compilation for the boards

// Arduino IDE: compiled with 1.8.13

// THIS SOFTWARE IS PROVIDED "AS IS" AND THERE IS NO 
// EXPRESS OR IMPLIED WARRANTIES WHATSOEVER WITH RESPECT TO 
// ITS FUNCTIONALITY, OPERABILITY, OR USE, INCLUDING, WITHOUT 
// LIMITATION, ANY IMPLIED WARRANTIES OF MERCHANTABILITY, 
// FITNESS FOR A PARTICULAR PURPOSE, OR INFRINGEMENT. 
// THERE SHALL BE NO LIABILITY WHATSOEVER FOR ANY DIRECT, 
// INDIRECT, CONSEQUENTIAL, INCIDENTAL OR SPECIAL DAMAGES, 
// INCLUDING, WITHOUT LIMITATION, LOST REVENUES, LOST PROFITS, 
// LOSSES RESULTING FROM BUSINESS INTERRUPTION OR LOSS OF DATA, 
// REGARDLESS OF THE FORM OF ACTION OR LEGAL THEORY UNDER WHICH
// THE LIABILITY MAY BE ASSERTED, EVEN IF ADVISED OF THE 
// POSSIBILITY OR LIKELIHOOD OF SUCH DAMAGES.

/* Comment next line out to disable prints and save space */
#define BLYNK_PRINT Serial
#define BLYNK_DEBUG // Debug - enable verbose mode
#define BLYNK_HEARTBEAT 30
#define BLYNK_NO_FLOAT // Disable floating point operations

// Sketch definitions to run in Arduino:
//#include <ESP8266_Lib.h>
//#include <BlynkSimpleShieldEsp8266.h>
//---------------------------//
// Sketch definitions to run in ESP8266:
#include <ESP8266WiFi.h>
#include <BlynkSimpleEsp8266.h>

#define MSGMAXLEN 20 // Max Devia Controller App message length
#include "heltec.h" // if using Heltec board
#define D2 2

// Hardware Serial on Mega, Leonardo, Micro...
// #define EspSerial Serial1
// -------------------------------------- //
// or Software Serial on Uno, Nano...
#include <SoftwareSerial.h>
SoftwareSerial ESPSerial(11, 10); // Software Serial RX, TX

// Attach virtual serial terminal to Virtual Pin V19
WidgetTerminal terminal(V19);

//ESP8266 wifi(&EspSerial);
//BlynkTimer timer;

// Define and set board definition for Blynk:
String Board = "Heltec WiFi Kit 8 ";
#define WiFiKit8
// or
//String Board = "NodeMCU ESP8266 ";
//#define NodeMCU
// or
//String Board = "Wemos D1 Mini ";
//#define WemosD1Mini

String BlynkOnline = "Blynk On-line Message Broker";
String Version = Board + "2020-0621"; // compile date

bool object_tracking = false;
bool delayed_start = false;
bool display_inverted = false;
unsigned int speed_time = 15;
unsigned int delay_time = 15;
unsigned int rail_length = 600;
unsigned int xaxis_length = 500;
unsigned int yaxis_length = 300;
unsigned int zaxis_tilt = 0;

char prbuff[100];
char packetBuffer[MSGMAXLEN];

// This function sends Arduino's up-time every X seconds to
// Virtual Pin (21). In the app, the Widget's reading frequency
// should be set to PUSH. This means that you define how often
// to send data to Blynk App.
//void myTimerEvent()
//{
//   You can send any value at any time.
//   Don't send more that 10 values per second.
//   Blynk.virtualWrite(V21, millis() / 1000);
//}
 
// The functions listed below will be called every time
// widgits in the Blynk app write values to their Virtual Pin.

BLYNK_WRITE(V0) // "0" -- Object Tracking
{
  int pinValue = param.asInt(); // assigning incoming value
  // You can also use:
  // String i = param.asStr();
  // double d = param.asDouble();
  Serial.print("V0 Button value is: ");
  Serial.println(pinValue);
  terminal.print("Object Tracking is set to: ");
  if (pinValue != 0) {
    terminal.println("ON");
    object_tracking = true;
  } else {
    terminal.println("OFF");
    object_tracking = false;
  }
  terminal.flush();
}

BLYNK_WRITE(V1) // "1" -- Delayed Start
{
  int pinValue = param.asInt(); // assigning incoming value
  // You can also use:
  // String i = param.asStr();
  // double d = param.asDouble();
  Serial.print("V1 Button value is: ");
  Serial.println(pinValue);
  terminal.print("Delayed Start is set to: ");
  if (pinValue != 0) {
    terminal.println("ON");
    delayed_start = true;
  } else {
    terminal.println("OFF");
    delayed_start = false;
  }
  terminal.flush();
}

BLYNK_WRITE(V2) // "2" -- Travel Time in seconds
{
  int pinValue = param.asInt(); // assigning incoming value
  // You can also use:
  // String i = param.asStr();
  // double d = param.asDouble();
  Serial.print("V2 Slider value is: ");
  Serial.println(pinValue);
  terminal.print("TRAVEL TIME is set to: ");
  terminal.print(pinValue);
  terminal.println(" seconds");
  terminal.flush();
  speed_time = pinValue;
  sprintf(prbuff, "%04d", speed_time);
  memset(packetBuffer, '0', MSGMAXLEN);
  packetBuffer[0] = 'X';
  packetBuffer[1] = '5';
  packetBuffer[2] = 'C';
  packetBuffer[3] = 'S';
  packetBuffer[16] = prbuff[0];
  packetBuffer[17] = prbuff[1];
  packetBuffer[18] = prbuff[2];
  packetBuffer[19] = prbuff[3];
  ESPSerial.print(packetBuffer);
  memset(prbuff, 0, (sizeof(prbuff)/sizeof(prbuff[0])));
  Serial.println(packetBuffer);
}

BLYNK_WRITE(V3) // "3" -- Time Delay
{
  int pinValue = param.asInt(); // assigning incoming value
  // You can also use:
  // String i = param.asStr();
  // double d = param.asDouble();
  Serial.print("V3 Slider value is: ");
  Serial.println(pinValue);
  terminal.print("TIME DELAY is set to: ");
  terminal.print(pinValue);
  terminal.println(" seconds");
  terminal.flush();
  delay_time = pinValue;
  sprintf(prbuff, "%04d", delay_time);
  memset(packetBuffer, '0', MSGMAXLEN);
  packetBuffer[0] = 'B';
  packetBuffer[1] = 'X';
  packetBuffer[2] = 'T';
  packetBuffer[3] = 'D';
  packetBuffer[16] = prbuff[0];
  packetBuffer[17] = prbuff[1];
  packetBuffer[18] = prbuff[2];
  packetBuffer[19] = prbuff[3];
  ESPSerial.print(packetBuffer);
  memset(prbuff, 0, (sizeof(prbuff)/sizeof(prbuff[0])));
  Serial.println(packetBuffer);
}

BLYNK_WRITE(V4) // "4" -- Rail Length
{
  int pinValue = param.asInt(); // assigning incoming value
  // You can also use:
  // String i = param.asStr();
  // double d = param.asDouble();
  Serial.print("V4 Slider value is: ");
  Serial.println(pinValue);
  terminal.print("RAIL LENGTH is set to: ");
  terminal.print(pinValue);
  terminal.println(" mm");
  rail_length = pinValue;
  terminal.flush();
}

BLYNK_WRITE(V5) // "5" -- X-Axis Length
{
  int pinValue = param.asInt(); // assigning incoming value
  // You can also use:
  // String i = param.asStr();
  // double d = param.asDouble();
  Serial.print("V5 Slider value is: ");
  Serial.println(pinValue);
  terminal.print("X-AXIS LENGTH is set to: ");
  terminal.print(pinValue);
  terminal.println(" mm");
  xaxis_length = pinValue;
  terminal.flush();
}

BLYNK_WRITE(V6) // "6" -- Y-Axis Length
{
  int pinValue = param.asInt(); // assigning incoming value
  // You can also use:
  // String i = param.asStr();
  // double d = param.asDouble();
  Serial.print("V6 Slider value is: ");
  Serial.println(pinValue);
  terminal.print("Y-AXIS HEIGHT is set to: ");
  terminal.print(pinValue);
  terminal.println(" mm");
  yaxis_length = pinValue;
  terminal.flush();
}

BLYNK_WRITE(V7) // "7" -- Z-Axis Tilt
{
  int pinValue = param.asInt(); // assigning incoming value
  // You can also use:
  // String i = param.asStr();
  // double d = param.asDouble();
  Serial.print("V7 Slider value is: ");
  Serial.println(pinValue);
  terminal.print("Z-AXIS tilt is set to: ");
  terminal.print(pinValue);
  terminal.println(" degrees");
  zaxis_tilt = pinValue;
  terminal.flush();
}

BLYNK_WRITE(V8) // "8" -- START
{
  if ( param.asInt() != 0 ) { // debounce
    int pinValue = param.asInt(); // assigning incoming value
    // You can also use:
    // String i = param.asStr();
    // double d = param.asDouble();
    Serial.print("V8 Button value is: ");
    Serial.println(pinValue);
    terminal.println("");
    terminal.println("START!");
    terminal.print("Time Delay ");
    if (delayed_start) {
      //terminal.print("ON for ");
      terminal.print(delay_time);
      terminal.print(" seconds");
    } else {
      terminal.print("off  ");
    }
    terminal.println("");
    terminal.print("Object Tracking ");
    if (object_tracking) {
      terminal.print("ON -- Angle is ");
      volatile int32_t object_angle = atan2(float(yaxis_length), float(xaxis_length)) * 180 / PI;
      terminal.print(object_angle); terminal.print(" degrees");
    } else {
      terminal.print("off");
    }
    terminal.println("");
    terminal.print("Rail Length "); terminal.print(rail_length); terminal.print("mm ");
    terminal.print(" ");
    terminal.print("Z-axis Tilt "); terminal.print(zaxis_tilt); terminal.print(" degrees");
    terminal.println("");
    terminal.print("X-axis Length "); terminal.print(xaxis_length); terminal.print("mm ");
    terminal.print(" ");
    terminal.print("Y-axis Height "); terminal.print(yaxis_length); terminal.print("mm ");
    terminal.println("");
    unsigned int t = speed_time;
    unsigned int s = t % 60;
    t = (t - s) / 60;
    unsigned int m = t % 60;
    t = (t - m) / 60;
    unsigned int h = t;
    terminal.print("Travel Time ");
    if (h > 0) {
      terminal.print(h);
      terminal.print(" Hour(s) ");
    }
    if (m > 0) {
      terminal.print(m);
      terminal.print(" Mins ");
    }
    terminal.print(s); terminal.print(" Seconds");
    terminal.println("");
    terminal.flush();
    if (delayed_start == true) // start with delay
    {
      terminal.println("START with DELAY");
      terminal.flush();
      memset(packetBuffer, '0', MSGMAXLEN);
      packetBuffer[0] = 'X';
      packetBuffer[1] = '3';
      packetBuffer[2] = 'C';
      packetBuffer[3] = 'S';
        sprintf(prbuff, "%04d", rail_length);
        packetBuffer[4] = prbuff[0];
        packetBuffer[5] = prbuff[1];
        packetBuffer[6] = prbuff[2];
        packetBuffer[7] = prbuff[3];
          sprintf(prbuff, "%04d", xaxis_length);
          packetBuffer[8] = prbuff[0];
          packetBuffer[9] = prbuff[1];
          packetBuffer[10] = prbuff[2];
          packetBuffer[11] = prbuff[3];
            sprintf(prbuff, "%04d", yaxis_length);
            packetBuffer[12] = prbuff[0];
            packetBuffer[13] = prbuff[1];
            packetBuffer[14] = prbuff[2];
            packetBuffer[15] = prbuff[3];
              sprintf(prbuff, "%04d", speed_time);
              packetBuffer[16] = prbuff[0];
              packetBuffer[17] = prbuff[1];
              packetBuffer[18] = prbuff[2];
              packetBuffer[19] = prbuff[3];
      if (object_tracking == false) {
        for (int j=8; j<16; j++) {
            packetBuffer[j] = '0';  
        }
      }
      ESPSerial.print(packetBuffer);
      memset(prbuff, 0, (sizeof(prbuff)/sizeof(prbuff[0])));
      Serial.println(packetBuffer); 
    }
    else
    {
      terminal.println("START with no delay");
      terminal.flush();
      memset(packetBuffer, '0', MSGMAXLEN);
      packetBuffer[0] = 'X';
      packetBuffer[1] = '1';
      packetBuffer[2] = 'C';
      packetBuffer[3] = 'S';
        sprintf(prbuff, "%04d", rail_length);
        packetBuffer[4] = prbuff[0];
        packetBuffer[5] = prbuff[1];
        packetBuffer[6] = prbuff[2];
        packetBuffer[7] = prbuff[3];
          sprintf(prbuff, "%04d", xaxis_length);
          packetBuffer[8] = prbuff[0];
          packetBuffer[9] = prbuff[1];
          packetBuffer[10] = prbuff[2];
          packetBuffer[11] = prbuff[3];
            sprintf(prbuff, "%04d", yaxis_length);
            packetBuffer[12] = prbuff[0];
            packetBuffer[13] = prbuff[1];
            packetBuffer[14] = prbuff[2];
            packetBuffer[15] = prbuff[3];
              sprintf(prbuff, "%04d", speed_time);
              packetBuffer[16] = prbuff[0];
              packetBuffer[17] = prbuff[1];
              packetBuffer[18] = prbuff[2];
              packetBuffer[19] = prbuff[3];
      if (object_tracking == false) {
        for (int j=8; j<16; j++) {
            packetBuffer[j] = '0';  
        }
      }
      ESPSerial.print(packetBuffer);
      memset(prbuff, 0, (sizeof(prbuff)/sizeof(prbuff[0])));
      Serial.println(packetBuffer); 
    }
  }
}

BLYNK_WRITE(V9) // "9" -- STOP
{
  if ( param.asInt() != 0 ) { // debounce
    int pinValue = param.asInt(); // assigning incoming value
    // You can also use:
    // String i = param.asStr();
    // double d = param.asDouble();
    Serial.print("V9 Button value is: ");
    Serial.println(pinValue);
    terminal.println("STOP");
    terminal.flush();
    memset(packetBuffer, '0', MSGMAXLEN);
    packetBuffer[0] = 'X';
    packetBuffer[1] = '0';
    packetBuffer[2] = 'C';
    packetBuffer[3] = 'S';
    ESPSerial.print(packetBuffer);
    memset(prbuff, 0, (sizeof(prbuff)/sizeof(prbuff[0])));
    Serial.println(packetBuffer);
  }
}

BLYNK_WRITE(V10) // "10" -- Continue
{
  if ( param.asInt() != 0 ) { // debounce
    int pinValue = param.asInt(); // assigning incoming value from pin V1 to a variable
    // You can also use:
    // String i = param.asStr();
    // double d = param.asDouble();
    Serial.print("V10 Button value is: ");
    Serial.println(pinValue);
    if (delayed_start == true) // continue with delay
    {
      terminal.println("CONTINUE with DELAY");
      terminal.flush();
      memset(packetBuffer, '0', MSGMAXLEN);
      packetBuffer[0] = 'X';
      packetBuffer[1] = '4';
      packetBuffer[2] = 'C';
      packetBuffer[3] = 'S';
        sprintf(prbuff, "%04d", rail_length);
        packetBuffer[4] = prbuff[0];
        packetBuffer[5] = prbuff[1];
        packetBuffer[6] = prbuff[2];
        packetBuffer[7] = prbuff[3];
          sprintf(prbuff, "%04d", xaxis_length);
          packetBuffer[8] = prbuff[0];
          packetBuffer[9] = prbuff[1];
          packetBuffer[10] = prbuff[2];
          packetBuffer[11] = prbuff[3];
            sprintf(prbuff, "%04d", yaxis_length);
            packetBuffer[12] = prbuff[0];
            packetBuffer[13] = prbuff[1];
            packetBuffer[14] = prbuff[2];
            packetBuffer[15] = prbuff[3];
              sprintf(prbuff, "%04d", speed_time);
              packetBuffer[16] = prbuff[0];
              packetBuffer[17] = prbuff[1];
              packetBuffer[18] = prbuff[2];
              packetBuffer[19] = prbuff[3];
      if (object_tracking == false) {
        for (int j=8; j<16; j++) {
            packetBuffer[j] = '0';  
        }
      }
      ESPSerial.print(packetBuffer);
      memset(prbuff, 0, (sizeof(prbuff)/sizeof(prbuff[0])));
      Serial.println(packetBuffer);  
    }
    else // continue with no delay
    {
      terminal.println("CONTINUE with no delay");
      terminal.flush();
      memset(packetBuffer, '0', MSGMAXLEN);
      packetBuffer[0] = 'X';
      packetBuffer[1] = '2';
      packetBuffer[2] = 'C';
      packetBuffer[3] = 'S';
        sprintf(prbuff, "%04d", rail_length);
        packetBuffer[4] = prbuff[0];
        packetBuffer[5] = prbuff[1];
        packetBuffer[6] = prbuff[2];
        packetBuffer[7] = prbuff[3];
          sprintf(prbuff, "%04d", xaxis_length);
          packetBuffer[8] = prbuff[0];
          packetBuffer[9] = prbuff[1];
          packetBuffer[10] = prbuff[2];
          packetBuffer[11] = prbuff[3];
            sprintf(prbuff, "%04d", yaxis_length);
            packetBuffer[12] = prbuff[0];
            packetBuffer[13] = prbuff[1];
            packetBuffer[14] = prbuff[2];
            packetBuffer[15] = prbuff[3];
              sprintf(prbuff, "%04d", speed_time);
              packetBuffer[16] = prbuff[0];
              packetBuffer[17] = prbuff[1];
              packetBuffer[18] = prbuff[2];
              packetBuffer[19] = prbuff[3];
      if (object_tracking == false) {
        for (int j=8; j<16; j++) {
            packetBuffer[j] = '0';  
        }
      }
      ESPSerial.print(packetBuffer);
      memset(prbuff, 0, (sizeof(prbuff)/sizeof(prbuff[0])));
      Serial.println(packetBuffer);
    }
  }
}

BLYNK_WRITE(V19) // Virtual Terminal
{
  while(true) {
    if (String(param.asStr()) == String("clear")) {
      terminal.clear(); // Clear the Blynk terminal
      terminal.println(BlynkOnline + " (the BOMB)");
      terminal.println(Version + " BaxRoad.com");
      terminal.println("") ;
      terminal.flush();
      #ifdef WiFiKit8
      Heltec.display->clear(); // Clear the HelTec display
      Heltec.display->drawString(0, 0, BlynkOnline);
      Heltec.display->drawString(0, 10, Version);
      Heltec.display->display();
      #endif
      break;
      }

    #ifdef WiFiKit8
    if (String(param.asStr()) == String("invert")) {
      if (!display_inverted) { // only works once ...
        Heltec.display->clear(); // Clear the HelTec display
        Heltec.display->init(); // invert the display 180 degrees
        Heltec.display->drawString(0, 0, BlynkOnline);
        Heltec.display->drawString(0, 10, Version);
        Heltec.display->display();
        display_inverted = true;
        terminal.println("OK") ;
        terminal.flush();
        }
        break;
      }
    #endif
    
    if (String(param.asStr()) == String("marco")) {
      terminal.println("You said: 'Marco' !") ;
      terminal.println("I say: 'Polo' !") ;
      terminal.flush();
      break;
      }
      
    terminal.println("  ??") ; // unknown command
    terminal.flush();
    break;
  }
}
  
BLYNK_WRITE(V20) // WiFi Test
{
  if ( param.asInt() != 0 ) { // debounce
    String LocalIP = "IP address: " + WiFi.localIP().toString();
    terminal.println(LocalIP);
    terminal.flush();

    #ifdef WiFiKit8
    Heltec.display->clear(); // Heltec
    Heltec.display->drawString(0, 0, BlynkOnline);
    Heltec.display->drawString(0, 10, Version);
    Heltec.display->drawString(0, 20, LocalIP);
    Heltec.display->display();
    digitalWrite(D2, HIGH); // HelTec but actually the LED is on; this is because
    #endif

    #ifdef WemosD1Mini
    digitalWrite(BUILTIN_LED, LOW); // Wemos Mini
    #endif
    
    #ifdef NodeMCU
    digitalWrite(BUILTIN_LED, LOW);  // NodeMCU - Turn the BLUE LED on (Note that LOW is the voltage level
    #endif
    
    delay(500);             // Wait a bit

    #ifdef NodeMCU
    digitalWrite(BUILTIN_LED, HIGH); // turn the LED off by making the voltage HIGH
    #endif

    #ifdef WemosD1Mini
    digitalWrite(BUILTIN_LED, HIGH); // turn it off
    #endif

    #ifdef WiFiKit8
    digitalWrite(D2,LOW);
    Heltec.display->clear();
    Heltec.display->drawString(0, 0, BlynkOnline);
    Heltec.display->drawString(0, 10, Version);
    Heltec.display->display();
    #endif
    
    int pinValue = param.asInt(); // assigning incoming value from pin V1 to a variable
    // You can also use:
    // String i = param.asStr();
    // double d = param.asDouble();
    memset(packetBuffer, '0', MSGMAXLEN);
    packetBuffer[0] = 'B';
    packetBuffer[1] = 'X';
    packetBuffer[2] = 'W';
    packetBuffer[3] = 'T';
    ESPSerial.print(packetBuffer);
    Serial.println(packetBuffer);
  }
}

void setup()
{
  #ifdef WiFiKit8
  Heltec.begin(true /*DisplayEnable Enable*/, true /*Serial Enable*/);
  #endif
  Serial.begin(9600);  // Start serial port
  delay(1000);
  ESPSerial.begin(9600); // start Devia Controller comm port
  delay(1000);
  Serial.println("");
  Serial.println("Blynk Online Message Broker (the BOMB) BaxRoad.com");

  // Router authentification variables: (use your own)
  char auth[] = "YourAuthString";
  char ssid[] = "YourSSID";
  char pass[] = "YourPassword";
  
  String Connecting = "Connecting to "+ String(ssid);
  Serial.println(Connecting);
  #ifdef WiFiKit8
  //Heltec.display->clear();
  //Heltec.display->init(); // inverts the display if needed
  Heltec.display->drawString(0, 20, Connecting );
  Heltec.display->display();
  #endif
  
  Blynk.begin(auth, ssid, pass); // Fireup the Blynk engine
  delay(1000); // stabilize

  #ifdef WemosD1Mini
  pinMode(BUILTIN_LED, OUTPUT); // Wemos D1 Mini
  digitalWrite(BUILTIN_LED, HIGH); // Turn it off to start
  #endif

  #ifdef NodeMCU
  pinMode(BUILTIN_LED, OUTPUT); // NodeMCU
  digitalWrite(BUILTIN_LED, HIGH); // Turn it off to start
  #endif

  #ifdef WiFiKit8
  pinMode(D2, OUTPUT); // HelTec
  digitalWrite(D2, LOW); // Turn it off to start
  #endif
  
  // Setup a function to be called every one second if needed
  //timer.setInterval(1000L, myTimerEvent);

  terminal.clear();
  terminal.println(BlynkOnline + " (the BOMB)");
  terminal.println(Version + " BaxRoad.com");
  terminal.println("") ;
  terminal.flush();

  #ifdef WiFiKit8
  Heltec.display->clear();
  Heltec.display->drawString(0, 0, BlynkOnline);
  Heltec.display->drawString(0, 10, Version);
  String LocalIP = "IP address: " + WiFi.localIP().toString();
  Heltec.display->drawString(0, 20, LocalIP);
  Heltec.display->display();
  delay(2000);
  Heltec.display->clear();
  Heltec.display->drawString(0, 0, BlynkOnline);
  Heltec.display->drawString(0, 10, Version);
  Heltec.display->display();
  #endif
  
  //Serial.swap(); // $Debug -- move Rx/Tx connections
}

void loop()
{

  if (Serial.available()) // Check if incoming data is available
  {
    //Serial.print("$");
    byte byteRead = Serial.read(); // Read the most recent byte
    if (byteRead != 0x0D) {
      Serial.print(char(byteRead)); // Echo the byte
      ESPSerial.print(char(byteRead)); // Echo the byte to Serial2
      if (byteRead == 0x0A) {
          Serial.println("");  // force a linefgeed
      }
    }
  }

  if (ESPSerial.available()) // Check if incoming data is available
  {
    //Serial.print("$");
    byte byteRead = ESPSerial.read(); // Read the most recent byte
    if (byteRead != 0x0D) {
      Serial.print(char(byteRead)); // Echo the byte
      ESPSerial.print(char(byteRead)); // Echo the byte to Serial2
      if (byteRead == 0x0A) {
          Serial.println("");  // force a linefgeed
      }
    }
  }

  Blynk.run();   // Keep Blynk running; refresh
  //timer.run(); // Initiate BlynkTimer here if needed
}

// Message Definitions:
// ===================
// Message J5CS : Change speed camera slider + 4 params ()
// Message J4CS : Continue with delay camera slider + 4 params ()
// Message J3CS : Start from init with delay camera slider + 4 params ()
// Message J2CS : Continue camera slider + 4 params ()
// Message J1CS : Start from init camera slider + 4 params ()
// Message J0CS : STOP
// Message BXTD : Set Time Delay
// Message BXWT : WiFi Test for Blynk-to-Bomb connectivity

To Blynk, or not to Blynk; that is the question. There are pluses and minuses.

The camera slider App provided by many manufacturers is free, but rarely comes with source code. If you want to use Blynk instead like I did for this project, my costs here were an additional $62. What are some reasons to make you want to switch? For many users, the original cellphone App is just fine. But with Blynk, you can custom-tailor the App.

  1. The manufacturer cellphone App cannot be modified as far as layout, functionality, and usability. On the other hand, the Blynk App allows new widgets (sliders, buttons, joysticks, virtual terminals, LEDs, charts, etc.) to be added, deleted, or reconfigured.

  2. The manufacturer App allows parameters to be reconfigured (rail length, distance to object, and height to object), but must be re-entered each time you turn the power on. Blynk allows you the ability to set parameters offline in edit mode and lock them, so after reconfiguration you are ready to hit the [start] button immediately.

  3. The manufacturer App works pretty much line-of-sight using BlueTooth or Wifi. Blynk allows you to be in one location and control a slider in the next room, next city, or anywhere in the world for that matter. That’s the IOT (Internet of Things) philosophy; sensor data can be received and re-transmitted to anywhere in the world from the Blynk Cloud.

  4. One Blynk App can be used with different sliders instead of needing a different cellphone App for each one. I have two different sliders, and can control either one from the same Blynk App.

  5. Like any Internet-based server, the Blynk Cloud can get busy every once in awhile; you will see a short lag time between button presses on the Blynk App and the response from the camera slider. Press the WiFi Test blue button on the App; you should see an immediate response (blue LED flash) on the Wemos or Heltec board. If it doesn’t come along in a few seconds, then check to see if you are still online as indicated in the upper right-hand corner of the Blynk App.

This is not the end of the list of advantages that outweigh the additional cost. I’m sure there are many more. Hit me up with your reasons if you decide to switch to Blynk.

1 Like

@mstoddardthanks for the tip on those new drivers. Got mine and swapped out old ones and yes they are extremely quiet

1 Like

Are we good to go now? This was as easy as interfacing an Arduino to a crockpot …

:joy::rofl: you win I loooooose!

Kidding aside. Good project and documentation! :+1:t3:

1 Like

Final project video: Blynk Camera Slider 2020-0701

The Wemos D1 Mini CH340 ESP8266 Arduino-compatible board is available for $5 from China on eBay. If you have a JJRobots slider, you can add immediate Blynk connectivity with the Wemos board, a few jumpers, some hex standoffs and nuts, and still use their orange 3D-printed plastic cover. The Wemos board runs off of the same power supply as the Devia board. Just be sure your 12Volt 2Amp supply plugs into the Devia controller to power the steppers, with a 5V feed via jumpers to the Wemos board.

Hello @mstoddard ,

I have the Devia Board have it running as the Camera Slider from JJRobotics and would like to use it with the Blynk app.

Can you provide some information or direction on how to get the Devia board connected to Blynk?

Thanks!

Hi; this project thread pretty well enumerates all the steps I went thru to connect the JJRobotics Devia board to a message -broker shield I designed for the HelTec display. This was all of course for the old Blynk IOT service before the migration to the new 2.0 IOT service. Now that the new 2.0 Blynk code seems to have stabilized and the App is working, I am migrating the code for my original first Blynk project I did for a remote controlled digital salt lamp controller also on this board on a different thread here IR Transceiver using Blynk .

The Fritzing diagram here on " Arduino-based Camera Slider project using Blynk" at about frame 9 on this thread shows a pretty good block diagram of everything; the iPhone Blynk App, the HelTec ESP8266 OLED display running my sketch to talk to the Devia controller, and the stepper motors.