The following compiles with CHANGE or RISING (normally RISING is better).
Commented out ESP8266 wifi(EspSerial) and placed #include <SimpleTimer.h> after #include <BlynkSimpleEsp8266.h>. Don’t think you need #include <SPI.h> either but I have left it in.
#define BLYNK_PRINT Serial
#include <SPI.h>
//#include <Ethernet.h>
//#include <BlynkSimpleEthernet.h>
#include <ESP8266WiFi.h>
#include <BlynkSimpleEsp8266.h>
#include <SimpleTimer.h>
char auth[] = "***************";
SimpleTimer timer;
//ESP8266 wifi(EspSerial);
void setup()
{
    Serial.begin(9600);
Blynk.begin(auth, "**********", "**********");
//Blynk.begin(auth);
  while (Blynk.connect() == false) {
    // Wait until connected
  }
  // Notify immediately on startup
  Blynk.notify("Device started");
  // Setup a function to be called every minute
// timer.setInterval(60000L, notifyUptime);
  // Setup notification button on pin 5
  pinMode(5, INPUT_PULLUP);
  // Attach pin 5 interrupt to our handler
  attachInterrupt(digitalPinToInterrupt(5), notifyOnButtonPress, RISING);
}
void notifyUptime()
{
  long uptime = millis() / 60000L;
  // Actually send the message.
  // Note:
  //   We allow 1 notification per minute for now.
  Blynk.notify(String("Running for ") + uptime + " minutes.");
}
void notifyOnButtonPress()
{
  // Invert state, since button is "Active LOW"
  int isButtonPressed = !digitalRead(5);
  if (isButtonPressed) {
    Serial.println("Button is pressed.");
    Blynk.notify("Yaaay... button is pressed!");
  }
}
void loop()
{
  Blynk.run();
  timer.run();
}
It’ll declare the function you made so the program knows it exists. Sometimes it’s needed (and truth be told, it’s nicer in terms of programming neat-ness : ) )
Yes there was a “feature” introduced around version 1.6.5 whereby the functions have to be in a specific order. They quickly realised this was a backward step and it was fixed in later versions.
It seems endless story …
I updated Java and now also Arduino IDE 1.6.9 …
They are not errors in the compilation … but when I press the button Wemos will disconnect …
My button is connected to GND and pin D4 (2 Arduino IDE)
I tried with two Wemos boards with the same result
#define BLYNK_PRINT Serial
#include <SPI.h>
#include <ESP8266WiFi.h>
#include <BlynkSimpleEsp8266.h>
#include <SimpleTimer.h>

char auth[] = "*************************";

SimpleTimer timer;
//ESP8266 wifi(EspSerial);   <-------- commented

void setup()
{
    Serial.begin(9600);
    Blynk.begin(auth, "TP-LINK", "*************");
     while (Blynk.connect() == false) {
    // Wait until connected
  }

  // Notify immediately on startup
  Blynk.notify("Device started");

  // Setup a function to be called every minute
  // timer.setInterval(60000L, notifyUptime);    <--------commented??

  // Setup notification button on pin 2
  pinMode(2, INPUT_PULLUP);
  // Attach pin 2 interrupt to our handler
  attachInterrupt(digitalPinToInterrupt(2), notifyOnButtonPress, RISING);
}

void notifyUptime()
{
  long uptime = millis() / 60000L;

  Blynk.notify(String("Running for ") + uptime + " minutes.");
}

void notifyOnButtonPress()
{
  // Invert state, since button is "Active LOW"
  int isButtonPressed = !digitalRead(2);
  if (isButtonPressed) {
    Serial.println("Button is pressed.");

    Blynk.notify("Yaaay... button is pressed!");
  }
}

void loop()
{
  Blynk.run();
  timer.run();
}
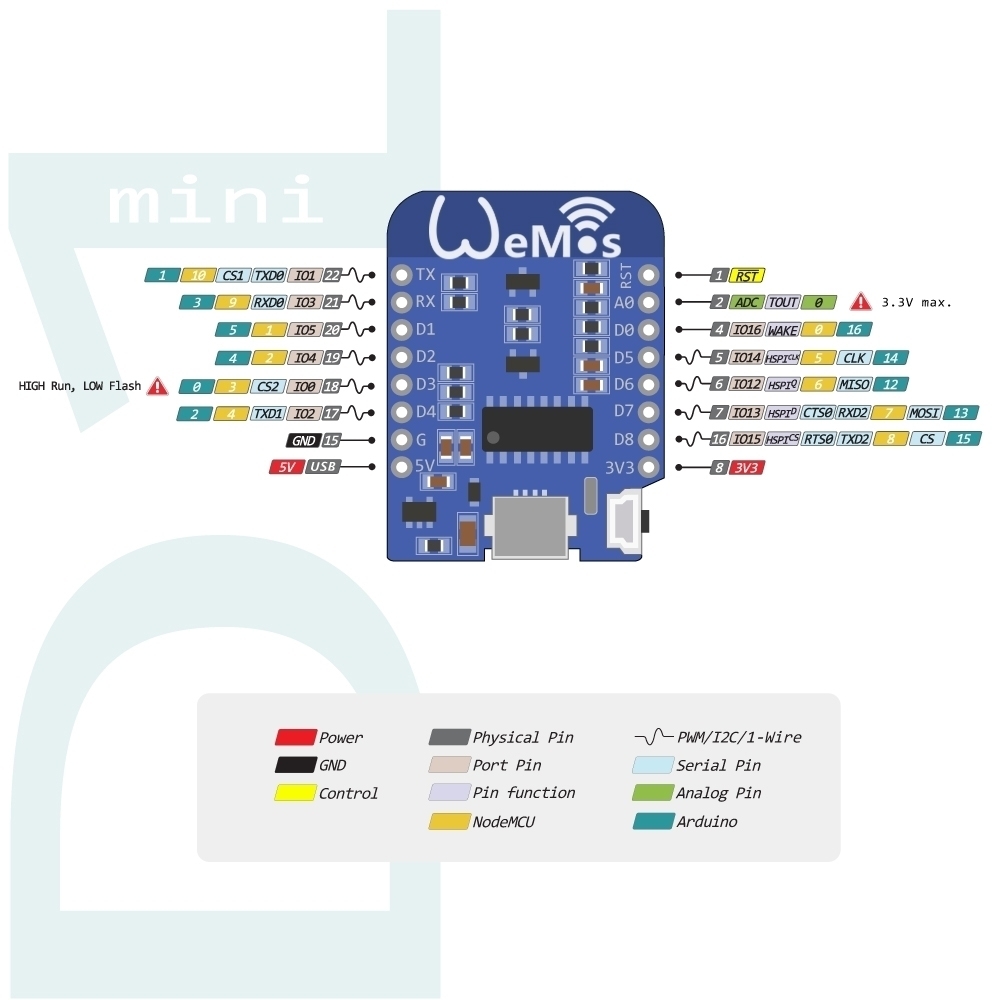
@n3v3r all the digital pins on the WeMos D1 and D1 Mini have full functionality (interrupt/pwm/I2C/one-wire support) with the exception of D0 (GPIO 16).
That said GPIO 0, 2, 16 (D3, D4 and D0) should only be used if you have no other pins available as it can mess up the flashing of your device (see below).
Are you using the D1 R2, Mini or the original D1?
Below is a “working” sketch running on my Mini with a button between ground and D4 (GPIO 2). You don’t need to do the digitalRead(2) because the attachInterrupt does this for you. Once you have it working you need to make the following changes:
Select another pin as GPIO2 will create problems for you.
Debounce the button.
Disable interrupt whilst you are running the notifyOnButtonPress() function and enable when it is finished. Failure to do this will certainly result in your device rebooting or worse, locking up.
Google has all the stuff you need.
// n3v3rButton.ino 24/8/16 Costas

#define BLYNK_PRINT Serial
#include <ESP8266WiFi.h>
#include <BlynkSimpleEsp8266.h>
#include <SimpleTimer.h>
char auth[] = "xxxxxxxxxx";
SimpleTimer timer;
void setup()
{
    Serial.begin(115200);
    Blynk.begin(auth, "xxxx", "xxxxx");
     while (Blynk.connect() == false) {
    // Wait until connected
  }
  // Notify immediately on startup
  Blynk.notify("Device started");
  // Setup a function to be called every minute
  // timer.setInterval(60000L, notifyUptime);    <--------commented??
  // Setup notification button on pin 2
  pinMode(2, INPUT_PULLUP);
  // Attach pin 2 interrupt to our handler
  attachInterrupt(digitalPinToInterrupt(2), notifyOnButtonPress, RISING);
}
void notifyUptime()
{
  long uptime = millis() / 60000L;
  Blynk.notify(String("Running for ") + uptime + " minutes.");
}
void notifyOnButtonPress()
{
  // Invert state, since button is "Active LOW"
  //int isButtonPressed = !digitalRead(2);
  //if (isButtonPressed) {
    Serial.println("Button is pressed.");
    Blynk.notify("Button is pressed!");
  //}
}
void loop()
{
  Blynk.run();
  timer.run();
}
@Costas I tried to load the code that you suggested, trying to even change the pin from D4 to D1 to D5 etc. … if I open the Monitor Serial I see that the button is pressed, but at the same time Wemos D1 mini resets with this code :
[10014] Connected to WiFi
[10014] IP: 192.168.1.105
[10014] Blynk v0.3.8 on NodeMCU
[10014] Connecting to blynk-cloud.com:8442
[10205] Ready (Table: 1ms).
Button is pressed.
ets Jan 8 2013, rst causes: 4, boot mode: (1.7)
wdt reset
I do not think a debounce problem…
#define BLYNK_PRINT Serial
#include <ESP8266WiFi.h>
#include <BlynkSimpleEsp8266.h>
#include <SimpleTimer.h>
char auth[] = "*********************";
SimpleTimer timer;
void setup()
{
    Serial.begin(115200);
    Blynk.begin(auth, "TP-LINK", "***********");
     while (Blynk.connect() == false) {
    // Wait until connected
  }
  // Notify immediately on startup
  Blynk.notify("Device started");
  // Setup a function to be called every minute
  // timer.setInterval(60000L, notifyUptime);    <--------commented??
  // Setup notification button on pin 2
  pinMode(14, INPUT_PULLUP);
  // Attach pin 2 interrupt to our handler
  attachInterrupt(digitalPinToInterrupt(14), notifyOnButtonPress, RISING);
}
void notifyUptime()
{
  long uptime = millis() / 60000L;
  Blynk.notify(String("Running for ") + uptime + " minutes.");
}
void notifyOnButtonPress()
{
  // Invert state, since button is "Active LOW"
  int isButtonPressed = !digitalRead(14);
  delay (100);
  //if (isButtonPressed) {
    Serial.println("Button is pressed.");
    Blynk.notify("Button is pressed!");
  //}
}
void loop()
{
  Blynk.run();
  timer.run();
}
It will reset because you haven’t disabled the interrupt whilst you do the processing. It is just to confirm that you can see the button is pressed.
If you comment out Blynk.notify(“Button is pressed!”) it should run for longer without crashing. Please confirm when you have tested this. It can handle a quick Serial.print but not a big long Blynk.notify process.
Ok now you understand that interrupts are very fussy. The procedure with interrupts is that when it is triggered is, disable the interrupt (to stop it triggering again), set a flag, enable the interrupt and a timer or loop() looks for the flag.
If you do it any other way your ESP will crash.
So add these global variables:
long prevZeroMillis = 0; // used to debounce button, set at 100 millis, 0.1s, debounce time
bool buttonChanged = false; // used to ensure button press is handled correctly
bool buttonStatus = false;  // toggle on and off
Add a new function:
void BlynkButton(){ //lines below will crash the ESP in notifyOnButtonPress() function
  if(buttonChanged){  // only do something if button state has changed
    Serial.println("Button is pressed.");
    Blynk.notify("Button is pressed!");
    buttonChanged = false;
  }
}
Change the notifyOnButtonPress function to:
void notifyOnButtonPress()  // debounced, disabled interrupt and enabled interrupt
{
    noInterrupts();  // disable interrupts
    if(millis() - prevZeroMillis > 100) { // different buttons need different debounce period, test it
      buttonStatus = !buttonStatus;
      buttonChanged = true;      // just set a flag for loop() or SimpleTimer to pick up
      prevZeroMillis = millis();
    }
    interrupts(); // enable interrupts
}
In loop() add (can also be done with SimpleTimer):
  if(buttonChanged){
    BlynkButton();
  }
Test it, confirm it works ok and then publish the code for others to use.
If we just gave you the full code at the start you wouldn’t learn anything.
in this case the board is disconnected after about 20 seconds …
#define BLYNK_PRINT Serial
#include <ESP8266WiFi.h>
#include <BlynkSimpleEsp8266.h>
#include <SimpleTimer.h>

long prevZeroMillis = 0;    // used to debounce button, set at 100 millis, 0.1s, debounce time
bool buttonChanged = false; // used to ensure button press is handled correctly
bool buttonStatus = false;  // toggle on and off

char auth[] = "************";
SimpleTimer timer;

void setup()
{
    Serial.begin(115200);
    Blynk.begin(auth, "TP-LINK", "********");
     while (Blynk.connect() == false) {
    // Wait until connected
  }
    Blynk.notify("Device started");
    pinMode(14, INPUT_PULLUP);
    attachInterrupt(digitalPinToInterrupt(14), notifyOnButtonPress, RISING);
}

void BlynkButton(){                    //lines below will crash the ESP in notifyOnButtonPress() function
  if(buttonChanged){                   // only do something if button state has changed
    Serial.println("Button is pressed.");
    Blynk.notify("Button is pressed!");
    buttonChanged = false;
  }
}

void notifyUptime()
{
  long uptime = millis() / 60000L;
  Blynk.notify(String("Running for ") + uptime + " minutes.");
}

void notifyOnButtonPress()                // debounced, disabled interrupt and enabled interrupt
{
    noInterrupts();                       // disable interrupts
    if(millis() - prevZeroMillis > 100) { // different buttons need different debounce period, test it
      buttonStatus = !buttonStatus;
      buttonChanged = true;               // just set a flag for loop() or SimpleTimer to pick up
      prevZeroMillis = millis();
    }
    interrupts();                         // enable interrupts
}

void loop()
{
  Blynk.run();
  timer.run ();
  if(buttonChanged){
      BlynkButton();
  }
}
changing the time debounce … nothing changes
Now I do not see even the button state in the serial monitor
[6265] Connected to WiFi
[6265] IP: 192.168.10.248
[6265] Blynk v0.3.8 on Arduino
[6266] Connecting to blynk-cloud.com:8442
[6665] Ready (ping: 5ms).
Button is pressed.
Button is pressed.
Button is pressed.
Button is pressed.
Button is pressed.
Button is pressed.
Button is pressed.
Button is pressed.
Button is pressed.
Button is pressed.
Button is pressed.
Button is pressed.
Button is pressed.
Button is pressed.
Button is pressed.
Button is pressed.
Button is pressed.
Button is pressed.
Button is pressed.
Button is pressed.
Button is pressed.
Button is pressed.
Button is pressed.
Button is pressed.
Button is pressed.
Button is pressed.
Button is pressed.
Button is pressed.
Button is pressed.
Working fine here, you have bad wiring.
I am also getting the PUSH messages but remember it is a maximum of 1 per minute so don’t press the button too frequently.
Today I tried to recompile everything and to make a new log in the server.
Now the notification is working properly.
I would like to try the board now,
A simple question …: because the reading of an analog / digital sensor can have a real time reading while a notification needs to be called only one time per minute?
Thanks again for your support!
this is the code:
/**************************************************************
 * Blynk is a platform with iOS and Android apps to control
 * Arduino, Raspberry Pi and the likes over the Internet.
 * You can easily build graphic interfaces for all your
 * projects by simply dragging and dropping widgets.
 *
 *   Downloads, docs, tutorials: http://www.blynk.cc
 *   Blynk community:            http://community.blynk.cc
 *   Social networks:            http://www.fb.com/blynkapp
 *                               http://twitter.com/blynk_app
 *
 * Blynk library is licensed under MIT license
 * This example code is in public domain.
 *
 **************************************************************
 * Simple push notification example
 *
 * App project setup:
 *   Push widget
 *
 * Connect a button to pin 2 and GND...
 * Pressing this button will also push a message! ;)
 *
 **************************************************************/

#define BLYNK_PRINT Serial
#include <ESP8266WiFi.h>
#include <BlynkSimpleEsp8266.h>
#include <SimpleTimer.h>

long prevZeroMillis = 0;    // used to debounce button, set at 100 millis, 0.1s, debounce time
bool buttonChanged = false; // used to ensure button press is handled correctly
bool buttonStatus = false;  // toggle on and off

char auth[] = "*****Your Token*****";// You should get Auth Token in the Blynk App.

SimpleTimer timer;


void setup()
{
     Serial.begin(115200);
     Blynk.begin(auth, "**Your SSID**", "**Your Password**");
     while (Blynk.connect() == false) {
    // Wait until connected
  }
    Blynk.notify("Device started");
  pinMode(2, INPUT_PULLUP);
  // Attach pin 2 interrupt to our handler
  attachInterrupt(digitalPinToInterrupt(2), notifyOnButtonPress, RISING);
}

void notifyOnButtonPress()                // debounced, disabled interrupt and enabled interrupt
{
    noInterrupts();                       // disable interrupts
    if(millis() - prevZeroMillis > 100) { // different buttons need different debounce period, test it
      buttonStatus = !buttonStatus;
      buttonChanged = true;               // just set a flag for loop() or SimpleTimer to pick up
      prevZeroMillis = millis();
    }
    interrupts();                         // enable interrupts
}

void BlynkButton(){                    //lines below will crash the ESP in notifyOnButtonPress() function
  if(buttonChanged){                   // only do something if button state has changed
    Serial.println("Button is pressed.");
    Blynk.notify("Button is pressed!");
    buttonChanged = false;
  }
}

void notifyUptime()
{
  long uptime = millis() / 60000L;
  Blynk.notify(String("Running for ") + uptime + " minutes.");
}

void loop()
{
  Blynk.run();
  timer.run ();
  if(buttonChanged){
      BlynkButton();
  }
}
@n3v3r glad we got there in the end and thanks for posting your final sketch.
If I understand your question correctly the answer is you can process data from “real” pins up to 100 times per second http://docs.blynk.cc/#troubleshooting-flood-error. Actually it is the same for most “virtual” pins but sending emails and push messages are a few of the items that have a restriction of one per minute.
If you do any analogue data processing please note the port is restricted to 3.2V even though the board operates at 3.3V. This is because of the resistors chosen by WeMos to step up the 1V maximum ESP analogue feed.
Sometimes you might to be able to get to 3.3V as it depends on the precise tolerance of the resistors but almost all of the ones I have checked fail at 3.3V. You can set up your own additional voltage divider if you need to go to 5V.
In general you may send as many notifications as you want, however server will send only 1 per minute (latest one). You can also decrease 1 minute limit with local server. We also will decrease this 1 minute limit to 1 sec limit I think in nearest future.