No, a change of strategy 

Correction, there has never been an official release of the firmware but there are 9 branches that look to have all been set up by org.
In the branches they have regular WiFi examples found elsewhere on the internet from 2010 and updated 2012. I don’t know if any of them work with the Uno WiFi but a good starting point might be this Web Client that connects to google.com and searches for the word Arduino https://github.com/arduino-org/arduino-firmware-esp/blob/wifi-lib/wifi-lib/WiFiShield/examples/WiFiWebClient/WiFiWebClient.ino
If it works, modify to use Blynk API.
I think is written for a WiFi shield, in the serial monitor i get:
WiFi shield not present
Maybe this could help, because the UNO WiFi has rest capabilities:
http://community.blynk.cc/t/blynk-without-hardware-just-http-rest/3774
In other words, I am able to run this example from org:
//WebServerBlynk example
#include <Wire.h>
#include <ArduinoWiFi.h>
/*
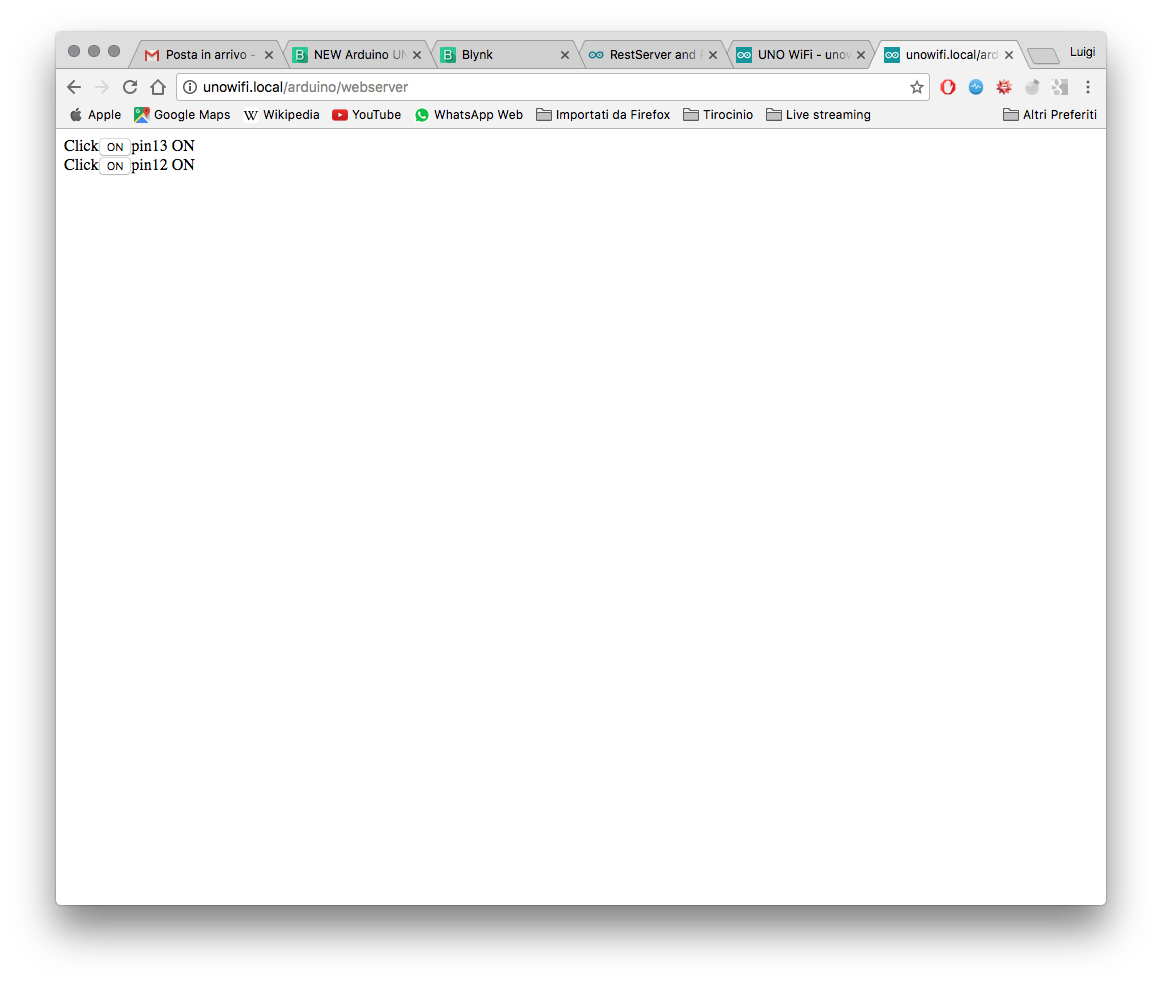
on your borwser, you type http://<IP>/arduino/webserver/ or http://<hostname>.local/arduino/webserver/
http://labs.arduino.org/WebServerBlink
*/
void setup() {
pinMode(13,OUTPUT);
pinMode(12,OUTPUT);
Wifi.begin();
Wifi.println("WebServer Server is up");
}
void loop() {
while(Wifi.available()){
process(Wifi);
}
delay(50);
}
void process(WifiData client) {
// read the command
String command = client.readStringUntil('/');
// is "digital" command?
if (command == "webserver") {
WebServer(client);
}
if (command == "digital") {
digitalCommand(client);
}
}
void WebServer(WifiData client) {
client.println("HTTP/1.1 200 OK");
client.println("Content-Type: text/html");
client.println();
client.println("<html>");
client.println("<head> </head>");
client.print("<body>");
client.print("Click<input type=button onClick=\"var w=window.open('/arduino/digital/13/1','_parent');w.close();\"value='ON'>pin13 ON<br>");
client.print("Click<input type=button onClick=\"var w=window.open('/arduino/digital/12/1','_parent');w.close();\"value='ON'>pin12 ON<br>");
client.print("</body>");
client.println("</html>");
client.print(DELIMITER); // very important to end the communication !!!
}
void digitalCommand(WifiData client) {
int pin, value;
// Read pin number
pin = client.parseInt();
// If the next character is a '/' it means we have an URL
// with a value like: "/digital/13/1"
if (client.read() == '/') {
value = client.parseInt();
digitalWrite(pin, value);
delay(2000);
digitalWrite(pin,LOW);
}
// Send feedback to client
client.print(F("Pin D"));
client.print(pin);
client.print(F(" set to "));
client.print(value);
client.print(EOL);
}
Which uses the onboard server to let me interact from browser with the pins in this way:
Can I use this door to control the board via Blynk app?
Thats a good start, it confirms that it can connect to wifi successfully.
Now clean up the code and get rid of the webserver garbage - give me a few mins
So, ArduinoWiFi.h gives us the following:
		boolean connected();
		void connect(char* , char*);
		void powerON();
		void powerOFF();
Limited further information but it suggests that WiFi.connect may allow for an SSID and PSK.
Let me write a test quick.
Update: Nope, not winning with any of the combinations of wifi / blynk options, without an actual board to test on I’m hesitant to mess with the libraries.
If i manage to source one locally I’ll try help out more.
1 Like
I’m thinking you could probably do something HTTP API provided, but I’m not sure how. You can do HTTP calls from the board with a “normal” arduino sketch to the Blynk server. With GET you should be able to get the status of Pins you set in the App, so therefor you could in theory set pins on your non-Blynk-compliant Arduino board.
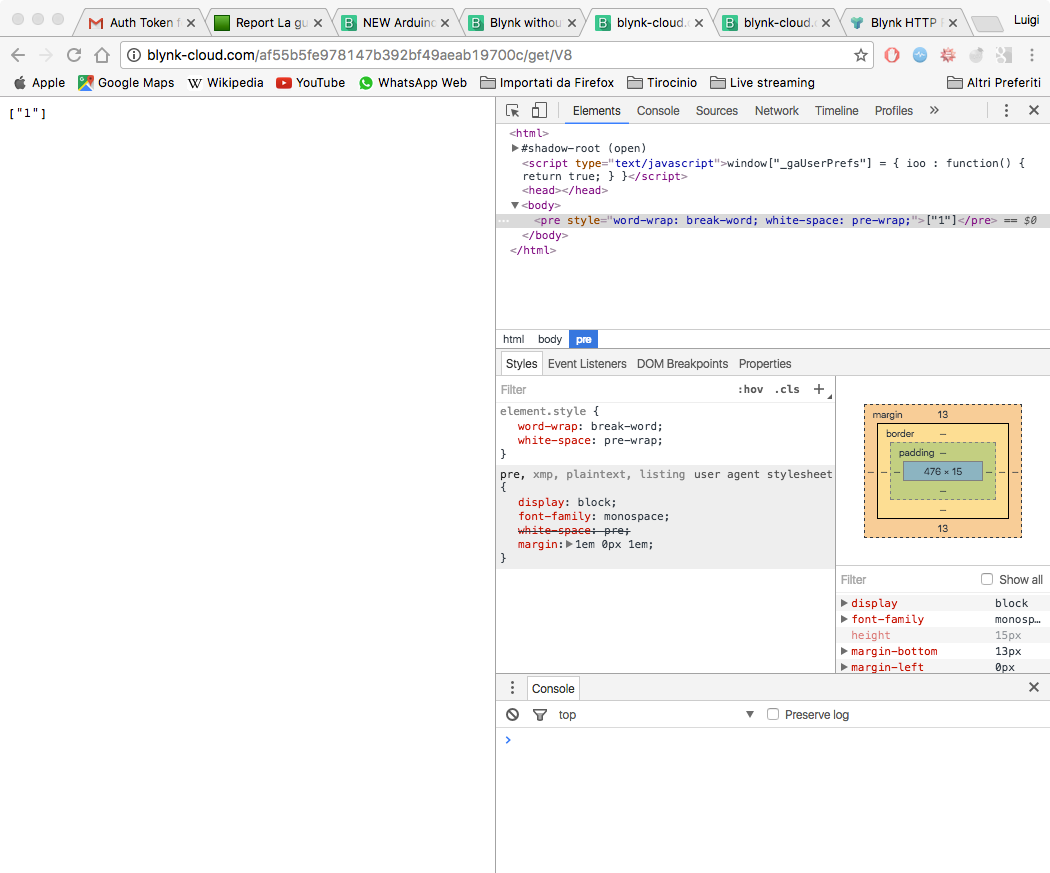
This could work!! I am able to read and write pins in the Blynk app from my browser using HTTP RESTful Api. So the last thing to do is linking this with the WebServerBlink org example to read the value in the body and put it in the line of code which read/write the pin in the onboard sketch.
Am I right? Is it possible? Any help is appreciated, I have no html skills ![]()


I am wondering whether we can make use of this tutorial or not.
http://www.arduino.org/learning/tutorials/boards-tutorials/ciaorestclient-thingspeak-2
It is using ciao library to write to thingspeak api.
i tried doing ciao.read but i am not able to read the state from my blynk account accurately.
The HTTP Restful API in ‘Arduino format’ is covered in the link in my first post.
Hi guys! Good news, the solution was in the Ciao library like @kagaya81 suggested. Manipulating the RestClient example from org I am able to control it from a button in the blynk app.
This is the code I used:
/*
****************************************************************************
This is a modification of the Arduino.org RectClient example
for interaction with Blynk.
Ciao is used to make Rest calls to the Blynk server on virtual pin V13,
the value obtained is then linked manually with D13 pin in the loop.
****************************************************************************
In the Blynk app:
Use a button to control pin V13
****************************************************************************
*/

#include <Wire.h>
#include <Ciao.h>

#define CONNECTOR     "rest" // define connector type for the Ciao Library
#define SERVER_ADDR   "46.101.143.225" // blynk-clud.com IP address


//use auth token given in the blynk app
String command = "/mytoken/get/V13";
int nvalue = 0; //inizialize pin 13 value at 0

void setup() {

  Ciao.begin(); // inizialize the Ciao library

}

void loop() {
  // read pin V13 state on the app and store it in a CiaoData object
  CiaoData buttonState = Ciao.read(CONNECTOR, SERVER_ADDR, command);
  // print the state string in wifi console
  Ciao.println( "State: " + String (buttonState.get(2)) );
  // convert state from character to number
  char value = (String (buttonState.get(2))).charAt(2);
  nvalue = value-'0';
  // print number value in wifi console
  Ciao.println(nvalue);
  // link V13 on app to D13 onboard
  digitalWrite(13,nvalue);

}
I know it is a dirty solution that works partially, I have problems when the system is idle and in converting a char into a number for example, but somehow… I’m Blynking!!! 
Improvements from real programmers are welcome… 
@russilui, thanks for your effort.
I think this is our workaround currently before someone make UNO WiFi fully compatible with blynk.
finally, i can work on some IoT project with this board now.
Happy blynking~~~
This would be a better solution but it is written to run directly on the ESP chip which is onboard on the UNO wifi and not directly accessible (I could’t manage to do that).
Using
#include <ArduinoWiFi.h>
instead of
#include <ESP8266Wifi.h>
leads to editing libraries, functions, classes, etc… this is out of my confort zone unfortunately.
However this advice was correct:
and I thank you for that, another piece of hardware is blyking! ![]()
Congratulations and thanks for posting your code for other Blynkers.
When do you think that Blynk will add the uno wifi board to it’s libraries. The work around techniques are not working and for, and I have a project that I need to finish in the next couple weeks. It’s a bit frustrating that the uno wifi board is not supported since it seems like such a nice board.
the code posted by @russilui is working.
you can change the server address to blynk-cloud.com instead
#define SERVER_ADDR “blynk-cloud.com”
but currently, we can only read the virtual pin from blynk-cloud.com. i havent tested on write to pin function yet.
1 more problem is the board will lost connection to the server after a few minutes. idle for a few minute and it will be connected again. alternatively, you can reset the board to initiate the connection again.
Writing to a pin should just be, change:
String command = "/mytoken/get/Vx";
to
String command = "/mytoken/update/Vx";
I have no idea how the Ciao library works but presumably it would be better to use SimpleTimer to read and write to the pins rather than using the main loop() as the sketch currently shows it.