@fazlianayunus Yes, virtual pins are used to send data to and from App & Hardware. I recommend you start in the documents for further information on everything Blynk:
And try out the Example Browser for actual examples that help demonstrate the various functions. For a simple example of using a virtual pin to send data to app, look at GettingStarted/PushData where it will send the uptime, of your hardware, in seconds to a display widget on your app.
Hi, so I managed to change my code by running energy() from simple timer. I also played around with the timer length etc,
What I noticed is that the LCD screen only enables if Wifi is connected and running? When connection is lost the LCD stops updating or at least is updating very radical.
I still have issues with “Buffer Overflow” I’m also experimenting with switching on an LED with Blynk when running this code, it cause a “Buffer Overflow”.
#include <EmonLib.h>
#include <LiquidCrystal_I2C.h>
#define BLYNK_PRINT Serial    // Comment this out to disable prints and save space
#include <ESP8266_Lib.h>
#include <BlynkSimpleShieldEsp8266.h>
#include <SimpleTimer.h>

// You should get Auth Token in the Blynk App.
// Go to the Project Settings (nut icon).
char auth[] = "40ee80f235714637a96";

// Your WiFi credentials.
// Set password to "" for open networks.
char ssid[] = "";
char pass[] = "";

// or Software Serial on Uno, Nano...
#include <SoftwareSerial.h>
SoftwareSerial EspSerial(2, 3); // RX, TX

// Your ESP8266 baud rate:
#define ESP8266_BAUD 9600

ESP8266 wifi(&EspSerial);

EnergyMonitor emon1;            // Create an instance
SimpleTimer timer;

LiquidCrystal_I2C lcd(0x27, 2, 1, 0, 4, 5, 6, 7, 3, POSITIVE);


void setup()
{
  emon1.current(0, 111.1);                                           // Current: input pin, calibration.
  emon1.voltage(1, 271.00, 1.43);                                    // Voltage: input pin, calibration, phase_shift


  Serial.begin(9600);                                               // Set console baud rate
  delay(10);
  // Set ESP8266 baud rate
  EspSerial.begin(ESP8266_BAUD);                                    // Set ESP baud
  delay(10);

  timer.setInterval(1000L, energy);
  Blynk.begin(auth, wifi, ssid, pass);
  timer.setInterval(500L, myTimerEvent);

  lcd.begin(20, 4);                                                  // enable the LCD display

}

void myTimerEvent()
{
  energy();
  Blynk.virtualWrite(V5, millis() / 1000);

}

void loop()
{
  Blynk.run();
  timer.run(); // Initiates SimpleTimer

}

void energy()
{


  emon1.calcVI(20,2000);                          // Calculate all. No.of half wavelengths (crossings), time-out
  float Irms            = emon1.Irms;             //extract Irms into Variable
  float realPower       = emon1.realPower;        //extract Real Power into variable
  float apparentPower   = emon1.apparentPower;    //extract Apparent Power into variable
  float powerFActor     = emon1.powerFactor;      //extract Power Factor into Variable
  float supplyVoltage   = emon1.Vrms;             //extract Vrms into Variable


  lcd.setCursor(0,0);                    // Code for LCD Display //
  lcd.print(supplyVoltage);
  lcd.setCursor(0,1);
  lcd.print(Irms);
  lcd.setCursor(0,2);
  lcd.print(apparentPower);
  lcd.setCursor(0,3);
  lcd.print(powerFActor);
  lcd.setCursor(6,0);
  lcd.print("  V");
  lcd.setCursor(6,1);
  lcd.print("  A");
  lcd.setCursor(6,2);
  lcd.print("  VA");
  lcd.setCursor(8,3);
  lcd.print("pF");

}
As an aside… since your posted code looks a little strange… when formatting your code, you only need the three backticks just before and three just after your entire code segment. not every line (if that is what you are doing).
Everything looks good now, as far as formatting the posting code
That is correct… in fact nothing in your program is running when the WiFi connection to the server is down. There are some ways of changing that, but I don’t know if introducing that now will help or hinder as you are just learning how Blynk works… well lets try it
In this line… Blynk.begin(auth, wifi, ssid, pass);… Change Blynk.begin to Blynk.config
This will still be due to getting the timing just right… the ESP is very picky about getting it’s fair share of attention
So let’s start with combining both recommendations… copy and paste this to replace what you currently have for your timer setup and start of Blynk: Take note of the commenting to help explain the commands
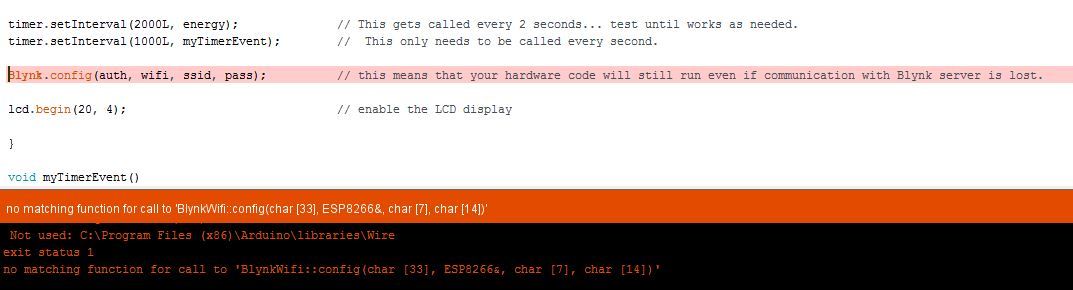
// Put these two timer lines before the Blynk.config line.
timer.setInterval(2000L, energy);  // This gets called every 2 seconds... test until works as needed.
timer.setInterval(1000L, myTimerEvent); //  This only needs to be called every second.

Blynk.config(auth, wifi, ssid, pass); // this means that your hardware code will still run even if communication with Blynk server is lost.
This isn’t tested (that’s your job ) but lets see how it works.
@willerpw perhaps all your lcd writes could be a culprit, instead of setting the cursors all around the place, try making a single string with your values and printing just that, once.
Or maybe a yield is in place, what say you on this @Gunner, could it be that the EMON1.CALCVI function just takes to long. Deleted some shit need to read a bit more about emon.
  emon1.calcVI(20,2000);                          // Calculate all. No.of half wavelengths (crossings), time-out
  yield(); // release control to esp for internal stuff
  float Irms            = emon1.Irms;             //extract Irms into Variable
  float realPower       = emon1.realPower;        //extract Real Power into variable
  float apparentPower   = emon1.apparentPower;    //extract Apparent Power into variable
  float powerFActor     = emon1.powerFactor;      //extract Power Factor into Variable
  float supplyVoltage   = emon1.Vrms;             //extract Vrms into Variable
If you mean having multiple timers run at the same time?.. I guess it depends on the duration of each timer’s function. I have ran multiple timers that are the same, but not more than 2 or 3 in testing. Otherwise I just combine the same-time actions into a single timer function.
I did change my suggestions to 1 & 2 seconds, as the up time is only displaying every second anyhow (thus didn’t need to be 500ms), and I am just guessing on the energy timer, but that is the one writing to the LCD, so I spaced it out a little longer.
From what I can tell it seems like your device might need some time to “boot” in order to give proper and fast readings.
“Like you mentioned, I saw some strange calculations for the run-time at the beginning of the loops (i.e. up to 3 seconds to complete instead of 175ms). This generally lasts about 1 min and then evens out”
Src: https://openenergymonitor.org/forum-archive/node/2669.html
@willerpw now that you have worked out what the PushData example does you can remove all reference to it (i.e. myTimerEvent() function and the call in setup()). You just need the energy() stuff.
As the code is currently written the LCD will not be updated when you are not connected to Blynk. There are ways to overcome this but really you should work out why you are being disconnected from Blynk.
As you have seen with PushData, Blynk is rock solid if you your code is well written.
Chiming in as I’m also using EmonLib with some cheap 5A CTs (to a WeMos pin A0).
I had a similar issue as @willerpw with any emon1.calc function running at a frequency greater than 1 second. In my case it is emon1.calcIrms(1480);… meaning that 1,480 current samples are taken (source)! Of course putting this in loop() was no good, 500ms was shaky, 1 sec decent, 5 sec just fine. I should note this wasn’t just affecting my Blynk connection, this was affecting the ESP’s WiFi connection (from what I could tell pinging, etc).
I only picked up on this because I was trying to trigger a notification on a very short (< 1 sec) current blip, then noticed my OTA updates weren’t working. I’m going to try tweaking the number of samples vs. frequency and see what I get.