Hi Guys,
here’s the little starting project i’ve build with an Arduino Nano connected via USB and a DHT22 with the aim to measure my living room’s temperature and humidity.
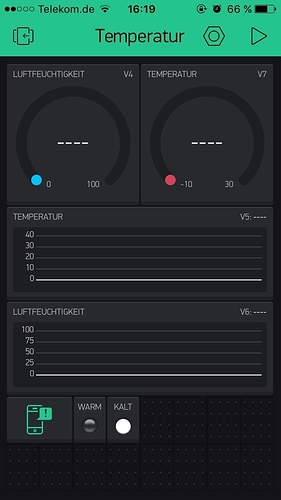
An the Blynk-part, i’m using an iPhone 5S and the Widgets seen in the Photo.
(Names are in German, Luftfeuchtigkeit (Blue) means Humidity, Temperatur (red) means Temperature.)
There are also 2 little LED which light up if the temperature is above 22°C (Warm) or below 22°C (Kalt).
Here’s my code.
#include "DHT.h"
#include <SPI.h>
#include <SoftwareSerial.h>
SoftwareSerial SwSerial(2, 3);
#define BLYNK_PRINT SwSerial
#include <BlynkSimpleSerial.h>
#define DHTPIN 4 // The pin you've connected Data from the DHT to your Arduino
#define DHTTYPE DHT22   // DHT11 or DHT22
DHT dht(DHTPIN, DHTTYPE);
#include <SimpleTimer.h>

SimpleTimer timer;

// You should get Auth Token in the Blynk App.
// Go to the Project Settings (nut icon).
char auth[] = "#################";

void setup()
{
  Serial.begin(9600);
  Blynk.begin(auth);
  timer.setInterval(2000, sendDHT);
}

void sendDHT()
{
//Read the Temp and Humidity from DHT
  float h = dht.readHumidity();
  float t = dht.readTemperature();

  // Some Ways for Data-Output
  Blynk.virtualWrite(4, h);
  Blynk.virtualWrite(5, t);
  Blynk.virtualWrite(6, h);
  Blynk.virtualWrite(7, t);
  Blynk.virtualWrite(8, t);
  Blynk.virtualWrite(9, h);

 if (t < 22) // Check if Temperature is in the Happy-Level
  {
  Blynk.virtualWrite(0, HIGH);
  Blynk.virtualWrite(1, LOW);
  }
  else
  {
  Blynk.virtualWrite(1, HIGH);
  Blynk.virtualWrite(0, LOW);
}
}
void loop()
{
  Blynk.run();
  timer.run();
}
Feel free to comment and ask.
Cheers,
Alex
